TAPER FADE HAIRCUTS FOR MEN MUST TRY HAIRSTYLES
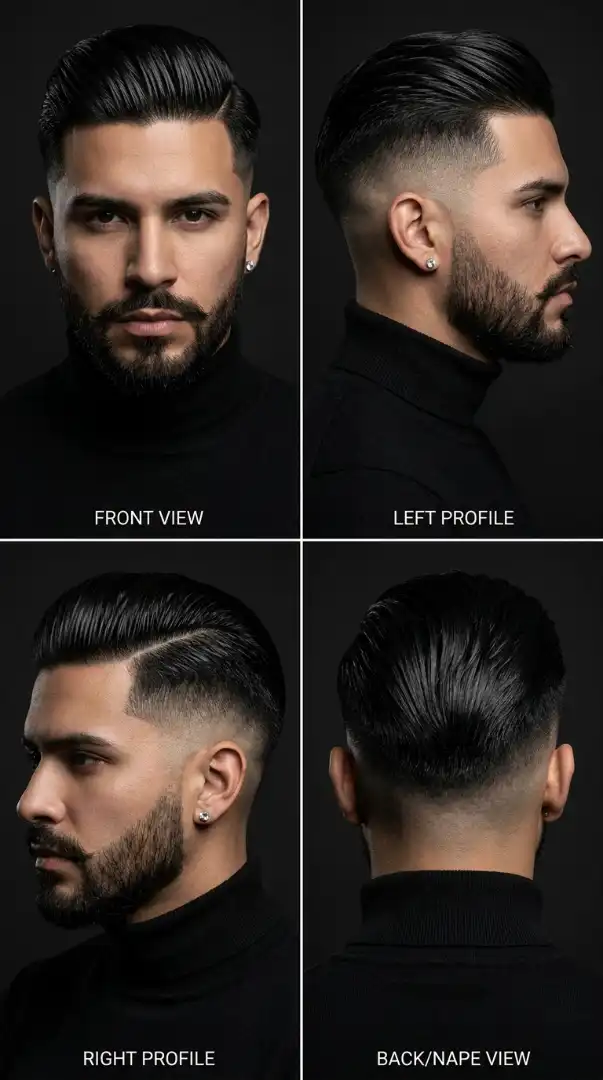
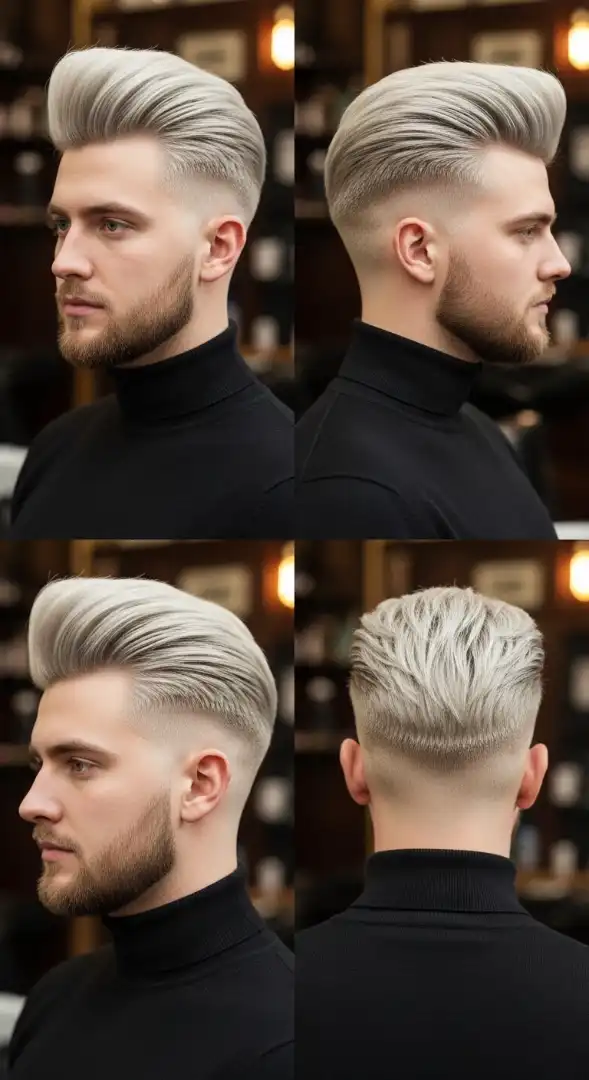
1 of 13 — The Executive Sharp Taper

FACE SHAPE MATCH: The Executive Sharp Taper is exceptionally flattering on Oval and Oblong face shapes because the graduated taper removes bulk from the sides while maintaining strategic volume on top. The clean temple fade creates vertical lines that elongate a Round face by drawing attention upward toward the textured crown. Square-faced men benefit from the soft side part breaking up angular jaw lines, while the controlled volume prevents the top-heavy look that can exaggerate face width. Diamond face shapes should request slightly more length at the temples to balance narrow foreheads.
GROOMING KIT: This precision cut demands professional-grade tools for home maintenance. Invest in the Wahl Magic Clip cordless clipper for general trimming between salon visits. The Andis T-Outliner trimmer is essential for maintaining those razor-sharp temple points and neckline definition—nothing else gives you that level of precision. For daily styling, you’ll need a Kent 81T fine-tooth comb for creating that executive side part, a boar bristle brush for distributing natural oils, and Layrite Superhold Pomade (nickel-sized amount) for all-day hold without the crunchy finish. Keep Honest Amish Beard Balm on hand to maintain beard-to-fade integration. A small detail mirror is crucial for checking your neckline between cuts.
MAINTENANCE LEVEL: HIGH. This is a commitment style requiring barber visits every 10-12 days to maintain the crisp fade gradient. Daily styling takes 8-10 minutes: dampen hair, apply pomade to towel-dried hair, create the part with the fine-tooth comb, blow-dry on medium heat while brushing in the direction of the part, finish with a light pomade touch-up on the top layer only. The beard requires daily trimming with a quality trimmer to keep the connection point between facial hair and sideburn fade absolutely seamless. Miss two appointments and the taper loses its executive sharpness—the grow-out is visible and unprofessional.
BARBER TALK: Walk into your barber and say exactly this: “I want a sharp taper fade starting at a 2 guard mid-temple, blending down to skin at the hairline. Leave 3.5 to 4 inches on top with texture cut throughout—I’m parting it on the left. Clean the temple points with a razor for definition. For the nape, square it off and taper it tight. Blend my beard into the sideburn fade with the trimmer—I want one continuous line from ear to jaw. Finish with the straight razor on the neck and cheek lines.” This script gives your barber the exact guard numbers and finish level without ambiguity.
Want a slightly more relaxed version with less maintenance? The next style shows you how to keep the taper but add modern texture that forgives a few extra days between cuts.
FAQs
Q: How often do I need to get a taper fade touched up to keep it looking sharp?
A: A professional taper fade requires a touch-up every 10-14 days to maintain the crisp gradient between the longer top and the skin-level fade at the hairline. The fade line becomes visibly blurred after two weeks, losing that executive polish. If you’re in a corporate environment where appearance matters, commit to the two-week schedule. Budget-conscious option: get the full cut monthly but do neckline and temple cleanups with your barber every two weeks at a reduced rate.
Q: What’s the difference between a taper fade and a regular fade?
A: A taper fade has a more gradual transition from longer hair on top to shorter hair on the sides, typically ending at skin level but with a softer blend that starts higher on the head. A regular fade (often called a “skin fade”) has a more dramatic contrast with the shortest length hitting skin much quicker, creating a bolder, more urban look. Tapers are boardroom-appropriate; skin fades skew younger and streetwear-friendly.
Q: Can I style a taper fade without pomade or is product mandatory?
A: Product is mandatory if you want the style to hold past your commute. The taper fade’s appeal is in the contrast between the clean sides and the styled top—without pomade or styling cream, the top hair falls flat and the entire cut loses its dimension. Minimum requirement is a matte clay or light pomade. If you genuinely can’t use product due to scalp sensitivity, ask your barber to cut more texture into the top so it has natural movement, but understand the hold won’t last through a full workday.
Q: Which face shapes should avoid the Executive Sharp Taper style?
A: Heart-shaped faces with wider foreheads and narrow chins should approach this carefully—the volume on top can overemphasize the forehead width. If you have a Heart face, ask for slightly less height and more forward fringe movement to balance proportions. Very Round faces also need modification: request the fade start lower (closer to a low fade) to avoid removing too much side volume, which can actually make the face appear wider.
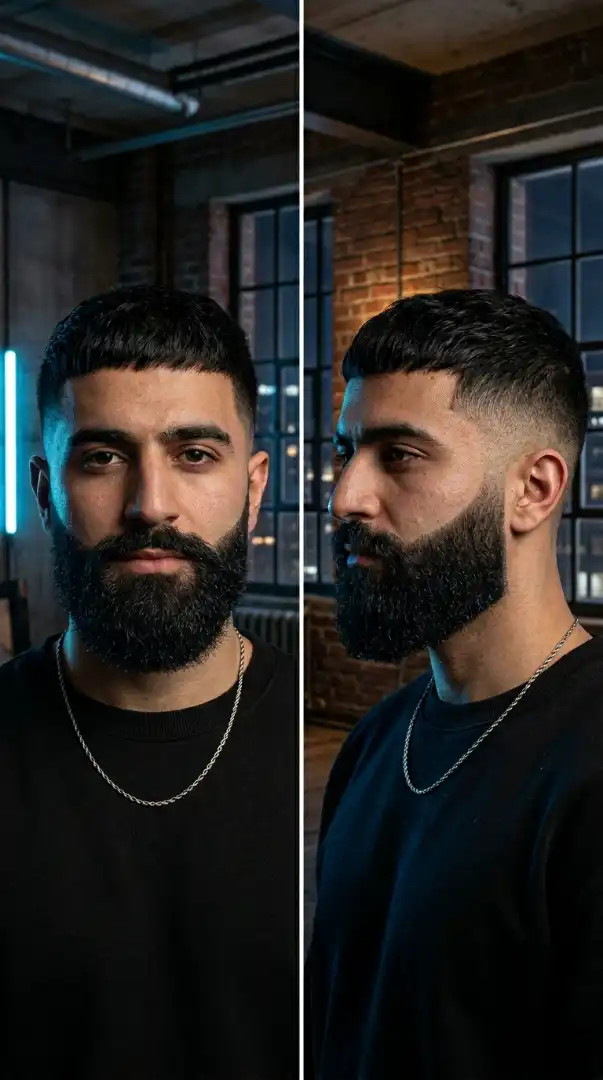
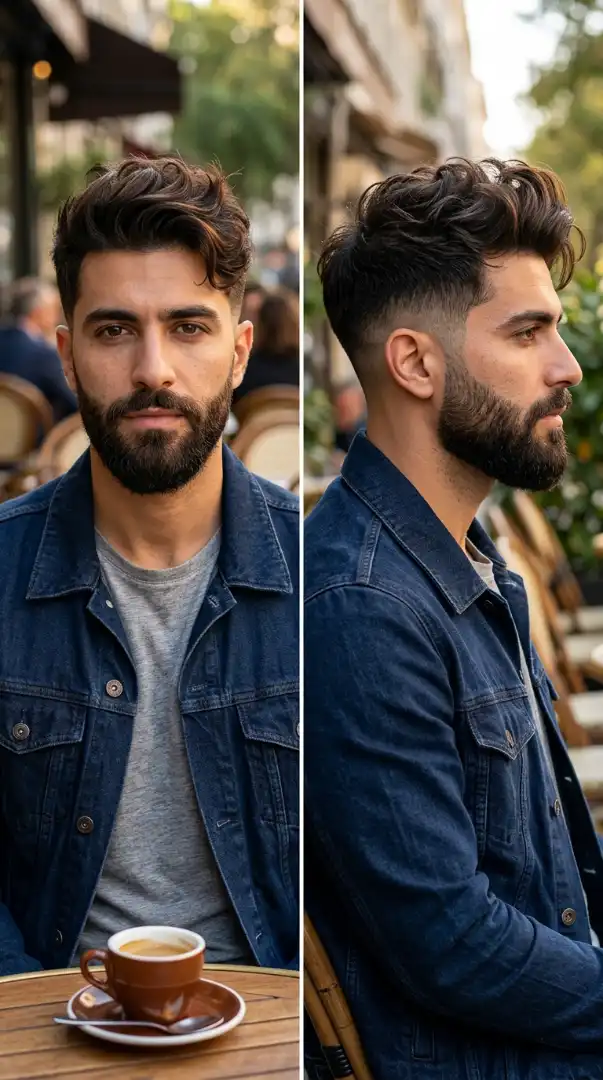
2 of 13 — The Urban Shadow Blend

FACE SHAPE MATCH: The Urban Shadow Blend is a face shape chameleon that works across most structures, but it absolutely dominates on Square and Diamond faces. The high fade placement removes weight from the widest part of a Square face—right at the temples and upper jaw—creating a slimming effect that brings attention to the strong jawline rather than competing with it. For Diamond faces with narrow foreheads and prominent cheekbones, the textured forward fringe adds visual width up top, balancing those killer cheekbones instead of making them look disproportionate. Round faces benefit from the vertical dimension—the high starting point of the fade elongates, while the textured top adds height without width. Oblong faces should request less height on top to avoid stretching face length further.
GROOMING KIT: The Urban Shadow requires a specific toolkit. Start with the Andis Master Adjustable Blade Clipper—the adjustable taper lever is critical for maintaining that shadow effect at home between cuts. You’ll need the BaByliss Pro FX787 Skeleton trimmer for edge work; its exposed blade gets closer than any foil trimmer for that urban-sharp outline. Daily styling demands Suavecito Matte Pomade for the textured, non-shiny finish that defines this look—glossy pomades kill the urban aesthetic. Add a wide-tooth comb for distribution and a blow dryer with concentrator nozzle for lift. For beard maintenance, invest in Honest Amish Beard Oil and a boar bristle beard brush to train those gray threads into the taper. Keep pre-shave oil on hand for the weekly edge razor touch-up.
MAINTENANCE LEVEL: MEDIUM-HIGH. Barber visits needed every 14-16 days—the high fade grows out visibly but the textured top forgives an extra few days unlike slicked styles. Daily routine takes 6-7 minutes: work pomade through damp hair using fingers (not a comb initially), blow-dry on high while directing hair forward and slightly to your preferred side, rough it up with your fingers to break up uniformity, finish with a tiny pomade dab on dry hair for piece definition. The beard needs trimming every 3 days with your skeleton trimmer to maintain the taper into the sideburn. This isn’t a wake-up-and-go cut, but it’s more forgiving than executive styles when life gets busy.
BARBER TALK: Tell your barber: “I want a high taper fade—start the fade at temple level with a 1.5 guard, blend down to skin at the ear and hairline. No bald fade, I want that shadow effect where the skin still has visible stubble coverage. Top stays between 3.5 and 4.5 inches, point-cut for texture throughout, no blunt lines. Push it forward with a slight left bias but no defined part. Fade the sideburns into my beard—I want one line from temple to jaw. Lineup the hairline and beard edges with the trimmer but keep it natural, not overly geometric. Finish the nape with a low taper, don’t square it off.” This gives the barber clear fade height, guard reference, and texture instruction.
The next style takes the taper concept into classic territory with a vintage twist that’s dominating Pinterest right now.
FAQs
Q: How do I maintain the shadow effect in a taper fade without it looking grown out?
A: The shadow effect requires keeping stubble-length hair at the fade’s lowest point rather than going to pure skin. Use a trimmer with a 0.5 guard or adjustable clipper set to the shortest setting for weekly touch-ups at the hairline and around the ears. The key is maintaining the gradient—if the shadow area grows past 2mm, it loses that intentional blur and starts looking unkempt. Touch up every 5-7 days at home, full barber service every two weeks.
Q: What’s the best way to add texture to the top without making it look messy?
A: Texture is controlled chaos, not actual mess. Start with damp hair and work a nickel-sized amount of matte pomade through from roots to tips. Blow-dry while using your fingers to direct sections in slightly different directions—not random, but varied. Once dry, add a tiny second application only to the top layer, then use your fingers to separate and define individual pieces. The rule: you should be able to see individual strands with air between them, but the overall shape still has direction. If it looks like you just woke up, you’ve gone too far.
Q: Can older men with graying hair pull off the Urban Shadow Blend?
A: Absolutely—gray and salt-and-pepper hair actually elevates this style by adding natural dimension. The shadow fade looks particularly sophisticated with gray because the stubble at the fade line creates tonal variation that younger guys have to fake with color grading. Request that your barber not fade your gray temples too aggressively; let some of that silver show in the shadow zone for a distinguished edge. Pair it with a gray-threaded beard that’s trimmed into the sideburn and you’ve got an urban look with gravitas.
3 of 13 — The Textured Fringe Taper

FACE SHAPE MATCH: The Textured Fringe Taper is engineered for Round and Oval faces with coily or curly hair textures. The low fade placement preserves side volume, which is crucial for Round faces—removing too much width at the temples can actually make a round face appear wider by eliminating natural balancing structure. The forward-swept fringe creates a horizontal line that broadens narrow foreheads on Oval and Diamond faces. Square faces should approach this carefully; the low fade can emphasize jaw width. If you have a Square face, request a mid-taper instead (fade starts mid-ear height) to remove strategic weight at the temples. Heart-shaped faces benefit from the added forehead coverage, balancing out that wide upper-third, narrow-chin proportion.
GROOMING KIT: Coily hair demands specialized tools and products that respect curl structure. The Wahl Professional 5-Star Magic Clip is non-negotiable—its stagger-tooth blade cuts through dense coily hair without snagging. Pair it with the Andis Pro Allure Trimmer for edge work; standard trimmers pull coily hair instead of cutting cleanly. For home maintenance, invest in a quality pick comb with wide teeth spacing and a soft-bristle brush for distributing product without disrupting curl pattern. Product-wise, you need Shea Moisture Curl Enhancing Smoothie applied to damp hair for definition, Cantu Natural Hair Moisturizing Curl Activator Cream for daily refresh, and a light oil like Aunt Jackie’s Growth Oil Elixir for scalp health. Never use alcohol-based pomades on coily hair—they cause breakage and dryness.
MAINTENANCE LEVEL: MEDIUM. Barber visits every 18-21 days—coily hair’s natural volume means the fade grows out more forgivingly than straight hair. Daily styling takes 5-8 minutes but requires the right technique: saturate hair with water in the shower or use a spray bottle, apply curl cream while hair is soaking wet (not damp), use the pick comb to lift and define coils from roots, allow to air-dry or use a diffuser on low heat if rushed, finish with a light oil on fingertips to eliminate frizz. The beard needs daily moisture application and weekly trimming to maintain the taper into the sideburn connection. This style actually thrives on a wash-and-go approach if your products are correct.
BARBER TALK: Walk in and say: “I want a low taper fade that starts just above my ear—use a 2.5 guard at the starting point and blend down to a 1 guard at my ear, no skin showing. Keep my natural coil pattern throughout the fade; don’t try to brush it straight. Top stays at 2.5 to 3 inches, maintain the curl structure, cut with the coils not against them. I’m wearing it forward as a textured fringe. Blend my sideburns into my beard naturally—no sharp disconnect. Line up my hairline and beard edges but follow my natural curve, don’t force geometric lines into coily hair. Taper the nape but keep it rounded, not squared.” This script protects your curl pattern and prevents barbers from forcing straight-hair techniques onto coily texture.
Curious how to adapt the taper fade for maximum volume and dramatic height? The next style shows you the pompadour fusion that’s taking over barbershops.
FAQs
Q: How do I keep my coily hair defined in a taper fade without it looking frizzy?
A: Moisture is everything. Apply curl-defining cream to soaking wet hair immediately after washing—the water helps distribute product evenly through coils. Use a wide-tooth pick comb to lift and separate while wet, then allow to air-dry completely without touching. Once dry, only refresh with a light oil or water-based spray; adding more cream to dry hair causes buildup and frizz. The key is establishing the curl pattern while wet and then leaving it alone. Sleep on a satin pillowcase to prevent friction frizz overnight.
Q: Can I get a taper fade if I have a receding hairline?
A: Yes, but the low taper is your friend, not the high fade. A low taper preserves more hair at the temple area, which camouflages recession by maintaining visual density where you need it. Ask your barber to line up your hairline following your natural curve rather than forcing a straight line across—this prevents drawing attention to the recession. The textured fringe should be swept forward to add coverage at the hairline. Avoid slicked-back styles with tapers if you’re receding; they expose the problem rather than working with it.
Q: What’s the difference between a taper and a fade on natural coily hair?
A: On coily hair, “taper” and “fade” are often used interchangeably, but technically a taper keeps more length throughout the sides with a gentler gradient, while a fade goes shorter faster and may hit skin or near-skin level. For Type 4 coily hair, most barbers recommend taper-fades (the hybrid) that blend down to a 1 or 0.5 guard rather than skin because cutting coily hair to skin can cause razor bumps and irritation. The textured fringe taper specifically uses a low starting point and stops at a 1 guard for this reason.
4 of 13 — The Pompadour Taper Fusion

FACE SHAPE MATCH: The Pompadour Taper Fusion is a height-based style that excels on Oval and Diamond faces while requiring careful modification for others. Oval faces are the natural canvas—the added height maintains beautiful proportion without distortion. Diamond faces with narrow foreheads benefit immensely because the pompadour volume adds visual width up top, balancing those prominent cheekbones. Round faces get dramatic improvement: the vertical volume elongates while the mid-taper removes side bulk at the widest point, creating a slimming effect that can knock 10 pounds off your facial appearance. Square faces should proceed cautiously—too much height can create a top-heavy box effect. If you’re Square-faced, request 3.5-4 inches of height maximum (not the full 5) and ask for the taper to start slightly lower to preserve some balancing width. Oblong faces should avoid this entirely—you’re already vertically stretched, and adding pompadour height exaggerates that to cartoon proportions.
GROOMING KIT: This is a high-maintenance style requiring premium tools. The foundation is the Dyson Supersonic hair dryer with concentrator nozzle attachment—you cannot build proper pompadour structure without directed heat. Pair it with a round ceramic brush (2.5-inch barrel diameter) for creating volume and backward sweep. Clipper-wise, the Oster Fast Feed is ideal for home touch-ups between barber visits; its powerful motor handles dense wavy hair without bogging down. For styling products, layer your approach: start with Uppercut Deluxe Matte Clay on damp hair for initial structure, blow-dry into shape with the round brush, finish with American Crew Pomade (strong hold, medium shine) on the top layer for definition and hold. Keep Got2b Glued Blasting Freeze Spray for all-day lock—one spray after styling prevents collapse. The Van Dyke beard requires Beardbrand Tree Ranger Beard Oil and precise trimming with the Wahl Peanut Trimmer every 3 days to maintain those sharp disconnect lines.
MAINTENANCE LEVEL: VERY HIGH. This is a commitment. Barber visits every 10-12 days are non-negotiable—the mid-taper loses its definition quickly, and the pompadour needs reshaping to maintain proportional height as hair grows. Daily styling takes 12-15 minutes: shower and towel-dry thoroughly, apply matte clay to damp hair focusing on roots, section the front portion and blow-dry straight up while pulling back with the round brush, secure that volume with a blast of heat followed by cool air to set, apply pomade to the top layer working back from the hairline, use fingers to create the swept-back texture, finish with freeze spray from 10 inches away. Your arm will get tired. Miss the morning routine and the pompadour falls flat by noon—there’s no recovery without starting over. The disconnected beard needs daily inspection and trimming to keep the cheek disconnect line sharp.
BARBER TALK: Give your barber these instructions: “I want a pompadour taper fusion—mid-taper fade starting at mid-ear height using a 2 guard, blend down to a 0.5 at the ear curve and hairline. No skin, I want the shadow visible. Leave 4.5 to 5 inches on top from the hairline back to the crown, point-cut for texture but maintain density for volume. Texturize the ends but keep the root area full. I’m sweeping it up and back, so cut with that direction in mind. For the sideburns, fade them completely out—I’m wearing a Van Dyke so there’s intentional disconnect between beard and hair. Shape my Van Dyke with clean lines at the mustache and soul patch, disconnect the cheeks completely. Taper the nape into a rounded shape, blend from the crown down to 0.5 at the neck hairline.” This script communicates both the hair design and the beard-facial hair integration.
Want the taper with less daily drama? The next style delivers modern edge with significantly less morning effort.
FAQs
Q: How do I stop my pompadour from falling flat halfway through the day?
A: The collapse happens because of weak product layering and insufficient heat-setting. The fix: use a pre-styler or matte clay on damp hair before blow-drying, blast the styled pompadour with heat for 15 seconds after shaping, then immediately hit it with cool air for 10 seconds to lock the structure—this heat-to-cool transition sets the hydrogen bonds in your hair. Finish with a strong-hold finishing spray. If it still falls, you’re using too much heavy pomade at the root level; pomade should only go on the top layer for definition, not at the foundation where it weighs hair down.
Q: Can thin or fine hair pull off the Pompadour Taper Fusion?
A: Yes, but you need volumizing tactics that thick-haired guys don’t. Use a thickening shampoo and volumizing mousse as your pre-styler—skip heavy clays that weigh fine hair down. When blow-drying, overdirect: pull sections 45 degrees beyond where they’ll ultimately sit so they have lift when they relax back. Request your barber leave slightly more length (5-5.5 inches) at the front so you have more material to create the illusion of density. Consider a root boost powder applied at the base for extra grip. Fine hair actually holds pompadour shape better once set because it’s lighter and less prone to gravity collapse.
Q: What’s the difference between a pompadour and a quiff?
A: A pompadour is swept straight back from the hairline with volume throughout—the entire front section goes backward. A quiff has height at the front hairline but the hair moves upward and forward before transitioning back, creating a forward-facing curl or wave at the peak. Pompadours have a cleaner backward sweep; quiffs have that signature forward flip. Both can incorporate taper fades on the sides.
5 of 13 — The Minimal Crew Taper

FACE SHAPE MATCH: The Minimal Crew Taper is the chameleon of taper fades, working universally across face shapes with only minor tweaks needed. Round faces benefit most—the skin fade removes maximum side bulk while the ultra-short top doesn’t add width, creating a slimming vertical emphasis. Square faces look phenomenal because the sharp angles of the cut mirror the strong jawline, amplifying masculine features rather than softening them. Oval faces wear this effortlessly—the balanced proportions mean you can go as short as you want without distortion. Diamond faces should ensure the fade doesn’t start too high; a low skin fade (starting just above ear) maintains slight width at the temples to balance narrow foreheads. Heart-shaped faces need caution—the minimal top can make wide foreheads appear larger by removing all visual weight; if you’re Heart-shaped, request 1.25-1.5 inches on top instead of the full minimal cut. Oblong faces can handle this but should keep the top at 1 inch minimum to avoid stretching face length further.
GROOMING KIT: The beauty of this cut is its simplicity, which extends to tool requirements. You need one excellent clipper: the Wahl Professional 5-Star Senior. Its adjustable taper lever handles both the crew-cut top and the fade work for home maintenance. Add the Andis Slimline Pro Li trimmer for edge work—its slim profile gets into tight corners around the ears and neckline that bulkier tools miss. For the fade itself, you’ll want a set of Wahl Premium Guards (sizes 0.5 through 3) for precise home blending. Daily styling requires almost nothing: a dime-sized amount of American Crew Forming Cream worked through barely-damp hair with fingertips provides just enough texture and hold without shine. Clean-shaven maintenance demands a quality safety razor like Merkur 34C with Feather blades for precision shaving without irritation. Keep Nivea Sensitive Post-Shave Balm and a basic moisturizer—this minimalist look puts your skin on full display, so skin care becomes haircare.
MAINTENANCE LEVEL: LOW. This is the ultimate low-effort taper. Barber visits every 18-21 days keep the skin fade crisp; you can stretch to 3 weeks if you do home touch-ups on the hairline and ear outline with your trimmer every 7 days. Daily “styling” takes 90 seconds: work cream through damp hair, brush forward with your hand, done. The clean-shaven face requires daily shaving (4-5 minutes) but there’s no beard sculpting or trimming complexity. Total daily time investment: under 10 minutes including the shower. This cut is built for men who hate morning routines but still want to look intentionally groomed. The grow-out is forgiving because the gradient is so aggressive—even at 3 weeks, you still have a fade; it’s just softer.
BARBER TALK: Tell your barber: “I want a crew cut with a low skin fade. Keep the top between 0.75 and 1 inch, trimmed flat across the crown with slight texture. Start the fade just above my ear using a 1.5 guard, blend aggressively down to skin at the ear curve and temple. I want a true skin fade—bare skin visible, not a shadow. Buzz my hairline, ear outline, and sideburns to skin with the trimmer. Square off the nape and taper it down to skin. Lineup my entire hairline with the trimmer for clean edges—I’m wearing this with a clean-shaven face so the hairline needs to be sharp.” This gives clear top length, fade starting point, and finishing expectations.
The next style shows you how to add modern edge to the taper without sacrificing simplicity.
FAQs
Q: How short can I go on top with a crew cut before it stops looking intentional?
A: The minimum is 0.5 inches—shorter than that and you’re into full buzz cut territory where the distinction between top and sides disappears. At 0.5 inches you still have visible contrast between the crew-cut top and the skin fade sides, maintaining that intentional “haircut” appearance versus “I just buzzed my head.” For straight, fine hair, 0.5 inches works. For thick or coarse hair, 0.75 inches is the functional minimum or the top becomes too spiky and uncontrollable without heavy product.
Q: Can I do a skin fade at home or do I absolutely need a barber?
A: You can maintain a skin fade at home but you can’t create one from scratch without professional training. The blend from guard length to skin requires angle control, pressure variation, and blending techniques that take years to master. For home maintenance between barber visits, use your adjustable clipper to touch up the 1.5 and 1 guard zones, then use a trimmer to clean up the actual skin line around ears and hairline. Attempting the full blend at home usually results in visible lines and patches. Get it cut professionally, maintain the edges at home.
Q: Does a clean-shaven face make the Minimal Crew Taper look too severe or military?
A: It can if you don’t balance with softer elements. The key is your wardrobe and overall styling—pair the minimal hair with casual clothing (Oxfords, Henleys, quality T-shirts) rather than ultra-formal suits, and the vibe shifts from military to modern minimalist. If you feel it’s too severe, grow a subtle stubble (1-2mm) instead of going fully clean-shaven; this adds texture to your face without requiring beard maintenance. The minimal crew with deliberate stubble is actually one of the most popular variations of this style.
6 of 13 — The Messy Quiff Taper

FACE SHAPE MATCH: The Messy Quiff Taper thrives on Oval, Diamond, and Square faces while requiring thoughtful modification for others. Oval faces are the ideal canvas—the upward quiff movement complements natural balance without distortion, and you can go as messy as you want. Diamond faces with narrow foreheads gain width where needed; the forward-falling quiff creates horizontal volume that broadens the upper third, balancing those prominent cheekbones beautifully. Square faces benefit from the soft, messy texture breaking up harsh angular jawlines—the intentional dishevelment adds curvature to an otherwise geometric face structure. Round faces need caution: too much forward movement can widen appearance. If you’re Round-faced, request the quiff sweep more upward than forward, and ensure the mid-high fade removes significant side bulk. Heart-shaped faces should approach carefully—the quiff volume at the forehead can overemphasize width disparity with the narrow chin. Oblong faces need the quiff to move forward not up, adding horizontal dimension rather than stretching vertical length.
GROOMING KIT: Controlled mess requires specific tools and products that create texture without looking greasy. Start with the BaByliss Pro Nano Titanium Dryer—its lower heat prevents damage to highlighted hair while still providing styling power. Pair with a vented brush for lift and a small paddle brush for smoothing sections. For the fade, the Oster Fast Feed with a 000 blade works perfectly for maintaining that mid-high blend at home. Product selection is critical for the messy aesthetic: Hanz de Fuko Claymation provides strong hold with a completely matte finish (glossy products kill the messy vibe), Bumble and bumble Surf Spray adds gritty texture when sprayed on damp hair before styling, and Oribe Dry Texturizing Spray creates that post-styling separation. The shaped beard requires Honest Amish Beard Balm for daily conditioning and the Brio Beardscape trimmer for precise length maintenance. Keep a quality beard comb and beard scissors for stray hair cleanup.
MAINTENANCE LEVEL: MEDIUM. Barber visits every 14-16 days keep the mid-high fade fresh and the quiff length in the sweet spot—too long and it becomes uncontrollable, too short and you lose the quiff structure. Daily styling takes 6-8 minutes: spray surf spray through damp hair, rough-dry with the dryer on medium heat while using fingers (not a brush) to create lift and varied direction, work Claymation through nearly-dry hair focusing on roots for lift and ends for separation, use fingers to pull sections in different directions creating intentional chaos, finish with texturizing spray on dry hair for additional grit and hold. The key is making it look uncontrived while being very intentional about placement. The shaped beard needs trimming every 4-5 days with your Beardscape at your chosen guard length, daily balm application, and weekly scissor cleanup of flyaways.
BARBER TALK: Walk in and say: “I want a messy quiff with a mid-high taper fade. Start the fade between my mid-ear and temple using a 2 guard, blend down to 0.5 at the ear curve and hairline. I want that shadow visible, not a full skin fade. Top stays between 3.5 and 4 inches, point-cut throughout for maximum texture—no blunt lines anywhere. I’m styling it up and forward as a quiff, so cut with that movement in mind. Texturize heavily, I want piece separation not uniformity. Blend my sideburns smoothly into my beard—I want one continuous line from my temple through my sideburn into my beard, no harsh disconnects. Shape my beard cheek line and neckline but keep the overall length at a 4 guard. Taper my nape but keep it rounded, not squared.” This ensures the barber builds in the texture your messy styling requires.
Wondering how to take taper fades into edgier territory? The next style introduces hard parts and geometric precision.
FAQs
Q: How do I make my quiff look messy on purpose instead of just sloppy?
A: Intentional mess has direction and structure underneath the chaos. The trick is creating zones: the quiff section at the front has upward-forward movement, the crown has backward flow, and transitional strands between these zones move in varied directions. Use your fingers to establish these zones while blow-drying, then add Claymation or texture paste to separate and define individual pieces within each zone. The hair should look tousled like you just ran your hand through it, not flat or stringy. If someone can’t tell where your hair is going, it’s sloppy; if they can see general direction with varied texture, it’s messy-intentional.
Q: Can older men with some gray hair wear the Messy Quiff Taper without looking like they’re trying too hard?
A: Absolutely—gray hair actually enhances the messy quiff by adding natural dimension that younger guys have to create with highlights. The key is owning your age: skip the ultra-trendy tight fades and go for a mid-high taper that’s modern but not trying to look 22. Keep the quiff height modest (3-3.5 inches, not 5) and let your gray be visible rather than over-styling to hide it. Pair it with age-appropriate wardrobe—quality denim, oxford shirts, knit polos—not streetwear. The messy quiff on a gray-haired man reads as distinguished confidence when styled correctly.
Q: What’s the best product for messy texture that doesn’t make my hair stiff or crunchy?
A: Clays and matte pastes over pomades and gels. Specifically, Hanz de Fuko Claymation, Baxter of California Clay Pomade, or Uppercut Deluxe Matte Clay all provide strong hold with zero crunch and a completely natural finish. The key is application technique: work product through damp (not soaking wet) hair, distribute to roots first for lift, then work through to ends. Once applied, leave it alone for 30 seconds to let it grip before styling—manipulating too soon creates stickiness. For additional texture without stiffness, finish with a dry texturizing spray after your hair is completely dry and styled.
7 of 13 — The Hard Part Fade
FACE SHAPE MATCH: The Hard Part Fade is a geometric style that works best on Square and Oval faces while requiring substantial modification for others. Square faces are the natural fit—the sharp horizontal line of the hard part echoes your strong jaw angles, and the high fade removes bulk at the temples without compromising your masculine structure. The geometric precision amplifies what you already have. Oval faces handle this effortlessly because balanced proportions mean you can add bold elements like hard parts without creating disproportion. Round faces need caution: the horizontal hard part can visually widen an already-wide face. If you’re Round-faced, position the hard part higher (closer to the crown) and ensure the high fade is very aggressive to remove maximum side width, creating vertical elongation. Diamond faces work well—the hard part adds needed width at the narrow forehead. Heart-shaped faces should avoid this entirely—adding a horizontal line at the wide forehead emphasizes the width disparity with your narrow chin. Oblong faces can wear this if the hard part is subtle and placed mid-crown to add horizontal breaks in vertical length.
GROOMING KIT: The hard part demands precision tools and maintenance. The Wahl Detailer is essential for creating and maintaining that surgical 2mm hard part line—nothing else gives you the accuracy for geometric lines in hair. Pair it with the Andis Master for general clipper work and fade maintenance. You’ll need a straight razor or shavette for refreshing the hard part weekly; the Feather Artist Club SS is the gold standard for crisp lines. For styling the top, keep a fine-tooth comb for creating the sweep from the part, and use American Crew Grooming Cream (medium hold, natural finish) for definition without shine. The salt-and-pepper hair requires special care to prevent yellow tones: invest in a purple-toning shampoo like Joico Color Balance Purple used twice weekly. The short beard needs the BaByliss Pro FX clipper for maintaining uniform length at a 2 guard, plus Beardbrand Utility Balm to condition those coarser gray hairs. A small trimming mirror is critical for checking the hard part line from multiple angles during home maintenance.
MAINTENANCE LEVEL: VERY HIGH. This is a weekly maintenance style, not a monthly cut. Barber visits every 10-14 days keep the high fade crisp and the hard part line sharp—grow out is visible and unprofessional after two weeks. Between barber visits, you’ll do weekly hard part touch-ups with your Detailer or straight razor (5-7 minutes), weekly beard trimming to maintain the uniform 2 guard length (4 minutes), and daily hairline edge-ups around the temples and nape (2-3 minutes). Daily styling takes 5 minutes: apply grooming cream to damp hair, comb from the hard part line toward the right, blow-dry on low while following the comb for smoothness, finish with a light cream touch-up on dry hair for hold. The hard part is a commitment—it requires precise hand-eye coordination for home maintenance, and if you miss a week, the line becomes fuzzy and the entire look degrades.
BARBER TALK: Give your barber this script: “I want a hard part fade on the left side. Shave the hard part line with a trimmer or straight razor—make it surgical, 2mm width, running from my hairline back about 3 inches toward the crown. High fade starting immediately below the hard part line at temple level—use a 1.5 guard at the starting point, blend aggressively down to skin at the ear and hairline. The transition should be tight, under 1 inch of vertical blend distance. Top stays at 3 inches with slight texturizing, but I’m combing it over smooth from the part. Blend my sideburns into my beard at a 2 guard length—keep my beard short and uniform. Square off my nape with defined corners, taper down to skin at the neckline. Lineup all my edges—hairline, hard part, nape, beard—with the trimmer for geometric precision.” This gives the barber exact line placement, fade aggression, and geometric expectations.
Want the drama of a hard part without weekly razor maintenance? The next style offers bold lines with more forgiving upkeep.
FAQs
Q: How do I maintain a hard part at home without messing up the line?
A: Invest in quality tools and practice on the less-visible back section first. Use a Wahl Detailer with the T-blade for precision. The technique: comb hair away from the part line to expose the shaved area, hold the trimmer at a 45-degree angle with the blade edge following the original line, use short controlled strokes moving in the direction of hair growth. Go slow—you can always take more, you can’t put it back. Check from multiple angles with a hand mirror. If you’re genuinely unsure of your hand-eye coordination, get the barber to refresh the part weekly for 10 dollars rather than risking an asymmetrical disaster at home.
Q: Does salt-and-pepper hair look better with or without the hard part?
A: Salt-and-pepper hair actually enhances hard parts by creating natural contrast—the gray and dark strands sitting on either side of the shaved line create visual dimension that monochromatic hair has to fake. The geometric line looks more organic when there’s tonal variation in the hair around it. Just ensure you’re using purple-toning shampoo to keep the gray from yellowing, which can make the hard part look dingy. The hard part on mature salt-and-pepper hair reads as bold confidence, not mid-life crisis, when paired with age-appropriate wardrobe and grooming.
Q: Can I have a hard part without the high fade or do they have to go together?
A: You can absolutely have a hard part with a low or mid-taper instead of a high fade. The high fade amplifies the geometric drama, but a hard part with a mid-taper is more conservative and office-appropriate. The key is ensuring the fade starts close enough to the hard part line that there’s visual connection—if the part is at the temple and the fade starts mid-ear, they look disconnected. Request the fade start within 1 inch below the hard part line for cohesion. The hard part mid-taper combo is actually growing in popularity for business professionals who want edge without looking too urban.
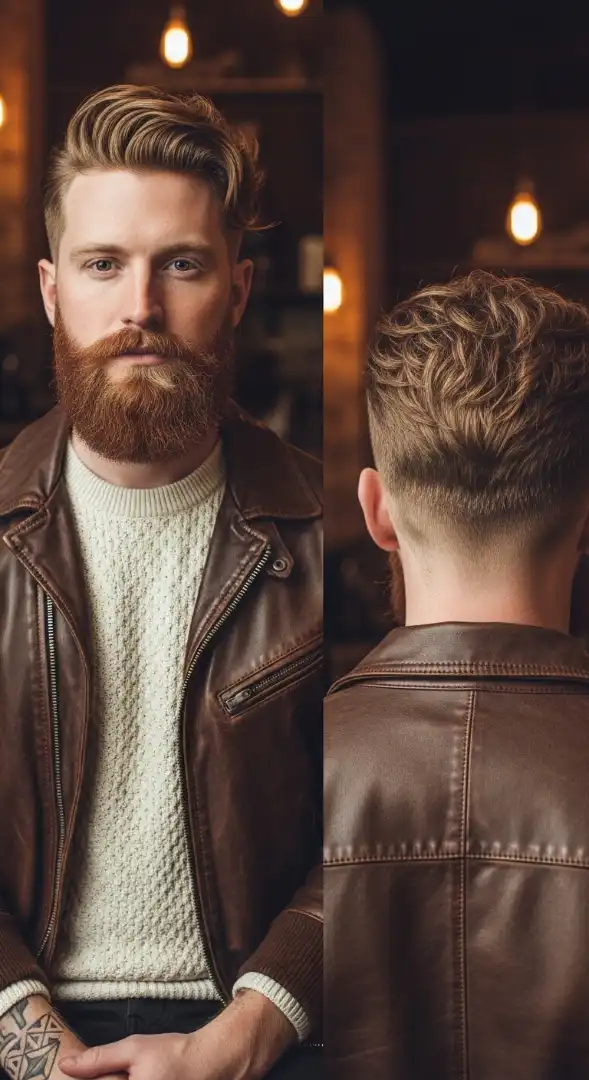
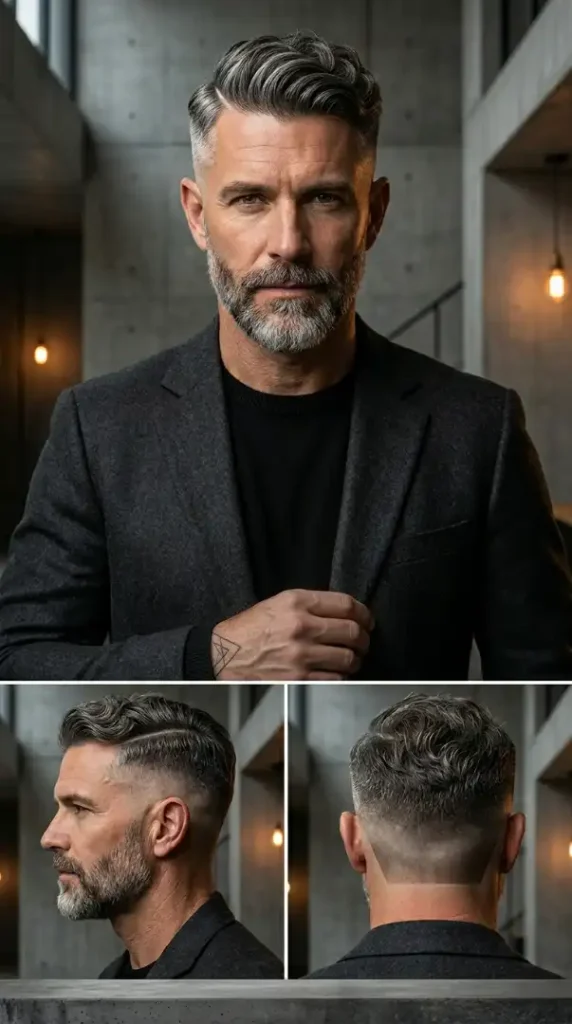
8 of 13 — The Slick Back Low Taper

FACE SHAPE MATCH: The Slick Back Low Taper is the boardroom power move that works best on Oval, Diamond, and Oblong faces while requiring strategic tweaks for others. Oval faces are ideal—the backward flow maintains perfect proportions while adding a masculine, authoritative edge. Diamond faces benefit significantly because slicking hair back exposes your strong cheekbones, turning a potential concern into your defining feature. The low taper preserves some width at the temples, preventing the pinched look that high fades create on narrow foreheads. Oblong faces work surprisingly well—the backward horizontal flow adds width perception, counteracting vertical length. Square faces should approach carefully: the slicked-back style exposes your entire face structure, which amplifies an already-bold jawline. If you’re Square-faced, pair this with a full beard to add softness below the jaw. Round faces need modification—request the fade start slightly higher (approaching mid-taper territory) to remove side bulk that the low taper would otherwise preserve. Heart-shaped faces can wear this if they add a full beard to balance the wide forehead with lower-face volume.
GROOMING KIT: The slicked-back style demands specific products for that classic high-shine finish. You’ll need a strong-hold pomade: Layrite Superhold Pomade delivers boardroom-appropriate shine with all-day hold, while Suavecito Original Pomade offers water-based washability. Pair with a fine-tooth comb—the Mason Pearson Pocket Comb is worth the investment for smooth distribution. For the low taper maintenance, the Wahl Magic Clip handles the conservative gradient work perfectly. A blow dryer with concentrator nozzle is essential for pre-styling: blow hair straight back while brushing with a paddle brush to establish direction before pomade application. The thick beard requires significant care: Honest Amish Beard Balm for daily conditioning and softening, a quality beard oil like Grave Before Shave Bay Rum for moisture and shine, the Brio Beardscape trimmer set to 6mm for maintaining uniform length, and Kent beard comb for distribution. Keep beard scissors for flyaway cleanup and a badger hair brush for exfoliation beneath the beard.
MAINTENANCE LEVEL: HIGH. Barber visits every 16-18 days keep the low fade looking intentional rather than grown-out. The conservative gradient means you can stretch appointments slightly longer than aggressive fades. Daily styling takes 10-12 minutes and cannot be skipped: shower and towel-dry thoroughly, blow-dry hair straight back on medium-high heat while brushing backward with a paddle brush (this pre-sets direction), work a quarter-sized amount of pomade through damp (not wet) hair from roots to tips, use fine-tooth comb to slick back in smooth lines from hairline to crown, ensure no sections are sticking up or breaking the uniform backward flow, finish with a light pomade touch-up on any areas that relax. The thick beard needs daily conditioning (2 minutes applying oil or balm), trimming to 6mm every 5-7 days, and weekly deep-conditioning treatment. This is not a wash-and-go style—it’s a daily commitment to looking authoritative.
BARBER TALK: Tell your barber: “I want a slick back with a low taper fade. Keep the top between 4 and 5 inches, all one length with minimal texturizing—I’m slicking it back smooth so I need density, not choppiness. Start the low fade just above my ear using a 3 guard, blend conservatively down to a 1.5 guard at the ear curve and hairline. I want a professional gradient, not an aggressive street fade. No skin showing. Blend my sideburns naturally into my beard—I’m wearing a full beard at 6mm so the connection should be seamless. Shape my beard’s cheek line with a slight curve, not a straight geometric line. Taper my nape with a rounded shape, blend from 3 guard down to 1.5 at the neckline. Lineup my hairline for definition but keep it natural, don’t force unnatural straight lines.” This script ensures a conservative, business-appropriate result.
The next style brings textured modernity to the classic taper while keeping professional viability.
FAQs
Q: How do I prevent my slicked-back hair from looking greasy instead of polished?
A: The line between polished and greasy is product amount and application timing. Apply pomade to damp hair, not soaking wet or bone-dry. Soaking wet dilutes the product and creates stringy grease; bone-dry makes product sit on top looking oily. Damp hair allows pomade to absorb slightly while still providing slip for combing. Use less than you think you need—start with a nickel-sized amount, distribute thoroughly, add more only if needed. Comb through completely so there are no product clumps. The shine should look like healthy hair, not oil slick.
Q: Can thin or fine hair pull off the slicked-back look without looking flat?
A: Yes, with technique modification. Thin hair requires volumizing pre-work: apply a volumizing mousse to damp hair at the roots, blow-dry straight back while lifting sections with a round brush to create base volume, then apply pomade only to the top layer (not roots) for hold and shine. This builds height foundation before slicking. Consider requesting your barber leave slightly more length (5-5.5 inches) on top so you have material to work with. The low taper is actually beneficial for thin hair because it preserves side volume, making your overall head shape look fuller.
Q: What’s the best way to train stubborn cowlicks for a smooth slicked-back style?
A: Cowlicks are all about timing and heat. Immediately after showering while hair is still very wet, blow-dry the cowlick area first, directing it against its natural growth pattern using your fingers and high heat. Overpower the cowlick with directed heat for 20-30 seconds, then let it cool in the back-swept position. Once cool, apply pomade and comb normally—the heat-setting will have weakened the cowlick’s pull. For severe cowlicks, consider a light texturizing spray before blow-drying for additional grip. Never fight a cowlick with product alone; you must heat-train it first.
9 of 13 — The Crop Top Fade

FACE SHAPE MATCH: The Crop Top Fade is the chameleon cut that flatters nearly every face shape with strategic modifications. Round faces get the most dramatic benefit—the horizontal fringe creates width balance while the high skin fade removes maximum side bulk, producing a slimming effect that can visually drop 15 pounds from your face. Oval faces wear this effortlessly; your balanced proportions mean you can wear the fringe at any length from eyebrow-level to mid-forehead without distortion. Square faces look phenomenal—the blunt horizontal fringe softens your angular features while the skin fade keeps things sharp, creating beautiful contrast between geometric and soft elements. Diamond faces should ensure the fringe sits at or slightly below eyebrow level to add needed width at narrow foreheads. Heart-shaped faces need the fringe to extend fully across the forehead, providing coverage that balances wide upper-thirds with narrow chins. Oblong faces should approach with modification: request the fringe sit lower (mid-forehead or lower) to break up vertical length, and consider a mid-fade instead of high to preserve some horizontal dimension.
GROOMING KIT: The crop demands minimal tools but specific products for that matte, textured finish. The Wahl Professional Senior is ideal for maintaining the high skin fade at home—its power and adjustability handle the aggressive blend work. You’ll need a quality trimmer like the Andis GTX for maintaining the stubble beard at 2-3mm; this specific length requires precision tools that won’t skip or pull. For styling the crop, texture is everything: Hanz de Fuko Quicksand provides ultra-matte finish with gritty texture (the best product for this specific style), Baxter of California Clay Effect Style Spray adds hold without weight, and a texturizing sea salt spray like Captain Blankenship Mermaid creates beach-hair grit when applied to damp hair. You’ll need a wide-tooth comb for initial distribution but the final styling is all finger-work. The stubble requires a quality electric trimmer with adjustable guards, plus a basic moisturizer to prevent dry skin beneath the stubble—stubble length exposes skin more than full beards.
MAINTENANCE LEVEL: MEDIUM. Barber visits every 14-18 days keep the high skin fade crisp and the blunt fringe properly textured. The crop is forgiving on grow-out because the fringe’s weight naturally pushes it forward—even at 3 weeks you still have the basic shape. Daily styling takes 4-6 minutes: apply sea salt spray to damp hair, rough-dry with hands (no brush—you want messy texture), work Quicksand through nearly-dry hair focusing on roots for lift and ends for separation, push hair forward with fingers creating piece separation and deliberate messiness, allow to air-dry completely for maximum texture. The stubble needs maintenance every 2-3 days with your trimmer set to 2.5mm, going against the grain for even coverage. This is a low-effort style that looks high-effort—the beach aesthetic thrives on barely-styled authenticity.
BARBER TALK: Walk in and say: “I want a textured crop with a high skin fade. Cut the top to 2 to 2.5 inches, create a blunt horizontal fringe at eyebrow level—not pointed, not wispy, blunt and thick. Texturize the top heavily with point-cutting and razoring, I want maximum piece separation and a choppy finish. High skin fade starting at temple level—use a 1.5 guard at the start point, blend aggressively down to bare skin at the ear and temple. The fade should be tight and dramatic. Fade my sideburns completely out to skin. For my stubble, just clean up my natural cheek line and neckline, but leave the stubble itself at my current length (2-3mm). Taper my nape with a rounded shape, blend down to skin at the neckline.” This script ensures the barber creates the blunt fringe structure with textured interior.
Wondering how to combine taper fades with natural curl patterns? The next style shows curly hair mastery.
FAQs
Q: How do I style a crop top to look textured instead of flat and lifeless?
A: Texture comes from product choice and application timing. Never apply product to wet hair for a crop—it weights down and kills texture. Spray sea salt spray on damp hair, rough-dry with your hands to about 80% dry, then work matte clay or texture paste through the nearly-dry hair. The key is getting product into almost-dry hair so it grips individual strands rather than coating wet hair uniformly. Push hair forward with your fingers in varied directions creating deliberate chaos, don’t comb it smooth. If your crop looks flat, you’re either using too much product, applying it too wet, or combing when you should be finger-styling.
Q: Can the Crop Top Fade work in professional business environments?
A: Absolutely, with one adjustment: request a mid-skin fade instead of a high skin fade. The crop itself is clean and modern, but the high skin fade can read as too urban for conservative corporate cultures. A mid-skin fade starting at mid-ear level maintains the crop aesthetic while looking more boardroom-appropriate. Pair it with business casual or formal attire and style with slightly less texture (more controlled, less beach-messy) for professional settings. The blunt fringe actually looks executive when paired with a suit and conservative styling.
Q: How do I prevent my fringe from sticking straight up instead of laying forward?
A: Stubborn fringe is a blow-dry problem. When drying, direct the airflow downward and forward, not upward. Use your hand to physically push the fringe toward your forehead while drying—you’re heat-training it to lay forward. If it still won’t comply, apply product to damp hair before blow-drying; the product weight helps pull it down. For severe cases, after applying product and pushing forward, clip the fringe flat against your forehead with a hair clip for 60 seconds while it dries completely. The hair will set in that forward position.
10 of 13 — The Curly Top Taper

FACE SHAPE MATCH: The Curly Top Taper leverages natural volume to flatter most face shapes, with modifications for extremes. Oval faces are the perfect match—curl volume maintains ideal proportions while the mid-taper removes just enough side weight without going aggressive. Round faces benefit from the vertical volume curls naturally create; the upward growth elongates while the mid-taper removes side bulk at the widest point. Request slightly more curl length (4-4.5 inches) if you’re Round-faced to maximize upward dimension. Square faces look excellent—the soft, organic curl texture contrasts beautifully with angular jawlines, softening your geometric features while the taper keeps things sharp. Diamond faces should ensure curls have good volume at the crown to balance narrow foreheads; the mid-taper preserves some temple width which is beneficial. Heart-shaped faces work well because curl volume adds width at the forehead, balancing narrow chins—this is one of the best cuts for Heart faces. Oblong faces need modification: request a low-mid taper (starting below mid-ear) and keep curl length at 3 inches maximum to avoid adding height to an already-vertical face structure.
GROOMING KIT: Curly hair demands curl-specific tools and products that respect natural texture. Never use standard clippers on curly hair—invest in the Wahl Professional Magic Clip which handles curl texture without snagging. The BaByliss Pro Volare is excellent for fade work on curly hair specifically. For curl definition and maintenance, your product lineup is critical: Shea Moisture Curl & Shine Conditioner used as a leave-in for moisture, DevaCurl Arc Angel Gel for definition without crunch when applied to soaking-wet hair, and Cantu Coconut Curling Cream for refresh days. You need a microfiber towel or cotton T-shirt for drying—regular terry cloth towels destroy curl patterns and create frizz. A wide-tooth pick comb or Denman brush for detangling only, never for styling. The wavy beard requires curl-safe products: Honest Amish Beard Balm applied daily, a boar bristle beard brush to encourage wave formation, and the Brio Beardscape for trimming without disrupting wave texture.
MAINTENANCE LEVEL: LOW-MEDIUM. Barber visits every 18-23 days—curly hair’s natural volume means fades grow out more forgivingly than straight hair; you maintain visual contrast longer. Daily styling follows the curly hair method and takes 8-10 minutes on wash days, 2-3 minutes on refresh days. Wash day (every 3-4 days): saturate hair with water in shower, apply curl cream to soaking-wet hair working through sections, apply gel over the cream while hair is still dripping wet, scrunch upward to encourage curl formation, allow to air-dry completely (or use diffuser on low heat and low speed), once 100% dry, scrunch out the gel cast with hands for soft defined curls. Refresh days: lightly spray hair with water, apply a tiny amount of curl cream to damp areas, scrunch, let air-dry. The wavy beard needs conditioning every other day and trimming weekly to maintain taper into the sideburn. This is genuinely low-effort once you understand the curl method—the styling happens while wet, then you leave it alone.
BARBER TALK: Tell your barber: “I want a curly top with a mid-taper fade. Leave 3 to 4 inches of length on top, cut dry with my natural curl pattern intact—don’t wet it down and cut straight, cut curl by curl respecting the spiral formation. Mid-taper fade starting at mid-ear using a 2.5 guard at the start, blend down to a 1 guard at the ear curve and hairline. No skin, I want some coverage. Work with my curl texture through the fade; don’t try to brush it straight. Blend my sideburns into my beard, which also has natural wave—keep that texture connection. Taper my nape with a rounded shape, blend from 2.5 guard down to 1 at the neckline. Line up my hairline but follow my natural curl pattern at the edge, don’t force straight lines.” This protects your curl integrity throughout the cut.
The next style brings the taper concept into undercut territory for maximum contrast and modern edge.
FAQs
Q: How do I get my curls to look defined instead of frizzy with a taper fade?
A: Definition comes from moisture and product application to wet hair. The biggest mistake curly-haired men make is applying product to damp or dry hair—that creates frizz. Your hair must be soaking wet when you apply curl cream and gel. Soaking, like water still dripping. Work products through in sections, scrunch upward to encourage curl formation, then do not touch your hair until it is 100% dry. Touching it while drying breaks up the curl clumps and creates frizz. Once fully dry, you can scrunch out the gel cast for soft curls. If you’re still getting frizz, you need more moisture—add a leave-in conditioner before the curl cream.
Q: Can I blow-dry my curly hair or will that destroy the curl pattern?
A: You can blow-dry but only with a diffuser attachment on low heat and low speed. Regular blow-drying with high heat and no diffuser will absolutely destroy your curl pattern and create frizz. The diffuser cradles curls while drying without disrupting their formation. Technique: hover the diffuser near your curls without touching, pulse on/off rather than continuous airflow, scrunch sections gently into the diffuser cup. Or just air-dry—it takes longer but is foolproof for curl preservation. Never blow-dry curly hair straight back or with a brush; you’re fighting your natural texture.
Q: Does the mid-taper work better than a high fade for curly hair?
A: Yes, for most curl types. Curly hair has natural volume and lift, so a mid-taper provides balance—it removes side weight without creating such dramatic contrast that you look top-heavy. High fades can work on looser curl patterns (Type 2B-3A waves) but Type 3B-4C tight curls with a high fade often creates a mushroom effect where the top looks disproportionately large. The mid-taper is the sweet spot: enough fade to look modern and clean, enough preserved length to balance curl volume.
11 of 13 — The Disconnected Undercut Taper

FACE SHAPE MATCH: The Disconnected Undercut Taper is a high-contrast style that works best on Oval and Square faces while demanding careful consideration for others. Oval faces handle this effortlessly—your balanced proportions mean you can support dramatic style elements like disconnects without creating disproportion. The volume on top maintains your natural balance. Square faces look phenomenal because the geometric disconnect line echoes your angular jawline, amplifying masculine features rather than fighting them. The swept volume adds slight softness to counterbalance jaw angles. Round faces need significant modification—the disconnect can emphasize width if not executed carefully. If you’re Round-faced, request the disconnect line sit higher (closer to the crown) and ensure the top is swept upward not to the side, creating vertical elongation. Diamond faces work well because the volume on top adds needed width at narrow foreheads, balancing cheekbones. Heart-shaped faces should avoid this—the top volume emphasizes the wide forehead while the clean-shaven face exposes the narrow chin, exaggerating the disparity. Oblong faces need the top swept forward not back, and keep length at 3.5-4 inches maximum to avoid adding vertical stretch.
GROOMING KIT: The disconnected undercut demands precision tools for maintaining that sharp horizontal line. You’ll need the Oster Fast Feed for the undercut section—its powerful motor handles frequent all-over buzzing without overheating. The Andis T-Outliner is essential for maintaining the disconnect line itself; that surgical precision requires a trimmer, not a clipper. For the long top section, invest in a quality blow dryer like the GHD Helios with concentrator nozzle, a medium round brush for adding volume while directing flow, and a paddle brush for smoothing. Product-wise, you’ll need versatile hold: Uppercut Deluxe Pomade for slicked styles, Hanz de Fuko Claymation for matte textured looks—the disconnect allows multiple styling options. Keep a fine-tooth comb for creating precise parts and a spray bottle for dampening sections during styling. For the clean-shaven look, maintain with a quality cartridge razor like Gillette Fusion ProGlide and Harry’s Shave Gel. Daily moisturizer is critical when your face is fully exposed.
MAINTENANCE LEVEL: VERY HIGH. This is a commitment style. Barber visits every 8-10 days are essential—the disconnect line grows out visibly and loses its sharpness quickly, and once fuzzy, the entire aesthetic fails. Between barber visits, you’ll need to buzz the undercut section yourself every 4-5 days with your Fast Feed clipper set to 3mm to prevent shadowy grow-out. The disconnect line itself requires weekly touch-ups with your T-Outliner to maintain that geometric precision (5-7 minutes). Daily styling varies based on your chosen look: slicked takes 8-10 minutes with blow-drying and pomade application; textured messy takes 5-6 minutes with clay and finger-work. Clean-shaven maintenance is daily shaving (5 minutes). Total daily time investment: 10-15 minutes plus weekly home clipper work. This style looks effortlessly cool but is absolutely not effortless.
BARBER TALK: Walk in and say: “I want a disconnected undercut taper. Create a sharp horizontal disconnect line at temple level running from my hairline back toward my crown—I want a visible geometric line, not a blend. Everything below that disconnect line gets buzzed to 3mm uniformly—no fade, no gradient, just uniform 3mm from the disconnect down to my hairline and nape. Above the disconnect line, leave 4 to 5 inches of length, point-cut for texture throughout. I’ll be styling it swept to the right but I want versatility. Make the disconnect line razor-sharp with the trimmer—this line is the feature, it needs precision. Buzz my nape to the same 3mm with a squared-off shape showing defined corners. Keep my sideburns buzzed to match the undercut length.” This script ensures the barber understands the disconnect is intentional and geometric, not blended.
The next style takes the taper into long-hair territory, proving fades aren’t just for short cuts.
FAQs
Q: What’s the difference between a disconnected undercut and a regular undercut?
A: A regular undercut has some blending or taper between the long top and short sides—there’s a gradual transition zone even if it’s abrupt. A disconnected undercut has zero blend: the long hair sits directly next to the buzzed section with a visible horizontal line of demarcation. It’s an intentional geometric division, not a fade. The disconnect creates more dramatic contrast and is more editorial/fashion-forward. Regular undercuts are more versatile and business-appropriate.
Q: Can I style a disconnected undercut in different ways or am I locked into one look?
A: The disconnect allows multiple styling options—that’s its versatility. You can slick it back with pomade for formal events, sweep it to the side for daily casual wear, push it forward as a textured fringe for edgier looks, or even tie the long section into a small top knot if you grow it slightly longer. The disconnect itself remains constant, but the top styling changes daily. This is actually more versatile than fully faded styles that dictate one specific direction.
Q: How do I maintain the disconnect line at home without making it crooked?
A: Maintaining the horizontal line requires a steady hand and reference points. Before touching it with clippers, comb the long section up and away to expose the disconnect zone clearly. Use a hand mirror to check both sides simultaneously—you’re looking for the line to hit the same point relative to your ear on both left and right. Start conservatively: use your T-Outliner to clean fuzz just below the existing line, don’t try to re-cut the line higher. Go slow with tiny strokes, checking frequently in the mirror. If you’re genuinely uncertain, get weekly edge-ups at the barber for 10 dollars rather than risking asymmetry.
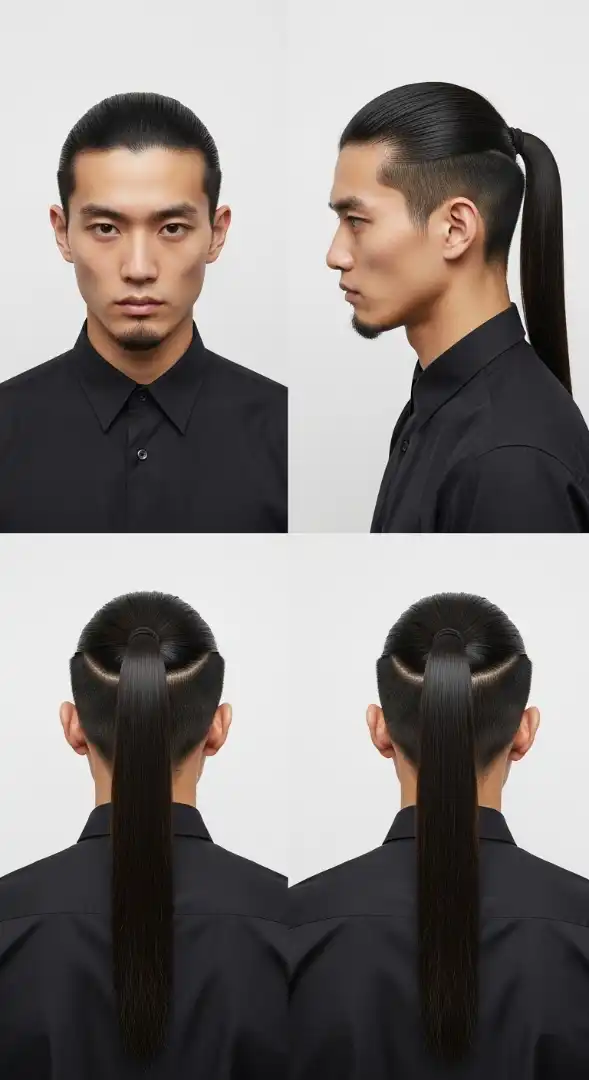
12 of 13 — The Long Hair Low Fade

FACE SHAPE MATCH: The Long Hair Low Fade leverages natural volume to create presence across most face shapes, with length adjustments for extremes. Oval faces are ideal—the added height maintains beautiful proportion while the low fade provides clean definition without aggressive side removal. Round faces benefit dramatically from the vertical volume coily hair creates when grown long; the upward lift elongates while the low fade removes just enough side bulk for balance without stripping beneficial structure. Request 6-7 inches of length if you’re Round-faced to maximize vertical dimension. Diamond faces work beautifully because the crown volume balances narrow foreheads while the low fade doesn’t remove temple width you actually need. Square faces pair the bold volume with strong jawlines for a powerful masculine look; the soft coil texture provides needed contrast to angular features. Heart-shaped faces gain forehead width from the volume, helping balance narrow chins—this is excellent for Heart faces. Oblong faces need modification: keep length at 4-5 inches maximum and request a very low fade (starting below ear level) to add horizontal dimension rather than stretching vertical length further.
GROOMING KIT: Long coily hair requires specialized care and quality tools. The Wahl Professional 5-Star Magic Clip is essential for fade maintenance—its motor handles dense coily hair without bogging down. For daily coil care, you’ll need a wide-tooth pick comb for lifting and separating, never a brush on Type 4 coils. Product lineup is critical for moisture and definition: Shea Moisture Jamaican Black Castor Oil Leave-In Conditioner applied daily to damp hair for moisture retention, Cantu Natural Hair Moisturizing Curl Activator Cream for curl definition, and a quality hair oil like Aunt Jackie’s Grapeseed & Avocado Growth Oil for sealing moisture. The thick beard at 10mm requires the Wahl Peanut Trimmer for precision length maintenance, Honest Amish Beard Balm for daily conditioning (coily beards dry out quickly), and a boar bristle beard brush for training and exfoliation. Invest in a satin pillowcase and sleep bonnet to prevent moisture loss and frizz overnight.
MAINTENANCE LEVEL: MEDIUM. Barber visits every 21-28 days keep the low fade clean—coily hair’s natural volume means the fade grows out very forgivingly; you maintain contrast longer than straight hair. Daily care takes 10-15 minutes and focuses on moisture, not styling: spray hair thoroughly with water or refresh spray every morning, work leave-in conditioner through damp hair section by section, apply curl activator cream while hair is still wet, use your pick comb to lift from the roots creating volume and separating coils, allow to air-dry completely (or use a diffuser on low heat for faster results), finish with a light oil on fingertips to seal moisture and eliminate any frizz. The beard needs conditioning daily (2 minutes applying balm), trimming to 10mm every 7-10 days, and weekly deep-conditioning. This routine seems involved but becomes second nature—the time investment protects your hair health and maintains definition.
BARBER TALK: Tell your barber: “I want to keep my length—I’m at 5 to 6 inches and I’m growing it out. Give me a low fade starting just above my ear using a 2 guard at the start point, blend down to a 1 guard at the ear and hairline. Don’t go to skin, I want coverage. Work with my natural coil pattern through the fade—cut dry, don’t wet my coils down and stretch them to cut. Maintain my coil structure and volume on top, just clean up any split ends or uneven growth. Blend my sideburns into my beard smoothly—my beard is at 10mm so match that at the blend zone. Taper my nape with a rounded shape, blend from 2.5 guard at the crown down to 1 at the neckline. Line up my hairline and beard edges following my natural growth pattern, don’t force straight geometric lines into coily hair.” This protects your length and curl integrity while getting clean fade definition.
The final style brings everything together with a modern take on the classic taper that works in any setting.
FAQs
Q: How do I grow out natural coily hair while keeping a fade looking fresh?
A: The key is strategic low fade placement and frequent edge-ups. As you grow the top, keep requesting the same low fade starting point—this maintains clean definition while your crown length increases. Get the fade touched up every 3-4 weeks, but don’t let the barber cut the top length at all unless you’re trimming damaged ends. Between barber visits, do weekly edge-ups yourself on the hairline, ear outline, and neckline with your trimmer to prevent the fade from looking overgrown. The low fade is the most growth-friendly option because it preserves side volume while still providing contrast.
Q: What’s the best way to add moisture to long coily hair without it looking greasy?
A: Moisture application is all about timing and product type. Apply leave-in conditioner and curl cream to soaking wet hair immediately after washing or refreshing with water—the water helps distribute product evenly without creating heavy buildup. Use creams and water-based products, not heavy oils or petroleum-based pomades which sit on top looking greasy. Oils should only be applied as a final sealant in tiny amounts on fingertips, not worked through roots. If your hair looks greasy, you’re using too much product or applying to dry hair. Proper moisture in coily hair looks soft and defined, not shiny or oily.
Q: Can I pull long coily hair back into a ponytail or bun with a fade?
A: Absolutely—that’s one of the best features of the long hair low fade combo. When you want a different look or need hair out of your face, gather the top section back and secure with a hair tie or elastic band. The faded sides remain visible, creating a clean modern ponytail or man bun aesthetic. Use a satin or silk scrunchie instead of regular elastic bands to prevent breakage. When wearing hair pulled back with a fade, the contrast between the exposed faded sides and the secured top creates a bold, intentional look that’s growing massively in popularity.
13 of 13 — The Classic Mid Taper

FACE SHAPE MATCH: The Classic Mid Taper is the universal haircut that flatters every face shape with minimal to zero modification required. This is the safe bet, the proven winner, the cut that works when you don’t want to gamble. Oval faces wear this in its pure form—the mid-taper placement and conservative length create the textbook ideal proportion. Round faces benefit from the balanced side removal; the mid starting point takes enough width away to elongate without stripping so much that you lose facial structure. Square faces look refined—the soft side sweep adds organic movement that contrasts with angular jaws while the mid-taper keeps things sharp and masculine. Diamond faces gain needed width at the narrow forehead from the swept top while the mid-taper preserves some temple volume for balance. Heart-shaped faces work beautifully because the side-swept volume adds forehead coverage, balancing the wide upper-third narrow-chin proportion. Even Oblong faces handle this well—the side sweep adds horizontal dimension without exaggerating vertical length. This is the one cut every face shape can wear confidently without consultation.
GROOMING KIT: The classic mid taper requires classic, reliable tools without unnecessary complexity. The Wahl Professional 5-Star Senior handles both the mid-fade work and general trimming with its versatile adjustable lever. Pair it with the Andis Slimline Pro Li for edge work and detail trimming. For daily styling, keep it simple: a quality paddle brush for smoothing and directing flow, a fine-tooth comb for creating the subtle side part, and American Crew Fiber (medium hold, low shine) for natural-looking texture and hold. The shaped beard at 8mm requires the Philips Norelco OneBlade for maintaining clean cheek and neck lines, Beardbrand Utility Oil for daily conditioning, and a basic beard comb for distribution. A travel-sized hair clay or pomade for on-the-go touch-ups. This kit is deliberately minimal—the classic cut doesn’t need a bathroom full of products. Quality basics executed well beat a drawer full of specialized gear.
MAINTENANCE LEVEL: MEDIUM. Barber visits every 16-20 days keep the mid-taper looking intentional and the side-swept length at its optimal styling zone. This is genuinely the Goldilocks maintenance level—not so frequent it’s a scheduling burden, not so rare the cut loses definition. Daily styling takes 5-7 minutes: apply a small amount of fiber to damp (not wet) hair, use your paddle brush to sweep hair from the left side part toward the right while blow-drying on medium heat, create the subtle part with your fine-tooth comb, work a tiny additional dab of fiber through the top layer for texture and hold, adjust individual sections with your fingers for natural imperfection. The shaped beard needs conditioning every other day (1 minute applying oil), trimming to 8mm every 7-10 days (3-4 minutes with your OneBlade), and weekly cleanup of the cheek and neck lines. This is attainable, sustainable maintenance that fits into real life.
BARBER TALK: Give your barber this straightforward script: “I want a classic mid-taper fade. Start the fade at mid-ear level with a 2.5 guard, blend down to a 1 guard at the ear curve and hairline. Conservative gradient, professional finish, no skin showing. Top stays at 3 to 3.5 inches, point-cut for natural texture but maintain enough density for a side-swept style. I’m parting it on the left and sweeping it right. Blend my sideburns naturally into my beard—my beard is shaped at 8mm so transition smoothly into that length. Shape my beard’s cheek line with a slight natural curve following my bone structure, clean up my neck line one finger-width above my Adam’s apple. Taper my nape with a rounded shape, blend from 2.5 guard down to 1 at the neckline.” This is clear, achievable, and produces the most versatile men’s haircut.
This classic mid-taper proves that sometimes the most timeless choice is the smartest choice—it works everywhere from boardrooms to beaches, from first dates to job interviews, from your twenties through your sixties.
FAQs
Q: Why is the mid-taper considered the most versatile taper fade variation?
A: The mid-taper hits the sweet spot between conservative and modern. It starts low enough to be acceptable in traditional corporate environments but high enough to look current and stylish. The mid-placement works with every hair type (straight, wavy, curly, coily), every length (from buzz cuts to longer styles), and every age range. High fades can read as too urban for some professional settings; low tapers can look dated or overly conservative. The mid-taper navigates between these extremes perfectly, which is why it’s been the default recommendation for decades.
Q: Can I wear the Classic Mid Taper with gray or graying hair?
A: Absolutely—the classic mid-taper is arguably most distinguished on salt-and-pepper and gray hair. The conservative styling and balanced proportions read as mature confidence rather than trying to look younger. Gray hair actually benefits from the mid-taper because the fade creates clean definition that prevents the “hasn’t had a haircut in months” look that can happen with gray hair grown out uniformly. Pair it with a well-maintained beard (gray or trimmed short) and you’ve got the refined older-man aesthetic that commands respect.
Q: What’s the easiest way to create a natural-looking side part without it looking too formal?
A: The key is subtlety and imperfection. After applying product and blow-drying your hair in the general swept direction, take your fine-tooth comb and create the part—but make it narrow and short, only running from your hairline back about 2 inches, not all the way to your crown. Once created, immediately run your fingers through it slightly to soften the line so it’s suggested rather than carved. A natural part is visible but not geometric. If you can balance a pencil in your part line, it’s too deep and formal. The part should guide the eye but look like your hair naturally falls that way.
Q: Does the Classic Mid Taper work for active lifestyles and sports?
A: Yes, it’s one of the best cuts for active men. The mid-taper keeps sides short enough that you don’t get helmet hair or hat-crease issues, but the slightly longer top (compared to a crew cut) still allows for styling versatility when you’re not working out. The cut holds up through sweat, shower, gym routine, and still looks presentable for work or social events afterward. Use a water-based fiber or clay so you can wet your hair, restyle quickly post-workout, and go. This is the athlete-professional hybrid cut.