
10 Curly Hair Men Best Styles for You
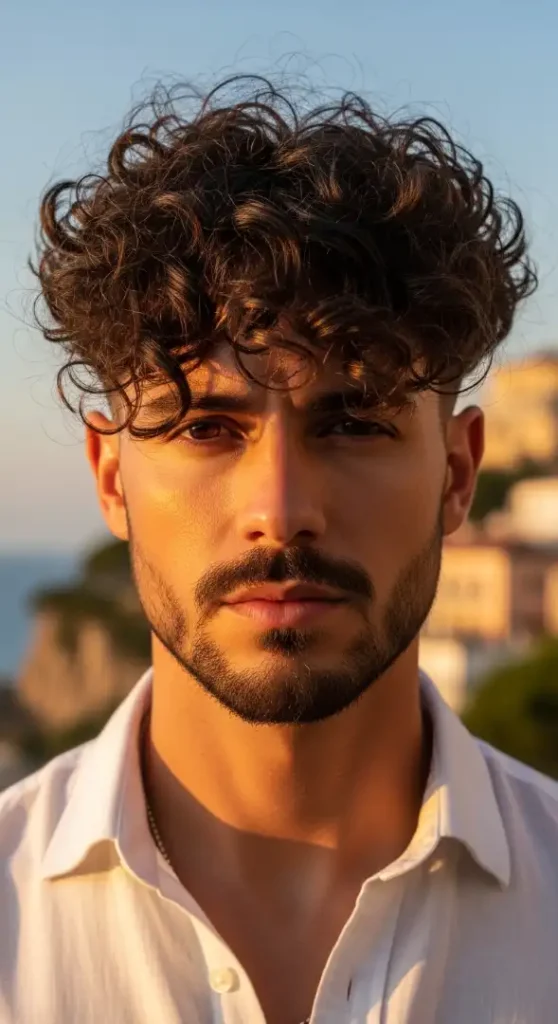
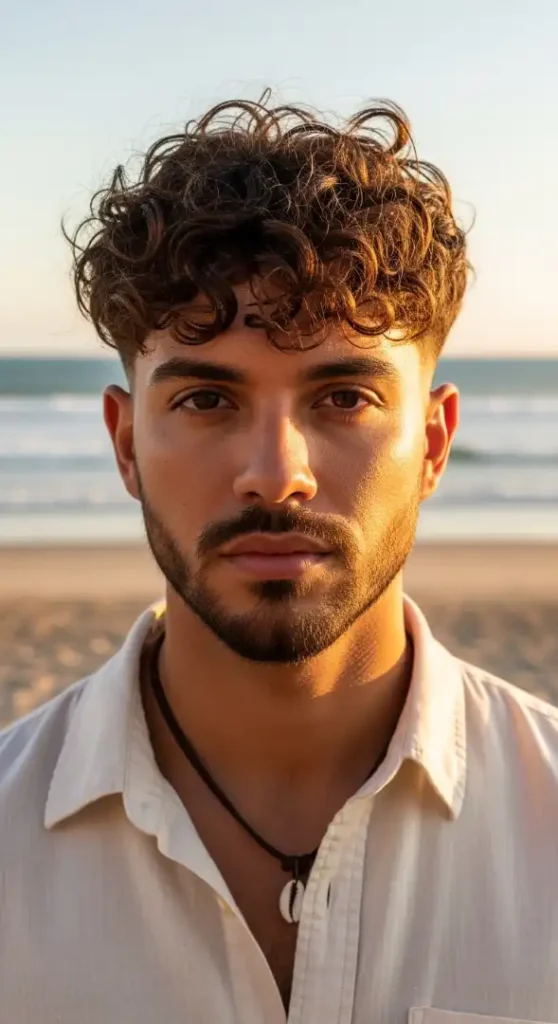
1 of 10 — The Mediterranean Curl Crown
The Complete Style Breakdown
Which Face Shapes Work Best
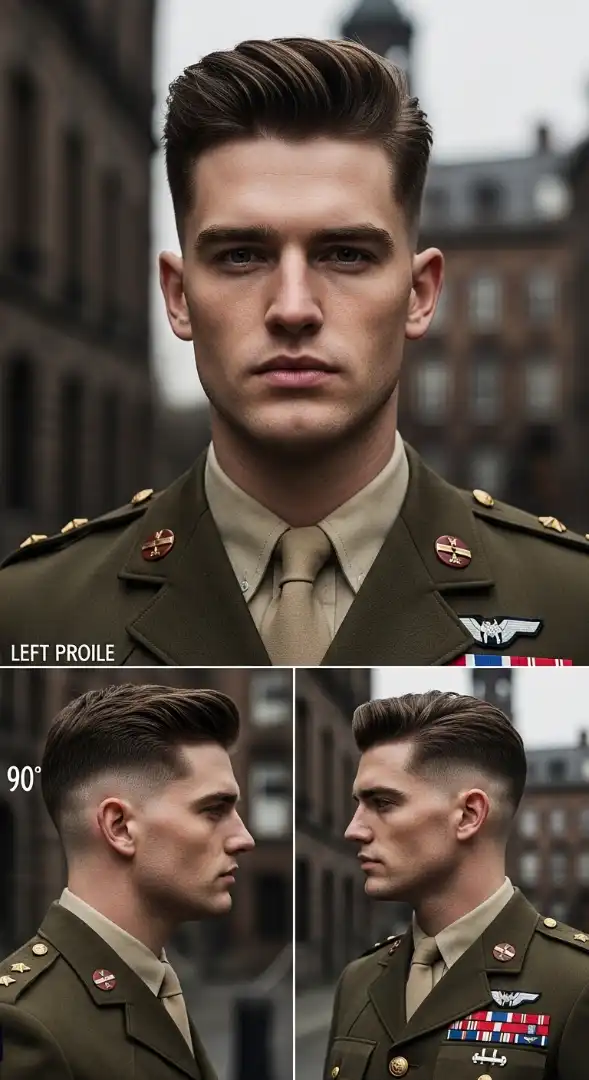
The Mediterranean Curl Crown is exceptionally flattering for Oval and Diamond face shapes. The reason is pure geometry: the natural volume concentration at the crown creates vertical lift, which Diamond faces need to balance wider cheekbones, while the forward-falling curls soften the temples without adding width. For Oval faces, this style maintains ideal proportions — the 3-4 inch curl length adds personality without distorting the naturally balanced structure. Round face shapes should approach cautiously; the horizontal curl spread can widen appearance unless paired with aggressive temple fades.
Your Essential Grooming Arsenal
Your curl success starts with the right tools. Invest in the Wahl Magic Clip for the taper fade work — its stagger-tooth blade handles curly texture without snagging. For edge definition, the Andis T-Outliner is non-negotiable; it creates those crisp temple lines without pulling curls. Your finishing kit needs a wide-tooth Kent comb (never brush dry curls), a Denman D3 brush for wet styling, and a microfiber towel to prevent frizz. Product-wise, Cantu Curl Activator Cream defines without crunch, SheaMoisture Curl Enhancing Smoothie adds hold, and Aunt Jackie’s Don’t Shrink Flaxseed Gel locks definition for 48+ hours. For the fade, your barber needs Andis Master clippers and finishing spray.
Maintenance Reality Check
This is a Medium maintenance style. Salon visits every 3 weeks to maintain the taper fade sharpness — curls grow fast and lose shape definition quickly. Daily routine: 8-12 minutes. Morning refresh requires water reactivation, curl cream application using prayer hands method, air-dry or diffuse on low. Night routine: satin pillowcase mandatory or pineapple your curls in a loose scrunchie. Product refresh every 2-3 days depending on curl porosity. This style demands commitment but delivers massive visual impact.
Barber Communication Script
Walk in and say this verbatim: “I want a low taper fade starting with a #2 guard at the temple, blending to scissor-over-comb work. Keep 3 to 4 inches on top — don’t touch the length, just shape for curl definition. I want the fade to follow my natural hairline curve, tight around the ears but not skinned. For the top, use point-cutting technique to remove bulk without destroying curl pattern. Leave the front slightly longer for forward movement. Blend the fade into the curls gradually — no hard line. Finish with a lineup at the temples and nape, keeping it natural, not boxy.” Show them the front view reference image on your phone.
The next style takes this curl foundation and adds serious edge with an undercut contrast you won’t expect.
FAQ
How do I maintain natural curl definition without frizz between wash days?
Refresh curls every morning using a spray bottle with 70% water and 30% leave-in conditioner, then scrunch upward from the ends. Apply a dime-sized amount of curl cream to damp hair using prayer hands method — this seals the cuticle without disturbing curl clumps. Air-dry or use a diffuser on low heat with a cupping motion. Sleep on a satin pillowcase or pineapple your curls in a loose silk scrunchie to prevent friction frizz. This method maintains 80% of day-one definition for 3-4 days.
Which face shape benefits most from the Mediterranean Curl Crown style?
Oval and Diamond face shapes see the best results because the natural curl volume creates vertical lift that balances wider cheekbones (Diamond) while maintaining ideal proportions (Oval). The forward-falling curls soften temple areas without adding horizontal width. Round faces should pair this style with aggressive temple fades to prevent widening effects. Square faces work well if curls are kept looser and less voluminous at the sides.
How often should I get the taper fade touched up for this curly style?
Every 3 weeks maximum. Curly hair grows faster visually because the coil pattern makes new growth very obvious, especially around the fade line. By week 4, the taper loses its sharp definition and the style starts looking grown-out rather than intentional. If you travel frequently or can’t commit to 3-week intervals, ask your barber for a slightly higher starting fade (#3 guard instead of #2) to buy an extra week.
What’s the difference between this style and a standard curly fade?
The Mediterranean Curl Crown prioritizes natural curl flow and crown volume over aggressive fade contrast. Standard curly fades often take the sides down to skin or #0.5, creating stark separation between top and sides. This style uses a gentler low taper (#2 starting point) with gradual blending, which looks more editorial and less streetwear. The curl length is also maintained at 3-4 inches specifically to create that forward-crown movement rather than maximum height.
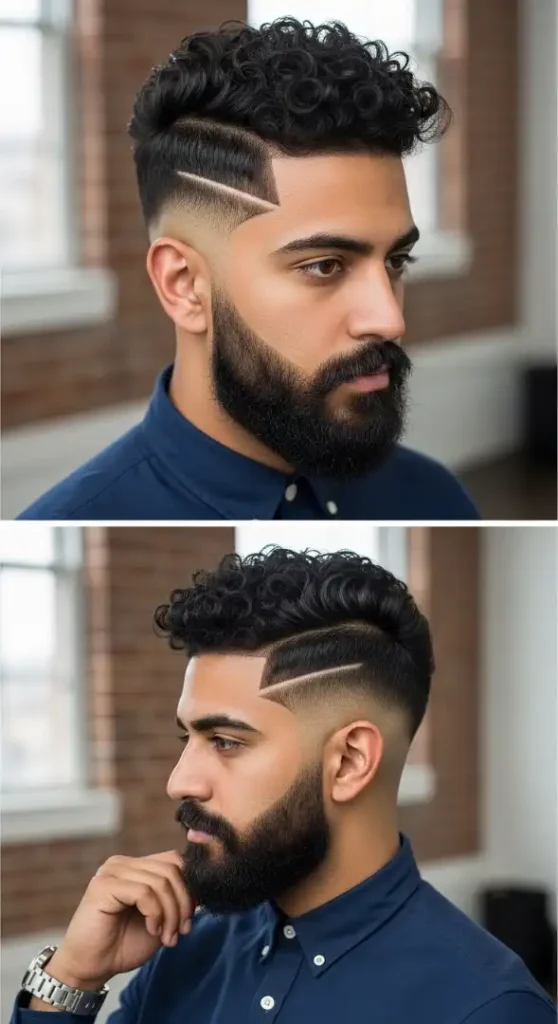
2 of 10 — The Sharp Edge Curly Undercut
The Complete Style Breakdown
Which Face Shapes Work Best
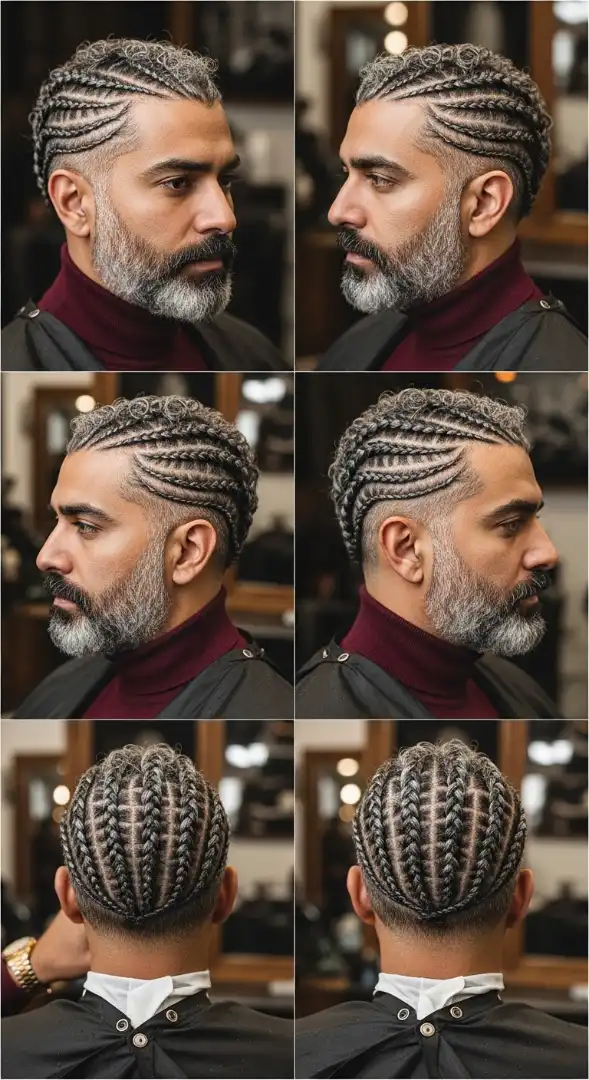
The Sharp Edge Curly Undercut is engineered for Square and Oblong face shapes. The geometric hard part and skin fade create vertical lines that elongate Oblong faces while the concentrated curl volume on top adds necessary width. For Square faces, the undercut disconnect removes bulk from the sides, emphasizing the strong jawline without competing with it — the curls draw the eye upward to balance the angular jaw. Heart-shaped faces should avoid this unless they want to emphasize forehead width. Round faces can attempt this but need the curls kept tighter and lower to prevent balloon effect.
Your Essential Grooming Arsenal
This precision cut demands professional-grade tools. Your barber needs Andis Master Adjustable Blade Clippers for the skin fade work and a Wahl Detailer for the hard part line — anything less creates jagged edges. At home, maintain with the BaByliss Pro FX Skeleton Trimmer for edge touch-ups between visits. For curl maintenance, use a boar bristle brush on damp hair only, never dry. Product rotation: As I Am Curling Jelly for hold without flake, Eco Styler Black Castor Oil Gel for maximum curl definition and shine, Jamaican Black Castor Oil for scalp health under the dense curl weight, and Jack Black Beard Oil to keep the beard soft where it meets the fade. Post-cut, use Bump Patrol on the fade areas to prevent razor bumps.
Maintenance Reality Check
This is High maintenance — no compromises here. Barber visits every 2 weeks mandatory to keep the skin fade clean and the hard part sharp. Miss a visit and the undercut disconnect disappears into grown-out fuzz. Daily routine: 15-18 minutes. Morning requires full curl reactivation: water spray, gel application with finger-coiling technique, diffuse on medium heat while scrunching. The hard part needs edge oil applied weekly to prevent dryness and flaking. Beard requires daily brushing and oil to maintain the blend into the fade. This style is not for travelers or minimalists — it demands consistent access to products and barber chairs.
Barber Communication Script
Tell your barber exactly this: “I want a full undercut with a skin fade — take the sides down to 0000 blade starting at the temple, fade up gradually over 2-3 inches. Carve a hard part on my left side using a straight razor, one finger-width from my natural part line. Disconnect the top completely — I don’t want any blending between the fade and the curls. Keep the top at 2.5 to 3 inches, use a curl-cutting technique to maintain clump definition. Beard needs to taper into the skin fade at cheek level — blend it so there’s no line where beard meets fade. Lineup the hairline and beard edges sharp but follow my natural growth pattern. I want the fade refreshed around the ears and nape.” Bring the profile reference image to show the exact hard part placement.
Style 3 softens this aggressive edge with something unexpectedly romantic — Mediterranean beach texture that looks effortless but isn’t.
FAQ
How do I maintain the hard part line between barber visits?
Apply beard oil or edge control to the hard part line every 3 days to keep the skin moisturized and prevent flaking that makes the line look messy. Use a fine-tooth comb to keep any stray hairs trained away from the part. If hair starts growing into the line by day 10, use a precision trimmer like the Wahl Detailer with no guard to trace the existing line — go slow and follow the original angle exactly. Never shave it yourself with a razor; you’ll create cuts or change the angle. The line should last 12-14 days before needing professional re-carving.
Which products prevent curls from looking greasy with high-shine finishes?
Use gel-based products instead of creams or pomades. Eco Styler Olive Oil Gel provides shine without the greasy feel because it’s water-based and dries down after application. Apply to soaking wet hair, scrunch thoroughly, then diffuse or air-dry completely. Once dry, scrunch again to break the gel cast — this releases soft, shiny curls without grease. Avoid layering multiple products; one gel application is enough. If you need extra shine, use a single spray of Cantu Sheen Spray from 12 inches away after styling is complete.
How often does the skin fade need touch-ups to stay sharp?
Every 2 weeks without exception. Skin fades grow out faster visually than any other fade style because you’re starting from bare skin — even 4-5 days of growth creates visible stubble that dulls the contrast. By week 3, the fade line is completely blurred and the undercut disconnect disappears. If you can’t commit to biweekly cuts, ask your barber to start the fade at a #0.5 or #1 guard instead of true skin; this buys you an extra 4-5 days but reduces the sharp edge effect.
Can this style work with looser curl patterns like 3A or 3B?
Yes, but the visual impact changes. Looser curls (3A-3B) create a softer, more voluminous top that reduces the stark contrast between the undercut sides and curly top. You’ll need more product to maintain curl clumps and prevent the hair from falling flat. Tighter coils (4A-4C) create the most dramatic undercut effect because the curls stack vertically and hold their shape. If you have loose waves, consider adding a curl-enhancing styling technique like finger coiling or using a Denman brush to create more defined curl clumps before drying.
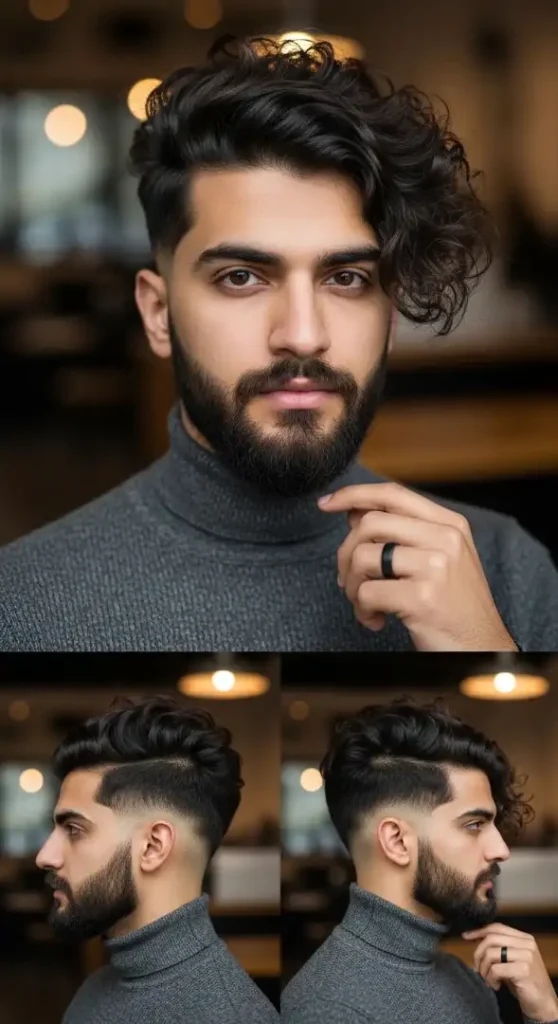
3 of 10 — The Textured Crown Taper
The Complete Style Breakdown
Which Face Shapes Work Best
The Textured Crown Taper is universally flattering but particularly exceptional for Round and Heart face shapes. For Round faces, the 4-5 inch crown height creates vertical elongation that counteracts facial width — the mid-taper removes bulk from the sides without going so aggressive that it emphasizes roundness. Heart-shaped faces benefit from the soft side-swept texture that adds width at the crown to balance a narrower chin, while the taper prevents the sides from flaring out at temple level. Oval faces wear this effortlessly. Square faces should ensure the curls stay loose and textured rather than tight to avoid creating a boxy silhouette.
Your Essential Grooming Arsenal
The natural texture demands gentle tools and lightweight products. Use the Wahl Senior for the mid-taper work — it’s powerful enough for thick curly hair but smooth enough to avoid harsh lines. At home, a wide-tooth Hercules Sägemann comb is essential for detangling without destroying curl clumps. Finishing tools: Denman D4 brush for curl definition while wet, and a hooded dryer attachment if you don’t want to diffuse. Product lineup: Ouidad Advanced Climate Control Heat & Humidity Gel prevents frizz in any weather, Bumble and bumble Curl Defining Cream adds separation without weight, Kevin Murphy Easy Rider gives matte texture for that effortless finish, and Paul Mitchell Tea Tree Hair Lotion adds light hold with natural movement. Beard maintenance requires Honest Amish Beard Balm to keep the 5mm length looking intentional rather than lazy.
Maintenance Reality Check
This is Medium-Low maintenance — the sweet spot for busy lifestyles. Barber visits every 4 weeks to maintain the mid-taper shape and trim crown length. The beauty of this cut is that it looks good grown out; by week 5 it transitions into a natural messy look rather than sloppy. Daily routine: 6-10 minutes. Morning refresh involves light water misting, a dime-sized amount of curl cream raked through, and either air-dry (20 minutes) or diffuse on low (8 minutes). The matte finish means second-day hair works — just fluff with dry hands and go. No intensive nightly routine required. This is the style for men who want textured curls without the product dependence.
Barber Communication Script
Use this exact script: “I want a mid-taper fade starting at a #1.5 guard at the temple area, blending up gradually into 4 to 5 inches on top. Don’t take the fade down to skin — I want a softer transition. Keep the taper tight around the ears but natural at the hairline, no boxy lineup. For the top, use point-cutting and slide-cutting to create texture and remove weight without losing length. I want a side-swept look with natural movement — no hard part, just let it fall where it wants to fall based on my growth pattern. Beard stays at 5mm all over, blend it into the fade at the cheek area so there’s no disconnected line. Finish with a natural lineup that follows my hairline shape.” Show the front and profile images so they see the exact fade starting point and crown texture level.
Next up: we’re taking curls into formal territory with a style that works in boardrooms and bars equally well.
FAQ
How do I get matte texture without making curls look dry or dull?
The trick is product layering in the correct order. Start with a water-based curl cream like Bumble and bumble Curl Defining Cream on soaking wet hair — this provides moisture and initial curl definition. Scrunch thoroughly and let it air-dry 80% of the way. While still slightly damp, apply a tiny amount (pea-sized) of matte clay like Kevin Murphy Easy Rider by warming it between palms and scrunching it into the ends and mid-lengths only, avoiding the roots. This creates texture without the heavy product look. The curls stay hydrated from the cream underneath but finish with a natural matte appearance. Never apply clay to fully dry or fully wet hair.
What’s the difference between a mid-taper and a low taper for curly hair?
A low taper starts the fade just above the ear, leaving more length on the sides and creating a more conservative, grown-in look. A mid-taper (like this style) starts the fade at temple level, removing more bulk from the sides for a cleaner, more modern silhouette. For curly hair specifically, mid-tapers prevent the sides from puffing out as the hair grows, which is common with curlier textures. If you have very thick curls, a mid-taper is almost always better than a low taper because it manages volume proactively.
Can I maintain this style with air-drying or do I need a diffuser?
Air-drying works perfectly for this style if you have time — it actually enhances the natural, effortless texture. Apply your products to wet hair, scrunch to encourage curl formation, and let it air-dry completely without touching it (touching creates frizz). The downside is time: wavy-curly 3A hair takes 45-60 minutes to air-dry fully. A diffuser on low heat with medium airflow cuts this to 12-15 minutes and creates slightly more volume at the roots. Both methods work; choose based on your morning timeline. Never use high heat or you’ll create frizz and destroy curl definition.
How do I prevent the mid-taper from growing out unevenly on both sides?
Uneven fade growth is usually due to uneven hair density or different curl patterns on each side of your head. Ask your barber to account for this during the cut by adjusting the starting guard or blend height slightly on the denser side. Between cuts, use a trimmer with a #1 guard to touch up the lower fade area yourself around week 3 — just trace the existing fade line, don’t go higher. Sleep on a satin pillowcase to prevent one side from getting flattened overnight, which makes growth look uneven even when it’s not. If one side consistently grows faster, book barber visits based on that side’s timeline, not the slower side.
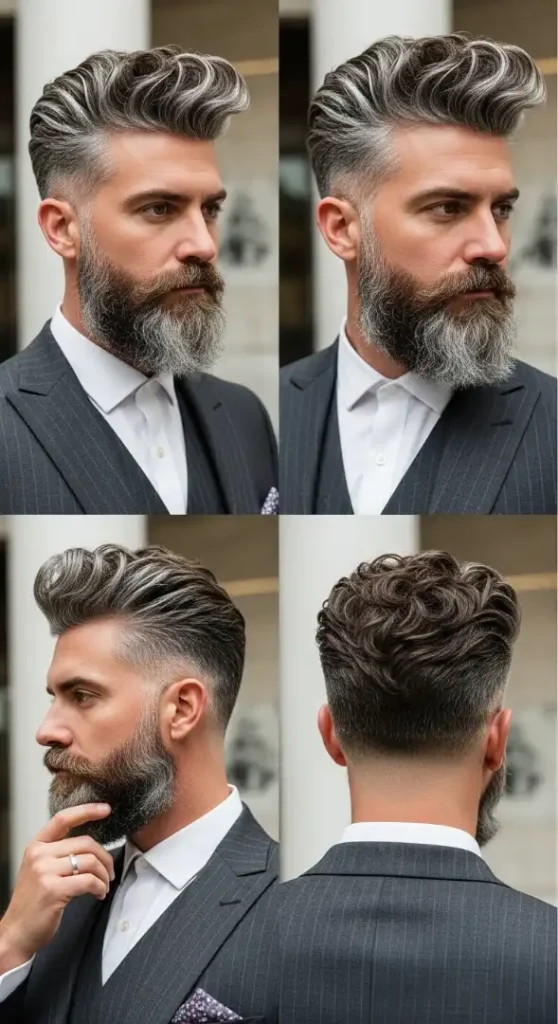
4 of 10 — The Executive Curly Pompadour
The Complete Style Breakdown
Which Face Shapes Work Best
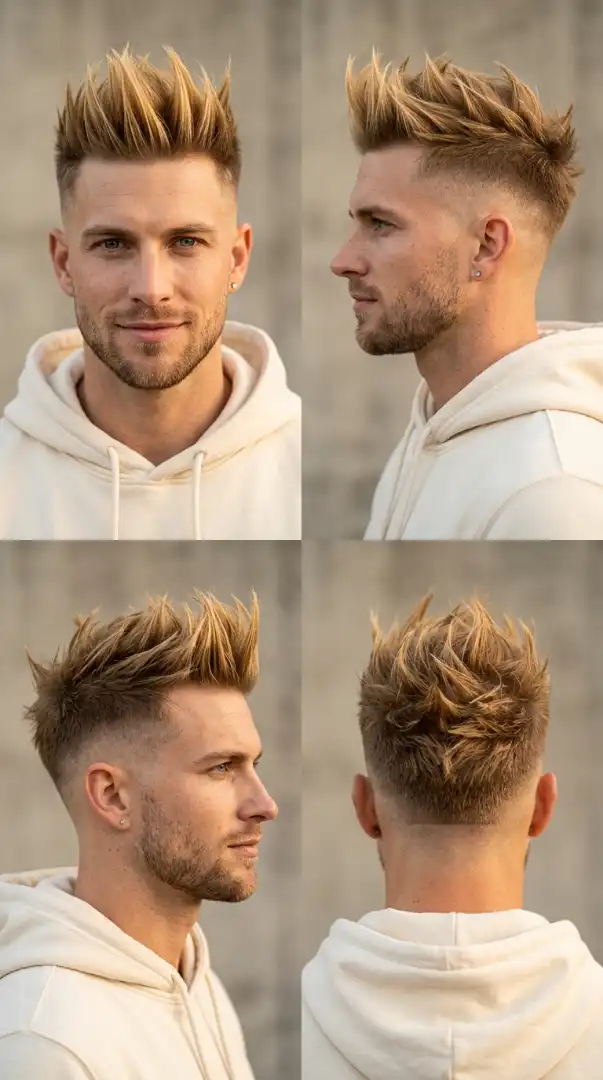
The Executive Curly Pompadour is a power move for Oblong and Oval face shapes. The extreme vertical height of the pompadour (5-6 inches) creates dramatic upward lift that Oblong faces can carry without looking stretched — the width at the crown balances facial length. Oval faces have ideal proportions to showcase this style’s architectural volume without distortion. Square faces work if the pompadour is slightly wider rather than purely vertical to avoid overemphasizing jaw width. Round faces should avoid this style entirely; the height combined with the skin fade sides creates a lollipop effect that exaggerates roundness rather than elongating it.
Your Essential Grooming Arsenal
Professional execution requires premium tools. The high skin fade demands Wahl Five Star Senior clippers for the initial cut and Andis Slimline Pro Li T-Blade Trimmer for edge work and zero-gap detailing. Pompadour styling at home needs a blow dryer with concentrator nozzle (mandatory — diffusers don’t create the lift), a round boar bristle brush for directing curls back while drying, and a wide-tooth vent brush for volume. Product arsenal: Layrite Super Shine Pomade for high-hold with gray hair dimension, Suavecito Premium Blends Matte Pomade for a more natural finish, American Crew Forming Cream for initial structure, Hanz de Fuko Claymation for texture, and Redken Brews Outplay texture pomade specifically formulated for salt-and-pepper hair to prevent yellowing. Beard management requires Honest Amish Beard Balm and Kent 81T beard comb for the 10mm length control.
Maintenance Reality Check
This is High maintenance bordering on extreme. Barber visits every 10-12 days — not negotiable. The high skin fade grows out visibly within a week, and by day 14 the contrast between sides and top is gone, destroying the pompadour effect. Daily styling routine: 20-25 minutes minimum. You must blow-dry using a round brush to create the backward lift — air-drying will not hold the pompadour structure with curly hair. Morning routine includes damp hair prep, blow-dry with directional brushing, pomade application working root to tip, and final shaping with fingers. Carry travel-size pomade for midday touch-ups if in professional settings. This style is for men with access to consistent barbering and who don’t mind daily heat styling.
Barber Communication Script
Communicate precisely: “I want a high skin fade — take the sides down to 0000 blade starting at the temple, fade up over 3-4 inches. The top stays at 5 to 6 inches minimum length — I’m building a pompadour so I need that height. Use point-cutting to create layers and remove bulk without destroying curl volume. Don’t thin the top too much; I need density for the pompadour structure. Beard trimmed to 10mm all over with a clean cheek line — fade the beard into the skin fade at the lower cheek area, no disconnected line. Nape needs to be tight, 0.5 guard taper blending into the neck. Give me a natural lineup at the hairline — not boxy, follow my natural corners. The back of the pompadour should show curl definition, not a solid wall of hair.” Show all four angles so they understand the 360-degree vision.
Style 5 drops the formality but keeps the confidence with a street-culture take on curls that still commands respect.
FAQ
How do I blow-dry curly hair into a pompadour without losing curl definition?
Use a concentrator nozzle on your blow dryer set to medium heat and high airflow. Work section by section: spray each section lightly damp, apply a small amount of forming cream, then blow-dry while using a round boar bristle brush to pull the hair backward and upward at a 45-degree angle. Keep the dryer moving constantly to prevent heat damage. Don’t fully dry each section — leave it about 85% dry to maintain some natural curl texture. Once the entire pompadour is shaped, let it cool for 2-3 minutes, then apply pomade by emulsifying it between palms and working it from roots to ends with upward-backward motions. The key is creating structure with the blow dryer, not obliterating curls completely.
What products prevent salt-and-pepper hair from turning yellow or brassy?
Use a purple-toning shampoo like Joico Color Balance Purple Shampoo once every 7-10 days — this neutralizes yellow tones that naturally occur in gray and white hair exposed to styling products, sun, and pollution. Avoid pomades with heavy oils or petroleum bases, which accelerate yellowing. Water-based pomades like Layrite or Suavecito are safer. If your hair has already yellowed, use a clarifying shampoo like Malibu C Hard Water Wellness to strip buildup, then follow with the purple shampoo. For daily styling, choose products labeled “for gray hair” as they’re formulated without ingredients that cause discoloration.
How often does this style need professional touch-ups to stay sharp?
Every 10-12 days without fail. The high skin fade loses its dramatic contrast by day 7, and by day 14 the sides have grown enough to soften the pompadour’s architectural impact — it starts looking like a grown-out cut rather than an intentional style. If you travel frequently or can’t commit to this schedule, ask your barber to start the fade at a #0.5 instead of true skin, and request a lower fade starting point (mid-temple rather than high-temple). This modification buys you 4-5 extra days but reduces the “executive” sharpness.
Can I style this pompadour without heat, or is blow-drying mandatory?
Heat is mandatory for this specific pompadour structure with curly hair. Air-drying will create volume but not the backward-swept architectural shape that defines the executive pompadour. The curls need directional tension from a brush combined with heat to temporarily reshape the curl pattern into the pompadour flow. If you absolutely cannot use heat, consider a different style — perhaps a curly quiff which works with natural curl direction rather than against it. Alternatively, use large magnetic rollers on damp hair to create backward direction, but this takes 45+ minutes and still doesn’t match blow-dried results.
5 of 10 — The Beach Texture Curly Fringe
The Complete Style Breakdown
Which Face Shapes Work Best
The Beach Texture Curly Fringe favors Oval, Heart, and Diamond face shapes overwhelmingly. For Heart faces, the forward fringe adds width at the forehead to balance a narrower chin — the curls create horizontal expansion exactly where it’s needed. Diamond faces benefit from the soft fringe softening wide cheekbones while the low fade prevents adding bulk at the temples. Oval faces can wear this with zero adjustments. Square faces should be cautious; the fringe can shorten the face visually, and if the curls are too heavy, they create a boxy frame around a boxy face. Round faces should avoid this unless pairing with a higher fade to add vertical elongation.
Your Essential Grooming Arsenal
This low-maintenance cut requires minimal tools but specific products. For the cut itself, barbers need standard Wahl Magic Clip clippers for the low fade and Mizutani scissors for point-cutting the fringe — cheaper scissors crush curl ends instead of cutting cleanly. At home, your only tool is a wide-tooth comb for shower detangling. Product simplicity is key to the beach texture: Bumble and bumble Surf Spray creates salt-texture without the ocean, Ouidad Curl Quencher Hydrating Gel defines curls without crunch or shine, Maui Moisture Curl Quench + Coconut Oil Curl Smoothie for moisture without weight, and Not Your Mother’s Beach Babe Texturizing Sea Salt Spray for second-day refresh. For the 3mm stubble, maintain with Philips Norelco OneBlade set to the #1 guard — quick daily passes keep it intentional rather than lazy.
Maintenance Reality Check
This is Low maintenance — genuinely effortless. Barber visits every 5-6 weeks because the low fade grows out gracefully and the fringe length is forgiving. By week 7 it transitions into a shaggy beach look rather than looking unkempt. Daily routine: 3-5 minutes maximum. Morning routine is literally shower, apply curl cream to soaking wet hair, scrunch, and air-dry while you have coffee. No blow dryer, no brush, no mirror required. The intentional messiness means “perfect” styling isn’t the goal. Second-day hair gets a light sea salt spray mist and scrunch — done. This style is designed for men who reject high-maintenance grooming but still want to look intentionally styled. Perfect for remote workers, creatives, and beach-town dwellers.
Barber Communication Script
Keep it simple: “I want a low fade starting at a #2 guard just above the ear, blending up gradually with no harsh lines. Keep it soft and natural — not aggressive. For the top, leave 3 to 4 inches of length with the front fringe area slightly longer, about 4.5 inches so it reaches my eyebrows. Use point-cutting to create texture and remove weight — I want a piece-y, beachy finish, not a blunt fringe. Don’t over-thin it; I need enough density for the curls to show. Center part with asymmetry — let it fall naturally. Stubble stays at 3mm, no beard shaping needed. Lineup should be super natural — I don’t want sharp edges anywhere, just clean up the neckline and keep everything soft and lived-in looking.” Show the front reference and describe the golden hour vibe you’re going for.
Next: we’re flipping the script with maximum contrast — a style that’s 100% intentional precision versus this effortless flow.
FAQ
How do I get beach texture without making hair feel dry or crunchy?
The secret is applying sea salt spray to damp hair, not dry or wet hair. After shampooing, towel-dry until hair is about 60% dry — still damp but not dripping. Spray sea salt spray evenly through the mid-lengths and ends, avoiding roots to prevent greasiness. Scrunch upward firmly 5-6 times to encourage curl formation and distribute the product. Then apply a small amount (dime-sized) of curl cream or smoothie to the ends only for moisture balance. Air-dry completely without touching. The curl cream prevents the salt spray from drying out the hair while the salt spray creates the texture. This combination gives you matte, beachy texture with soft, touchable curls.
Can I achieve this style with naturally straight hair using products?
Not authentically. Sea salt spray and texturizing products can add wave to straight hair, but they won’t create the defined curl structure this style requires. If you have straight hair and want this look, you’d need to get a perm or use a curling iron daily, which defeats the low-maintenance purpose of the style. However, if you have slight natural wave (2A-2B), you can enhance it with curl-defining cream and scrunching technique to create a similar effect. The key difference: naturally curly hair holds this style with 3 minutes of effort; straight hair would require 20+ minutes of styling daily.
How do I prevent the fringe from falling flat against my forehead?
Flat fringe happens when too much product weighs down the roots. Apply products only from mid-length to ends — never at the root area where the fringe starts. When scrunching, tilt your head upside down or to the side so gravity pulls the fringe away from your face as it dries. If you must blow-dry (humidity situations), use a diffuser on low heat and scrunch upward while drying to create lift at the root. Also check your fringe length with your barber — if it’s longer than 4.5 inches, it gets heavy and will naturally flatten. Keep it trimmed at eyebrow-touching length maximum.
What’s the difference between a curly fringe and a curly quiff?
Direction and structure. A curly fringe falls forward and down toward the eyebrows with natural gravity — it’s relaxed and requires minimal styling. A curly quiff is brushed or blown upward and backward, creating vertical lift and volume at the front — it requires heat styling and product for hold. A fringe works with your natural curl direction; a quiff fights against it. This beach texture curly fringe is specifically low-maintenance because you’re not reshaping the curl direction, just enhancing what naturally happens when your curls fall forward.
6 of 10 — The Statement Curly Mohawk Fade

The Complete Style Breakdown
Which Face Shapes Work Best
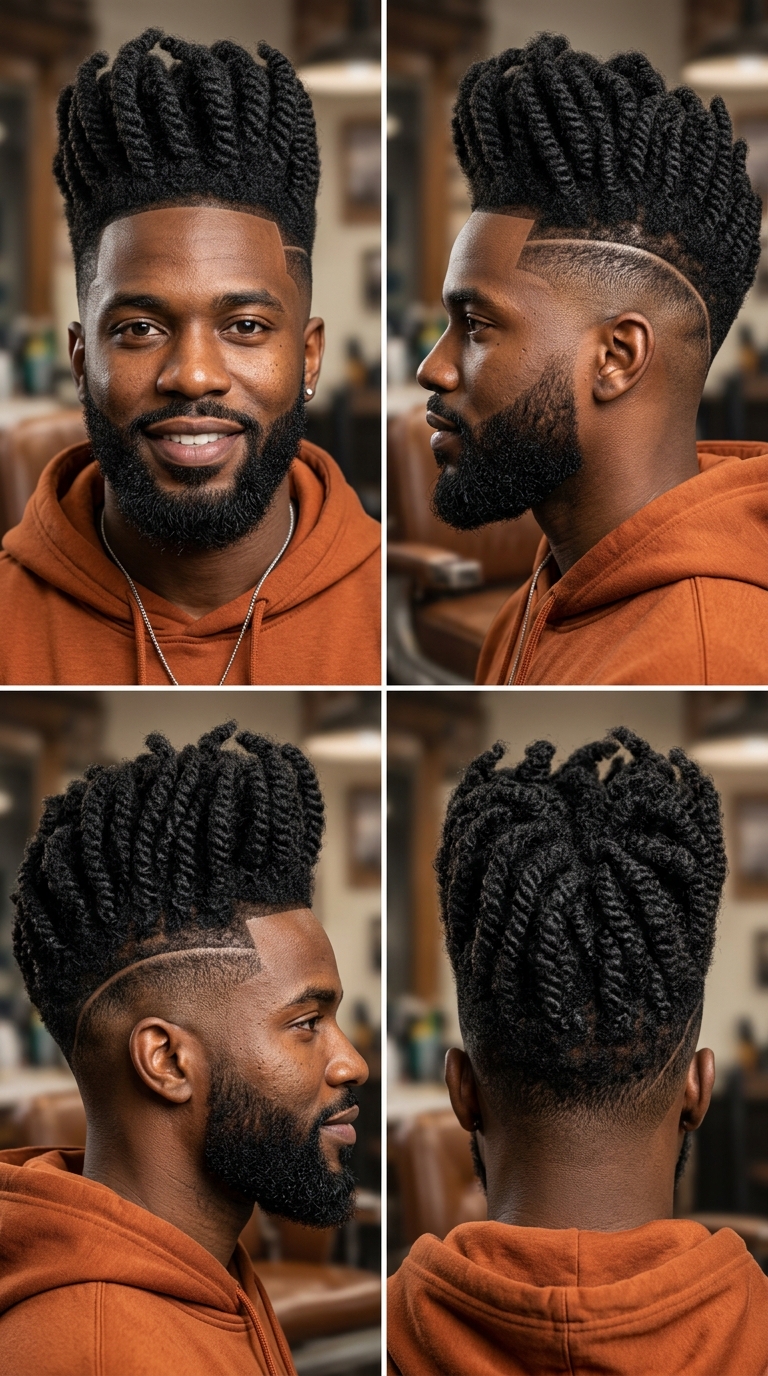
The Statement Curly Mohawk Fade is built for Diamond and Oval face shapes specifically. Diamond faces thrive with this style because the vertical mohawk strip creates height that balances wider cheekbones — the bald sides eliminate all horizontal width, drawing every line of attention to the center ridge and the cheekbones beneath it. Oval faces have the proportional balance to carry extreme styles without distortion. Square faces can attempt this but risk overemphasizing jaw width since the complete side removal leaves nothing to soften the angular jawline. Round faces should absolutely avoid this style; the vertical center strip with bald sides creates a bowling pin effect that exaggerates roundness catastrophically. Oblong faces will look stretched beyond proportion.
Your Essential Grooming Arsenal
This is an extreme cut demanding extreme precision tools. The skin fade requires Andis Master Adjustable Blade Clippers for the bulk work and Wahl Detailer for zero-gap finishing on the bald sides. At home, maintain the mohawk shape with Andis Slimline Pro Li T-Blade Trimmer for edge cleanup every 5-7 days. For the 4A coil structure, you need a pick comb for lift and separation, never a brush which will destroy the curl pattern. Product rotation: Eco Styler Olive Oil Gel for maximum hold and high shine, Cantu Shea Butter Curl Activator for curl definition without flaking, Jamaican Mango & Lime Locking Gel for extreme hold in humid conditions, and Murray’s Edgewax for keeping the mohawk edges sharp. The 12mm beard needs Honest Amish Beard Balm and daily brushing with a Cremo Beard Brush to maintain density appearance and blend into the skin fade seamlessly.
Maintenance Reality Check
This is Extreme maintenance — the highest tier. Barber visits every 7-10 days mandatory because the skin fade grows out visibly within 5 days, and by day 12 the entire mohawk effect is lost to grown-out sides. Daily styling routine: 18-25 minutes minimum. The mohawk strip requires precise gel application, pick-combing for height, and often blow-drying with a concentrator nozzle to set the vertical structure. You must reapply gel daily; 4A coils don’t hold shape overnight without product reactivation. Carry edge control in your bag for midday touch-ups on the mohawk perimeter. This style announces you have time and commitment — it’s not for men with unpredictable schedules or minimal grooming interest. Weekend warriors and creative professionals who use appearance as brand identity are the target audience.
Barber Communication Script
Be explicit and confident: “I want a full mohawk with skin fades on both sides — take the sides down to 0000 blade, completely bald from temple to above the ear. The mohawk strip should be 3 to 4 inches wide running from my hairline straight back to the crown. Keep the mohawk curls at 4 to 5 inches in height — don’t cut into the length, just shape for uniform curl definition using a pick and point-cutting technique. I want complete disconnect between the mohawk and the bald sides — no blending, no fade transition in the mohawk area itself. The sides should be mirror-smooth. Beard stays at 12mm all over with a sharp cheek line that fades into the bald sides — blend it seamlessly so there’s no visible line where beard meets skin fade. Lineup the mohawk edges with a straight razor for precision.” Show both front and profile photos to ensure they understand the width of the mohawk strip and the aggressive side fade.
Style 7 shifts the energy completely — same curl confidence but channeled into something wearable in formal settings.
FAQ
How do I keep the mohawk strip standing upright without it falling to the sides?
Use a two-product layering technique. Start with soaking wet hair, apply Eco Styler Olive Oil Gel heavily through the entire mohawk strip, then use a pick comb to lift and separate the curls straight upward. While the gel is still wet, blow-dry on medium heat using a concentrator nozzle, directing air upward from the roots while continuously picking the curls up. Once 90% dry, apply a second layer of Got2b Glued Spiking Glue (yes, the extreme hold yellow gel) to the roots only — this locks the vertical structure. The combination of gel for curl definition plus spiking glue for root lift creates the standing mohawk effect that lasts 12+ hours.
Which curl patterns work best for a mohawk fade style?
Tighter coil patterns (4A-4C) create the most dramatic mohawk effect because the curls stack vertically and hold their shape naturally with product. Looser curls (3A-3B) can work but require significantly more product and daily heat styling to maintain the vertical structure — they tend to fall sideways instead of standing up. If you have 3A curls and want this style, expect to use strong-hold gel, blow-drying, and potentially even a light hairspray to lock the shape. Wavy hair (2A-2C) cannot achieve this look authentically without a perm or extreme product manipulation that defeats the purpose.
How often do the bald sides need shaving to stay completely smooth?
The 0000 blade creates a skin fade that’s nearly bald but not fully shaved. To maintain complete smoothness, you have two options: (1) Barber visits every 7 days for professional blade work, or (2) Home maintenance every 3-4 days using a Andis ProFoil Lithium Shaver to keep the sides smooth between cuts. Never use a regular razor on your scalp without professional training — you’ll create irritation, ingrown hairs, and uneven patches. The skin fade will show visible stubble by day 5, so if you want mirror-smooth sides constantly, budget for weekly barber visits or learn to use a professional foil shaver correctly.
Can I style the mohawk curls differently for variety, or does it always have to be vertical?
The mohawk structure allows some styling variation. You can slick the curls straight back using pomade for a more streamlined look, sweep them to one side for an asymmetrical mohawk, or twist sections into mini loc-style clusters for textural variety. However, the sides must always remain bald for it to qualify as a mohawk fade — that’s the defining feature. If you let the sides grow out, it becomes a faux hawk or a simple curly top with faded sides. The vertical standing style is the classic mohawk presentation, but you have creative freedom with the curls themselves as long as the bald side contrast remains.
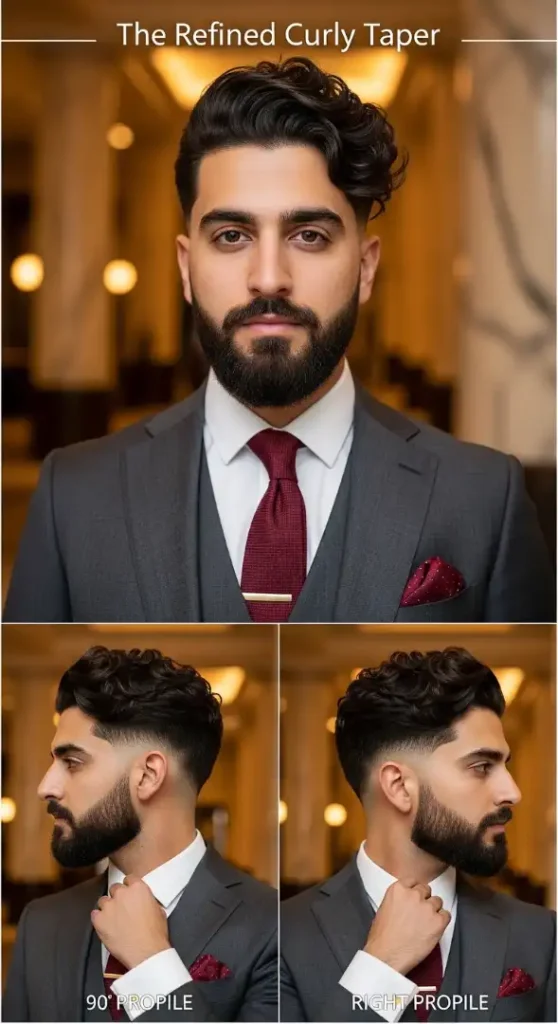
7 of 10 — The Refined Curly Taper
The Complete Style Breakdown
Which Face Shapes Work Best
The Refined Curly Taper is professionally optimized for Oval, Oblong, and Square face shapes. Oval faces wear this with zero adjustments needed — the controlled volume and medium taper maintain ideal proportions while looking polished. Oblong faces benefit from the 3.5-4 inch top length which adds width without excessive height, balancing facial length. Square faces appreciate the gradual taper that softens the jawline without removing all side volume — the medium starting point (#2 guard) prevents the harsh contrast that emphasizes angular features. Round faces need caution; request slightly higher taper starting point (#1.5) to avoid adding width. Heart faces work well due to the swept style adding balance at the crown level.
Your Essential Grooming Arsenal
Professional presentation requires professional tools. The medium taper demands Wahl Magic Clip for the initial fade work and Andis Master for blending precision. At home, maintain edges with the Philips Norelco OneBlade Pro for quick touch-ups. Styling tools: Dyson Supersonic Hair Dryer with diffuser attachment for controlled drying, Denman D3 Brush for wet styling and curl clumping, and a wide-tooth seamless comb for detangling. Product arsenal: Uppercut Deluxe Matte Clay for professional semi-matte finish, American Crew Fiber for workable hold through long business days, Baxter of California Clay Pomade for natural texture with light sheen, Jack Black Protein Booster Skin Serum applied to fade areas to maintain skin health, and Tom Ford Oud Wood Beard Oil for the 7mm beard — subtle fragrance appropriate for close professional quarters.
Maintenance Reality Check
This is Medium-High maintenance with strategic timing. Barber visits every 3 weeks to maintain the medium taper’s professional appearance and trim top length to the 3.5-4 inch sweet spot. By week 4, it transitions into a more casual look but never sloppy — this cut is designed to grow gracefully. Daily styling routine: 12-15 minutes. Morning includes damp hair prep with curl cream, diffuse-drying on medium heat while scrunching, then clay application for final shaping and hold. The semi-matte finish means you can run fingers through your hair during the day without destroying the style. Evening touch-ups before client dinners: 3 minutes with water mist and hand-scrunching. This style respects your professional calendar while maintaining grooming standards.
Barber Communication Script
Communicate with precision: “I want a medium taper fade starting at a #2 guard at the temple, blending up gradually over 3-4 inches into the top. All blending should be smooth with no visible lines — this needs to look executive, not streetwear. Top stays at 3.5 to 4 inches, use point-cutting to remove bulk and create natural movement without thinning too much. I want a soft side part on the left — not a hard carved line, just follow my natural growth pattern and enhance it. Beard trimmed to 7mm all over with a defined cheek line and mustache connection. Blend the beard into the taper at cheek level so there’s a gradual transition, no disconnect. Lineup should be clean but natural — I’m in corporate settings, not a nightclub. Shape the hairline, clean up the nape, keep everything looking intentional but not overly styled.” Show all three angles to convey the professional polish you’re targeting.
Next up: we’re taking curls to their wildest form with a style that’s pure artistic expression over conformity.
FAQ
How do I maintain professional curl definition without excessive shine or grease?
The key is matte or semi-matte products applied to damp hair, not dry. After shampooing, towel-dry to 70% dampness, apply a golf-ball-sized amount of Uppercut Deluxe Matte Clay or American Crew Fiber, distribute evenly with fingers, then scrunch to enhance natural curl pattern. Diffuse on medium heat until 95% dry, then air-dry the final 5% — this prevents the overly-set look. The result is defined curls with natural movement and a professional matte finish that doesn’t look product-heavy. Avoid gels and pomades for boardroom settings; they read as too styled or wet-looking under fluorescent office lighting.
What’s the difference between a medium taper and a mid fade for professional settings?
A medium taper starts at a #2 guard and blends gradually, leaving more length on the sides for a conservative, traditional professional appearance. A mid fade starts lower (often skin or #0.5) and creates more contrast between sides and top, reading as more fashion-forward or creative professional. For traditional corporate environments (law, finance, consulting), the medium taper is safer. For creative industries, tech, or startup cultures, the mid fade works. Both can be professional; the medium taper is simply more universally acceptable across conservative dress codes.
How often should I refresh the side part to keep it looking intentional?
The beauty of a soft side part (versus a hard carved part) is that it follows your natural hair growth, so it doesn’t need constant maintenance. Refresh it every 2-3 weeks during your regular barber visit by having them re-define the part line with scissors or clippers on a higher guard. Between visits, train the part daily: after showering while hair is still damp, use a comb to create the part line, apply product, then diffuse or air-dry without disturbing it. Sleeping on a satin pillowcase prevents the part from getting messy overnight.
Can I achieve this style with tighter coil patterns like 4A or 4B?
Yes, but the visual result will be different. Tighter coils (4A-4B) create more vertical volume and less horizontal flow, so the swept side-part effect is less pronounced. You’ll need to use curl-stretching techniques like blow-drying with a concentrator nozzle and brush to encourage directional flow. The professional polish is still achievable with proper product (use curl creams that provide definition without shrinkage), but expect your curls to stack more vertically than they sweep. The medium taper works beautifully with all curl patterns; the top styling technique is what requires adjustment.
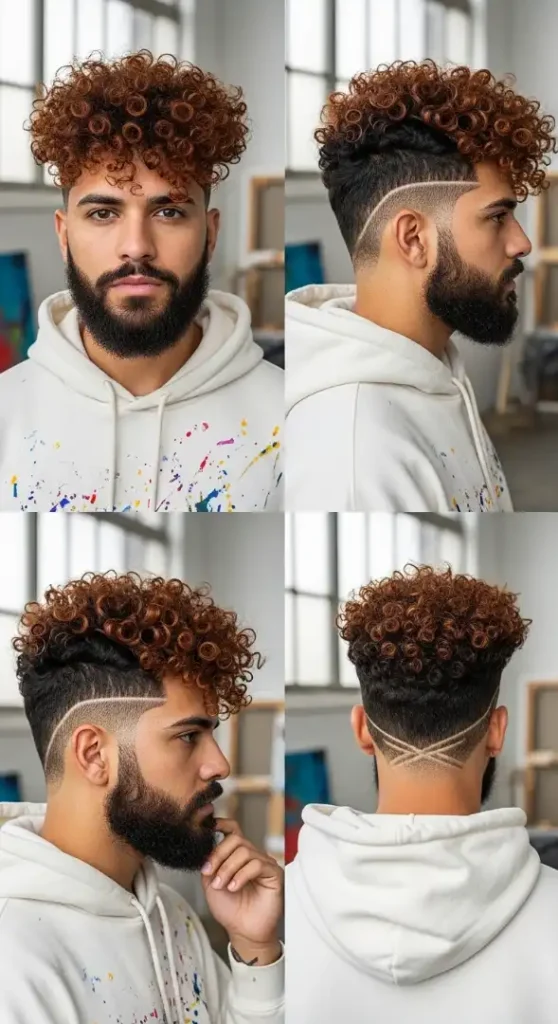
8 of 10 — The Artistic Curly Freeform
The Complete Style Breakdown
Which Face Shapes Work Best
The Artistic Curly Freeform transcends traditional face shape rules because volume is the entire point. That said, Oval and Diamond faces handle the 360-degree volume most harmoniously — the maximum width and height create balanced framing without distortion. Heart faces benefit from the volume adding width at the crown to balance a narrow chin. Square faces work if you embrace the boldness; the curl volume softens angular features dramatically. Round faces should approach cautiously — the horizontal curl spread can widen appearance unless you’re confident owning a bold, artistic aesthetic where proportion rules don’t apply. Oblong faces need to ensure the vertical height doesn’t exceed 7 inches or risk looking stretched.
Your Essential Grooming Arsenal
Freeform curls demand minimal cutting but maximum moisture maintenance. The minimal cleanup requires only Wahl Magic Clip for ear outlines and Andis T-Outliner for nape definition. At home, tools are simple: wide-tooth comb for shower detangling only, satin bonnet for overnight curl protection, and microfiber towel to prevent frizz. The product game is all about hydration: SheaMoisture Jamaican Black Castor Oil Leave-In Conditioner for daily moisture, Aunt Jackie’s Curl La La Defining Curl Custard for definition without crunch, Mielle Organics Pomegranate & Honey Curl Smoothie for twist-outs and curl clumping, Design Essentials Natural Honey Curl Forming Custard for maximum hold on humid days, and Shea Moisture Raw Shea Butter Deep Treatment Masque for weekly deep conditioning. Beard creativity requires Andis Outliner II for geometric line work and Murray’s Beeswax to hold beard shaping.
Maintenance Reality Check
This is Low-Medium maintenance but requires knowledge, not time. Barber visits every 6-8 weeks for light cleanup around ears and nape only — never touching the top length. The freeform philosophy is “let it grow” so minimal cutting is the entire concept. Daily routine: 5-8 minutes. Morning refresh involves water bottle misting, leave-in conditioner application, and finger-coiling any flat sections. No blow dryer, no brush, no mirror obsession required. The beauty is in the imperfection. Night routine is critical: apply light oil (argan or jojoba), pineapple curls in a satin scrunchie or wear a satin bonnet to prevent flattening. Weekly deep conditioning (30 minutes) is mandatory to prevent dryness at this length. This style is for men who reject grooming perfectionism but understand curl health science.
Barber Communication Script
Keep it minimal: “I’m growing out my curls into a freeform style — I don’t want any length cut off the top at all. Just clean up around my ears with a #3 guard, very light taper, and shape my nape naturally. Don’t fade the sides, don’t thin the top, don’t touch the crown length. I want maximum volume everywhere. For the beard, I want geometric line details — one clean shaved line on my right cheek following my cheekbone angle, done with a straight razor for precision. Beard stays at 15mm overall length, just shape it and keep the mustache connected. The whole vibe is artistic and freeform — I’m not looking for traditional barbering, just cleanup and creative line work.” Show the front and back angles to demonstrate the volume you’re maintaining.
Style 9 brings us back to earth with something instantly wearable but still distinctly curly — the perfect bridge style.
FAQ
How do I prevent freeform curls from becoming a tangled matted mess?
Detangle weekly while hair is soaking wet with conditioner as slip. Use your fingers first to gently separate major tangles, then use a wide-tooth comb starting from the ends and working up to roots — never comb from roots down. Apply leave-in conditioner daily to prevent dryness which causes tangling. Sleep protection is critical: satin bonnet or pineapple method every night without exception. If you find matting starting, apply a deep conditioner, let it sit for 20 minutes, then finger-detangle in the shower. Never rip through tangles dry; you’ll create breakage and lose length.
What’s the difference between freeform curls and neglect/dreadlocks?
Freeform curls are maintained as individual curl strands with regular washing, conditioning, and detangling — you’re letting curls grow without cutting, not without care. Freeform locs (dreadlocks) are intentionally left to tangle and mat together into rope-like strands through minimal manipulation and separation. Freeform curls require moisture, detangling, and curl definition products. Freeform locs require separation, palm-rolling, and loc-specific maintenance. They’re completely different hair journeys. This style is freeform curls — you maintain the curl pattern, just without traditional shape-cutting.
Can I add color highlights to freeform curls without damaging the texture?
Yes, but choose the right technique. Avoid full-head bleaching which destroys curl pattern permanently. Instead, request balayage highlights where color is hand-painted onto select curl sections, or money piece highlights framing the face. Use Olaplex No. 3 treatment weekly after coloring to rebuild bonds. Avoid heat styling after color — let curls air-dry only. The auburn highlights in this style are achieved through balayage on specific curl sections, not full bleaching. Work with a colorist who specializes in textured hair; box dye will create uneven results and damage.
How long does it take to grow freeform curls to 6-7 inches from a short cut?
Curly hair grows approximately 4-6 inches per year, but appears to grow slower due to shrinkage — your curls coil up so the actual length isn’t visible. To reach 6-7 inches of styled curly length from a 1-inch cut, expect 14-18 months of growth, assuming you’re trimming damaged ends every 2-3 months. If you’re starting from a fade or buzzed sides, the top section may already have 2-3 inches, meaning 10-12 months of additional growth. Patience is required. Monthly progress photos help track growth since daily changes are invisible.
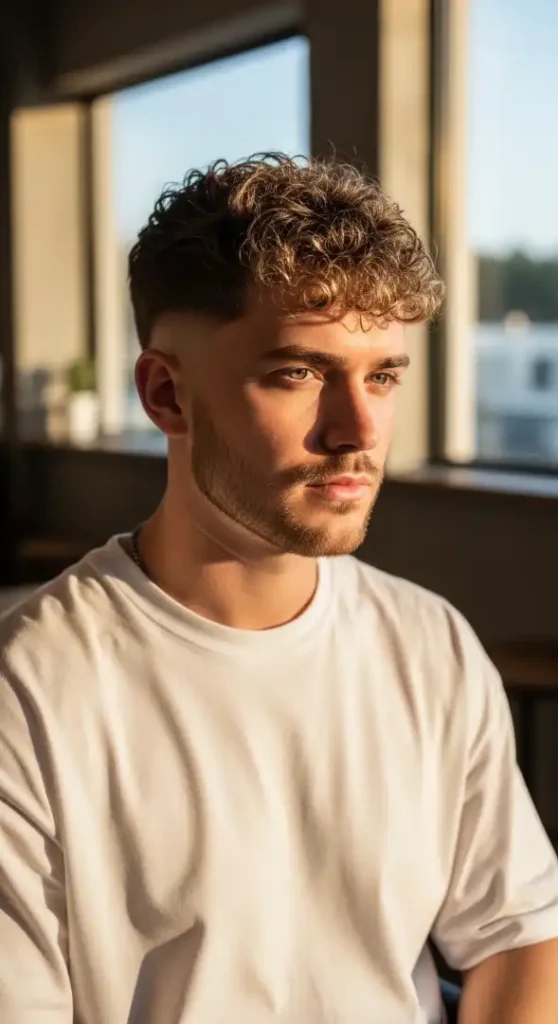
9 of 10 — The Modern Curly Crop
The Complete Style Breakdown
Which Face Shapes Work Best
The Modern Curly Crop is the most universally flattering curly style in this entire collection. Round faces benefit from the vertical texture and high fade combination which creates elongation without aggressive contrast. Oval faces wear this perfectly with zero modifications needed. Square faces appreciate the softened fringe and textured crop which balances angular jawlines without feminizing them. Heart faces gain width at the forehead level from the forward fringe. Diamond faces see their cheekbones balanced by the crop volume. Oblong is the only face shape requiring slight adjustment — keep the top closer to 2 inches rather than 2.5 to avoid adding excessive vertical length.
Your Essential Grooming Arsenal
The crop’s beauty is in its tool simplicity paired with product precision. Cutting requires Wahl Magic Clip for the high fade and Mizutani scissors for point-cutting the crop texture. At home, maintain with Philips Norelco OneBlade for stubble and fade edge touch-ups. Styling tools are minimal: just a wide-tooth comb for wet styling and a microfiber towel. Product rotation: Hanz de Fuko Claymation for maximum texture and matte finish, Baxter of California Clay Effect Style Spray for light hold with natural movement, Kevin Murphy Rough.Rider for piece-y definition, American Crew Forming Cream for softer days when you want less texture, and Bumble and bumble Surf Spray for second-day refresh. The 4mm stubble needs Jack Black Beard Oil applied post-shave to prevent irritation and maintain the intentional stubble look versus patchy growth.
Maintenance Reality Check
This is Low-Medium maintenance — the sweet spot for modern lifestyles. Barber visits every 3-4 weeks to maintain the high fade sharpness and trim the crop to the 2-2.5 inch target. By week 5, it transitions into a slightly shaggier texture but never looks unkempt. Daily styling routine: 4-7 minutes. Morning involves damp hair, clay application with fingers, light scrunching or tousling for texture, and air-dry or quick diffuse. No blow-drying required, no precise styling, no mirror anxiety. The matte finish means it looks good slightly messy — that’s the entire aesthetic. Second-day hair works with water mist and hand-tousling. This style respects your time while keeping you looking intentionally styled.
Barber Communication Script
Simple and clear: “I want a curly crop with a high fade. Take the sides down starting at a #1 guard at the temple, fade up into 2 to 2.5 inches on top. The fade should be clean but not aggressive — I want a modern look, not military. For the top, use point-cutting to create texture and remove weight. I want a forward fringe that barely touches my forehead, textured and piece-y, not a blunt fringe. Keep some length variation on top for natural movement — don’t make it uniform. Stubble stays at 4mm, just shape the neckline and clean up the edges. Natural lineup, not boxy — keep it looking effortless.” Show the front reference image focusing on the crop texture and fringe placement.
Final style incoming — we’re ending with maximum contrast to show the full curly spectrum.
FAQ
How do I style a curly crop to look textured and messy, not flat or helmet-like?
The secret is product application technique, not product amount. Apply clay to damp hair (not soaking wet, not fully dry) — about 70% dry is ideal. Warm a dime-sized amount between palms until it’s nearly invisible, then work it through your hair by raking fingers backward through the crop, then forward, then side-to-side. This creates multi-directional texture. Don’t smooth it down — use fingers to lift and separate curl clumps. The goal is controlled chaos. Air-dry completely without touching it. Once dry, scrunch or tousle lightly with dry hands to break up any stiffness. Never use a brush or comb after product application; that flattens texture.
What’s the difference between a curly crop and a curly fringe?
A curly crop is shorter all over (2-2.5 inches) with relatively uniform length on top and a forward texture direction. A curly fringe has longer length specifically at the front (3-4+ inches) with the fringe being the dominant feature and shorter back/crown area. Crops are boxy and compact; fringes are flowing and dramatic. The crop reads as casual and low-maintenance; the fringe reads as intentionally styled. Both can be worn forward, but the crop’s shorter length creates a tighter, more athletic silhouette.
Can I achieve this style with very tight coil patterns like 4B or 4C?
The visual result will be different but achievable. Tighter coils at 2-2.5 inches create a rounded, defined crop rather than a textured piece-y look. You’ll need curl-defining cream instead of clay to maintain moisture at this short length, and regular use of a sponge brush or finger-coiling technique to create uniform curl definition. The high fade works beautifully with all textures. The main difference: wavy-curly hair (2C-3B) creates the messy textured crop shown; coily hair (4A-4C) creates a sculpted defined crop. Both are valid modern styles.
How often do I need to trim a curly crop to keep it looking sharp?
Every 3-4 weeks for optimal shape. The crop style depends on precise length ratios — when the top grows beyond 3 inches or the fade grows out past 2 weeks, the crop loses its defining silhouette and becomes a generic short curly cut. If you prefer a slightly longer, shaggier version, you can stretch to 5 weeks, but the “crop” identity fades. This is inherently a more frequent-maintenance cut compared to longer styles because the short length means every half-inch of growth visibly changes the shape.
10 of 10 — The Signature Curly Burst Fade

The Complete Style Breakdown
Which Face Shapes Work Best
The Signature Curly Burst Fade is geometrically engineered for Oval, Square, and Diamond face shapes. Square faces benefit massively from the curved burst fade pattern which softens angular jawlines — the radiating curved lines create visual movement that contrasts with hard facial angles beautifully. Diamond faces appreciate how the burst fade draws attention to cheekbones while the curly volume balances the face’s natural width. Oval faces have the proportional versatility to wear this artistic fade without any adjustments. Round faces should approach with intention — request a higher starting point for the burst fade to avoid widening effects. Heart faces work if you maintain volume on top to balance the narrow chin with the dramatic side design.
Your Essential Grooming Arsenal
The burst fade’s complexity demands master-level barber tools and precision home maintenance. Professional execution requires Andis Master Adjustable Blade Clippers for the curved fade work, Wahl Detailer for the intricate burst pattern lines, and BaByliss Pro FX Skeleton Trimmer for outline perfection. At home, maintain edges with the Andis Slimline Pro Li T-Blade for touch-ups between visits. Curl styling needs a Denman D3 brush for curl clumping and a diffuser attachment for controlled drying. Product rotation: Eco Styler Argan Oil Gel for definition with shine control, Cantu Shea Butter Moisturizing Curl Activator Cream for hydration and curl formation, As I Am DoubleButter Cream for thick 3C-4A textures, Shea Moisture Coconut & Hibiscus Curl Enhancing Smoothie for frizz control, and Jamaican Mango & Lime Tingle Shampoo for scalp health. The 9mm sculpted beard requires Cremo Beard Oil and Kent 81T beard comb for daily shaping maintenance.
Maintenance Reality Check
This is High maintenance with artistic payoff. Barber visits every 10-14 days to maintain the burst fade’s curved precision — this fade style grows out faster visually than straight fades because the geometric pattern loses definition quickly. By day 16, the burst effect is gone and it looks like a grown-out taper. Daily styling routine: 15-20 minutes. Morning includes curl reactivation with water and curl cream, gel application for definition, diffuse-drying while scrunching for volume, then final shaping. The burst fade requires edge maintenance; apply edge control every 3-4 days and use your trimmer to trace existing lines. This style is a commitment statement — it announces you prioritize appearance and understand grooming as personal branding.
Barber Communication Script
Be detailed and precise: “I want a curly burst fade. The fade should curve around my ear in a radiating sunburst pattern — start the fade behind my ear and create curved lines that radiate outward following my head’s natural curve. Don’t do a straight traditional fade; I want the curved artistic burst effect. Drop the fade at the temple area to connect with the burst. Take the fade down to skin or 0000 blade at the tightest point. Top stays at 3 to 4 inches with curl definition maintained — use point-cutting to shape but don’t thin aggressively. I need density for the curl volume. Beard at 9mm all over with a sharp cheek line and geometric angles at the jawline — use a straight razor for precision edges. Lineup should be sharp — this is a statement cut, not casual.” Show both front and profile reference images with emphasis on the profile to demonstrate the exact burst curve pattern you want.
This completes the full spectrum — from effortless beach texture to artistic burst geometry, proving curly hair is the most versatile canvas in men’s grooming.
FAQ
What makes a burst fade different from a regular fade or drop fade?
A burst fade curves in a semi-circular radiating pattern around the ear, creating a sunburst or halo effect. A regular fade is a straight vertical transition from short to long. A drop fade curves downward behind the ear but still follows a relatively straight path. The burst fade is the most artistic and complex of the three, requiring precise curved clipper work to create the radiating lines. It’s also the highest maintenance because the geometric pattern is very visible — any growth disrupts the curved effect immediately.
How do I maintain the burst fade pattern between barber visits?
You can’t fully maintain the complex curved pattern at home — that requires professional clipper skills. However, you can extend the sharp appearance by using a T-blade trimmer to trace the existing burst lines every 5-7 days, just cleaning up growth along the existing pattern without changing the shape. Focus only on the outline edges, never attempt to recreate the internal fade blending. Apply edge control along the burst lines to keep the pattern visually crisp. Realistically, budget for visits every 10-14 days if you want the burst fade to always look fresh.
Can the burst fade work with looser curl patterns like 2C or 3A?
Absolutely. The burst fade is a side/back technique independent of top curl pattern. Looser curls (2C-3A) create a softer, more flowing top that contrasts beautifully with the sharp geometric burst fade — it’s actually a popular combination. Tighter coils (3C-4A) create more volume and density which provides maximum drama against the clean fade. The key is ensuring enough curl definition on top to create visual contrast with the sides; if your curls are too loose and undefined, the burst fade becomes the only focal point.
How long does it take a barber to create a burst fade correctly?
A proper burst fade takes 30-45 minutes minimum for an experienced barber, longer if they’re still mastering the technique. The curved clipper work requires multiple passes with different guards, constant angle adjustments, and precision blending throughout the radiating pattern. If a barber quotes you 15-20 minutes for a burst fade, they’re either exceptionally skilled or planning to rush it — rushed burst fades look sloppy with uneven curves. Book extended appointments and expect to pay premium pricing for this fade style; it’s a specialized skill.