
10 Short Men Haircut Trends You Need to Know
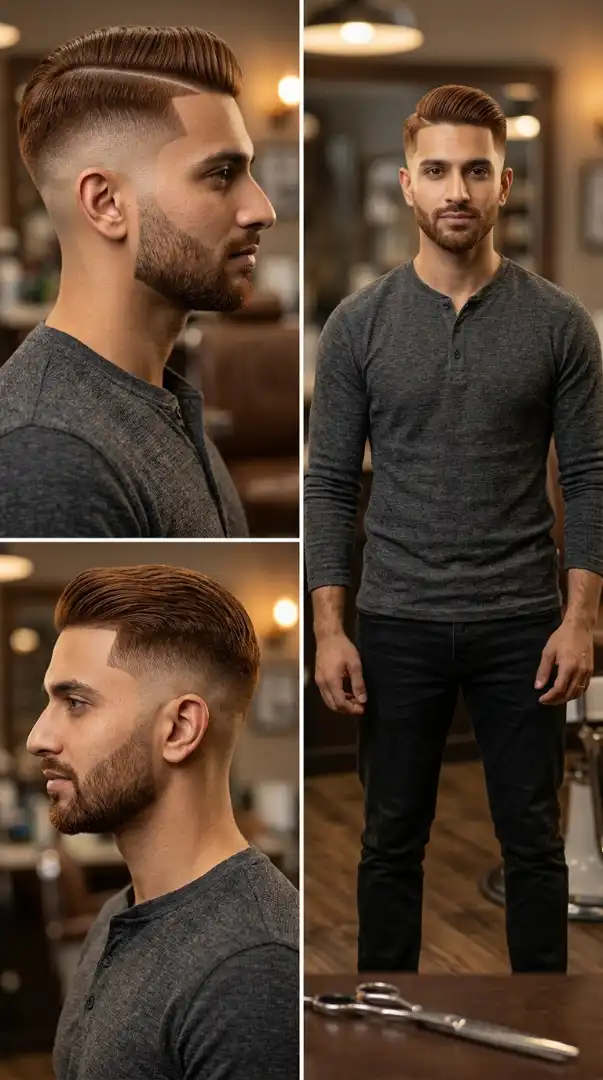
1 of 10 — The Sharp Edge Textured Crop
Which Face Shapes Work Best With This Cut
The Sharp Edge Textured Crop is a geometric masterpiece that works exceptionally well for Oval and Square face shapes. For Oval faces, the horizontal crop line creates a strong focal point that adds structure without overwhelming natural symmetry. The textured top adds visual interest while maintaining balance. For Square faces, this cut is transformative — the horizontal fringe line softens a strong jawline by drawing attention upward, while the textured volume on top creates height that elongates the face vertically. The clean temple fade removes bulk from the sides, which prevents the face from appearing too wide. Round face shapes should approach this style with caution unless paired with extra height on top, as the horizontal crop line can emphasize width. Diamond and Heart face shapes benefit from the added volume at the crown, which balances narrower chins.
Essential Grooming Tools & Products
To maintain The Sharp Edge Textured Crop at home, you’ll need professional-grade equipment. Start with the Wahl Magic Clip cordless clipper for precise fade maintenance between salon visits. The Andis T-Outliner trimmer is non-negotiable for keeping that sharp horizontal crop line defined — this is what separates a fresh cut from a grown-out mess. For daily styling, invest in a Denman D3 brush for blow-drying texture into the top section. Product-wise, American Crew Fiber is the gold standard for this style — it provides medium hold with a matte finish that doesn’t make the hair look crunchy or wet. Use a rice grain-sized amount, emulsify between palms, and work through towel-dried hair. For beard maintenance to complement this cut, the BaByliss Pro FXFS2 foil shaver keeps that 5mm stubble perfectly uniform. On styling days when you need extra texture, Suavecito Matte Pomade works as a secondary option, though it’s slightly heavier than Fiber.
Maintenance Requirements & Time Investment
This is a Medium maintenance cut that requires commitment. You’ll need a barber visit every 3 weeks to maintain the sharp crop line and fade — let it go beyond 4 weeks and the geometric precision dissolves into a generic short cut. Daily styling takes 8-10 minutes: towel-dry hair to 70% damp, apply product, blow-dry forward and upward with the Denman brush using medium heat, then use fingers to create piece-y separation in the fringe area. The morning routine includes a 2-minute beard trim every other day with your foil shaver to keep that 5mm length consistent. The fade section requires zero daily maintenance, but you’ll want to hit it with clippers at home using a #1.5 guard around the 10-day mark between barber visits to keep it crisp. Budget approximately $40-55 per barber visit depending on your city. This cut is not ideal for men who travel frequently without their styling products — without that fiber paste and 10 minutes in the morning, it falls flat and loses its signature texture.
How To Ask Your Barber For This Cut
Walk into the barbershop and say this exact script: “I want a textured crop with a sharp horizontal line across the forehead. Take the top to about 2.5 inches in length with point-cutting for texture — I want piece-y separation, not a solid block. Give me a mid fade on the sides starting about 2 inches above my ears, blend it smooth with a #2 guard transitioning down to a #0.5 at the temple. Keep the fade tight and clean around the hairline. For the front, I want that crop line sharp and geometric — not rounded or softened. Leave about an inch of fringe length so I can style it forward and to the side. Blend the top into the sides with scissor-over-comb, no harsh lines except that front edge. Clean up the nape with a skin taper, and line up my beard to match the fade — keep the stubble at 5mm all around. Finish with a straight razor lineup on the hairline and temples.” Show your barber the front-view image. That horizontal crop line is the key visual — don’t let them round it off.
Curious about pairing this sharp crop with different fade heights? The next style shows you how a skin fade changes the entire energy of a short textured cut.
FAQs:
Q: How do I maintain the sharp horizontal crop line between barber visits?
A: Use an Andis T-Outliner trimmer to clean up the crop line every 10 days at home. Comb your fringe straight down, identify the original line your barber cut, and carefully trim any hairs that have grown past that line. Work in small sections and use short, controlled strokes. Avoid cutting too high — it’s better to leave it slightly longer than to create an uneven line. If you’re uncomfortable doing this yourself, schedule touch-up appointments every 2 weeks instead of waiting the full 3 weeks.
Q: Which face shape suits The Sharp Edge Textured Crop best?
A: Oval and Square face shapes benefit most from this cut. The horizontal crop line adds strong structure to Oval faces without overwhelming natural symmetry, while it softens Square jawlines by drawing the eye upward to the textured crown. Round faces should request extra height on top to avoid emphasizing width. Diamond and Heart face shapes work well with this style as the crown volume balances narrower chins. Oblong faces may find the horizontal line shortens their appearance, which can be a positive depending on preference.
Q: What’s the difference between a textured crop and a French crop?
A: A textured crop features piece-y, separated strands on top with individual definition, achieved through point-cutting and texturizing techniques. A French crop typically has a more uniform, blunt fringe that sits heavier across the forehead with less internal texture. The Sharp Edge Textured Crop emphasizes that horizontal geometric line and strand separation, while a classic French crop has a softer, rounded fringe edge and denser top section. Both feature short sides, but the textured version requires more styling product and daily manipulation to maintain that piece-y look.
Q: How often should I get The Sharp Edge Textured Crop touched up?
A: Every 3 weeks is the sweet spot. The fade loses its crisp graduation around day 21, and the horizontal crop line starts to blur as fringe hairs grow past that geometric edge. If budget is tight, you can stretch to 4 weeks by doing home maintenance on the crop line with an Andis T-Outliner around day 14, and touching up the lower fade section with a #1 guard at home. Beyond 4 weeks, the style loses its defining characteristics and looks like a generic short cut that’s grown out.
2 of 10 — The Executive Skin Fade
Which Face Shapes Work Best With This Cut
The Executive Skin Fade is engineered for Diamond and Oblong face shapes, though it’s surprisingly versatile across most geometries. For Diamond faces, the swept-back pompadour volume and clean skin fade create the perfect balance — the volume at the crown fills out the narrow forehead area, while the ultra-tight sides prevent the cheekbones from appearing too prominent. The key is that graduated fade that removes bulk right where Diamond faces carry the most width. For Oblong faces, this cut is transformative when executed correctly: the pompadour adds forward volume that visually shortens a long face, and the skin fade’s horizontal lines at the temple create width perception that balances vertical length. Square faces benefit from the swept-back styling which softens angular jawlines, though these clients should request slightly more volume on top to avoid the face appearing too blocky. Round faces should approach this style cautiously — the slicked-back pompadour can emphasize roundness unless paired with significant height and a very aggressive skin fade that creates vertical lines.
Essential Grooming Tools & Products
The Executive Skin Fade demands professional-level maintenance tools. Your primary clipper should be the Andis Master — its adjustable blade is essential for the skin fade work your barber does, and you’ll use it at home with a #1 guard for touch-ups. The BaByliss Pro FX870 foil shaver is mandatory for keeping that skin fade section glass-smooth between visits — run it over the lower fade area every 3 days. For the pompadour styling, you need a proper blow dryer (not a $20 drugstore model) — the Dyson Supersonic is worth the investment if you’re wearing this cut daily. For product, Layrite Supershine Cream Pomade is the industry standard for this polished executive look — it provides strong hold with a natural shine that doesn’t look greasy under office fluorescent lights. Use approximately a dime-sized amount on towel-dried hair. Your beard requires the Brio Beardscape trimmer to maintain that perfect 8mm length — its ceramic blades stay cooler during longer trimming sessions. Keep a boar bristle brush (Kent brand preferred) for the backward sweep motion during styling. For touch-up maintenance on the beard edge, the Andis T-Outliner handles the precision work.
Maintenance Requirements & Time Investment
This is a High maintenance cut that’s non-negotiable for the executive lifestyle. Barber visits are required every 2 weeks — the skin fade loses its crisp graduation rapidly, and by week 3 it’s visibly grown out. Each visit runs $50-75 at a skilled barbershop that specializes in skin fades. Daily styling requires 15-18 minutes: shower, towel-dry hair to 60% damp, apply Layrite pomade throughout, blow-dry backward and upward using the boar bristle brush to create that swept volume, finish with a light mist of medium-hold hairspray. The skin fade section needs home maintenance with your foil shaver every 3 days — this 5-minute routine keeps the fade looking fresh between barber visits. Beard maintenance is daily: 3 minutes each morning with the Brio trimmer at 8mm guard setting, followed by beard oil application and edge cleanup with the T-Outliner every other day. This cut is ideal for professionals who understand that grooming is part of their personal brand — it’s not for men who hit snooze three times and run out the door. Budget 2.5 hours monthly for barber visits plus 12-15 minutes daily for styling and maintenance.
How To Ask Your Barber For This Cut
Sit in the chair and deliver this exact instruction: “I want an executive skin fade with a classic pompadour on top. For the fade, start with a #0000 blade at the bottom — true skin bald — and graduate up to a #2 guard at the temple, blending it perfectly with no visible lines. The fade should start about half an inch above my ears and transition smoothly into the longer top section. On top, leave 3 inches of length in the front graduating down to 2 inches at the crown — I want enough length to sweep it back with volume. Cut the top with scissor-over-comb technique for a natural blend, no clipper lines on top. Taper the back of my head, don’t leave it boxy. For my beard, line it up precisely and blend the fade line into my beard edge — no gap between the skin fade and beard. Keep the beard at 8mm length all around, shape the cheek line one finger-width below my natural cheek line, and take the neckline to one finger above my Adam’s apple. Hit the skin fade area with a foil shaver to make it glass-smooth, and finish with a straight razor cleanup on the hairline and beard edge.” Bring the front and side profile images — the pompadour volume and fade graduation are the critical visual references.
Need this level of polish but want something easier to maintain at home? Style 4 reveals the modern crop that gives you executive presence with half the daily styling time.
FAQs:
Q: How do I style The Executive Skin Fade pompadour every morning?
A: Apply a dime-sized amount of Layrite Supershine Cream Pomade to towel-dried hair (60% damp). Use a boar bristle brush while blow-drying, brushing backward and upward from the hairline toward the crown to build volume. Focus heat on the roots for the first 2 minutes to lock in lift, then switch to cool air while continuing the brushing motion. Finish by smoothing the sides with your palms. The entire process takes 12-15 minutes. If you’re rushing, skip the blow-dryer and slick it back wet — it won’t have the same volume but maintains the polished look.
Q: Which face shape suits The Executive Skin Fade best?
A: Diamond and Oblong face shapes benefit most. The pompadour volume balances Diamond faces by filling out narrow foreheads, while the tight skin fade prevents cheekbones from dominating. For Oblong faces, the swept-back volume shortens long proportions, and the fade’s horizontal lines at the temple add width perception. Square faces work well if extra height is added on top. Round faces should request significant height and an aggressive fade to create vertical lines that elongate the face.
Q: What’s the difference between a skin fade and a bald fade?
A: These terms are used interchangeably in most barbershops — both refer to fading the hair down to bare skin at the lowest point. A “skin fade” typically emphasizes the visible skin at the bottom transitioning into hair, while “bald fade” explicitly states the endpoint is completely bald. Technically, both use a #0000 blade or straight razor at the bottom. Some barbers distinguish “skin fade” as going to #0 clipper (very short but not bald) versus “bald fade” going to bare skin, but this isn’t industry standard terminology. If you want guaranteed bare skin at the bottom, say “bald skin fade” or “true skin fade with razor finish.”
Q: How often should I get The Executive Skin Fade touched up?
A: Every 2 weeks maximum. Skin fades lose their crisp graduation fastest of any fade style because the contrast between bare skin and hair is so stark. By day 14, the fade line has moved upward and lost its smooth transition. You can extend to 16 days by doing home maintenance with a foil shaver on the skin section every 3 days, but beyond that, the professional gradient is gone. Budget for 24-26 barber visits annually at $50-75 per visit. This is the cost of maintaining an executive-level appearance.
3 of 10 — The Mediterranean Wave Flow

Which Face Shapes Work Best With This Cut
The Mediterranean Wave Flow is exceptionally flattering for Heart and Oval face shapes, though it adapts beautifully to most geometries when customized correctly. For Heart-shaped faces with wider foreheads and narrower chins, the forward wave movement creates visual weight at the jawline while the side part breaks up forehead width — the waves falling across the face balance proportions by drawing attention to the middle and lower face rather than emphasizing the broad forehead. For Oval faces, this cut is nearly fool-proof: the natural wave texture adds interest without disrupting the balanced proportions, and the low taper fade keeps things clean without creating harsh lines. The 3-inch length allows the waves to form their natural S-pattern while avoiding the mushroom effect that plagues wavy-haired men with overly conservative cuts. Round face shapes should request a higher fade (mid fade instead of low fade) and slightly more length on top to create vertical lines that elongate. Square faces benefit tremendously from this style because the soft wave pattern counterbalances angular jawlines — where harsh geometric cuts can make Square faces look too severe, the flowing waves create organic movement.
Essential Grooming Tools & Products
Wavy hair demands specific tools that honor the natural texture rather than fighting it. Your clipper setup should include the Oster Fast Feed for home fade maintenance — its powerful motor handles thick wavy hair without pulling. For styling, abandon any brush with plastic bristles; wavy hair requires a wide-tooth wooden comb (Cricket brand) to detangle without breaking the wave pattern. The single most important product for this cut is a salt spray — Kevin Murphy Easy Rider texture spray is the professional standard, providing grit and wave definition without the crunchy feel of cheaper products. Apply it to towel-dried hair and scrunch upward to enhance natural wave formation. Follow with a pea-sized amount of Uppercut Deluxe Matt Clay for hold — this product is specifically formulated to work with texture sprays without causing buildup. For beard maintenance on wavy beards, you need a dedicated beard trimmer that can handle the curl pattern — the Philips Norelco 7200 with its adjustable guard system maintains that 6mm length without catching. Beard oil is mandatory for wavy facial hair: Honest Amish Heavy Duty Beard Oil prevents the frizz that plagues wavy beards. Keep a wooden beard comb for training beard waves to grow in your desired direction.
Maintenance Requirements & Time Investment
The Mediterranean Wave Flow sits at Medium maintenance with a specific type of care. Barber visits are needed every 4-5 weeks — wavy hair forgives longer intervals better than straight hair because the texture hides imperfect fade lines. Each visit runs $35-50 depending on your market. Daily styling is minimal but technique-specific: 5-7 minutes total. After showering, don’t towel-dry aggressively — squeeze water out gently to preserve wave formation. While hair is still quite damp, spray Kevin Murphy Easy Rider throughout, scrunch hair upward with your palms to enhance waves, apply Matt Clay to the top section only (avoid the sides), then let it air-dry for the most natural wave pattern. If you must blow-dry, use a diffuser attachment on low heat and don’t touch the hair with your hands during drying — this prevents frizz. The low taper fade requires minimal maintenance between cuts; you can extend the professional look by using your Oster clippers with a #1.5 guard around the ears at the 3-week mark if needed. Beard maintenance is 3 minutes every other morning with the Philips trimmer at 6mm setting, followed by beard oil application — work the oil through with your wooden beard comb. This cut is ideal for men with natural wave texture who’ve spent years trying to straighten their hair; it’s a low-effort style once you accept your natural texture.
How To Ask Your Barber For This Cut
Walk in and say exactly this: “I want to work with my natural wave pattern, not fight it. Give me a low taper fade starting at the middle of my ear, blending up smoothly into 3 inches of length on top. Use point-cutting and texturizing scissors on top — I want the waves to have movement and individual definition, not a solid heavy block. Leave it longer in the front for a side part on my left side; I’ll style it swept across with the wave pattern showing. The fade should be subtle, nothing dramatic — graduate from a #1 guard at the bottom up to the longer top section with a smooth transition. Don’t use clippers on the top section at all, scissors only. Taper the back naturally; I don’t want a shelf or a harsh line. For my beard, shape the cheek line to follow my natural line but clean it up, trim to 6mm length all around with an adjustable guard, and define the neckline about one finger above my Adam’s apple. Leave some texture in the beard to match my wavy hair — don’t sculpt it too precise. I want the fade and beard edge to blend naturally, no harsh disconnect.” Show your barber all three angles from the reference images, especially the front view where the wave pattern and side part are visible. The wave texture is what makes this cut work.
If you’re loving the wave texture idea but want something even shorter and easier for hot weather, wait until you see Style 6’s beach-ready buzz variation.
FAQs:
Q: How do I enhance my natural wave pattern without it getting frizzy?
A: The key is product application timing and technique. Apply salt spray (like Kevin Murphy Easy Rider) to very damp hair — not soaking wet, about 70% water content. Spray throughout, then scrunch hair upward with your palms using a pulsing squeeze motion. Don’t rub or tousle. Add a pea-sized amount of matte clay to the top section only, working it through with your fingers. Let it air-dry completely without touching it — every time you touch drying wavy hair, you create frizz. If you must blow-dry, use a diffuser attachment on low heat, cupping sections of hair in the diffuser bowl without moving the dryer around. The scrunching motion when damp is what creates defined waves instead of undefined frizz.
Q: Which face shape suits The Mediterranean Wave Flow best?
A: Heart and Oval face shapes benefit most. The forward wave movement adds visual weight to narrow chins on Heart-shaped faces, while the side part breaks up wide foreheads. Oval faces can wear this cut effortlessly as the wave texture adds interest without disrupting natural balance. Round faces should request a mid fade instead of low fade and slightly more top length to create vertical elongation. Square faces benefit from the soft wave pattern that counterbalances angular jawlines, creating organic movement that softens harsh lines.
Q: What’s the difference between wavy hair products and curly hair products?
A: Wavy hair products (2A-2C curl pattern) focus on enhancing natural wave formation without weighing hair down or creating excessive hold. They typically have lighter textures like sprays or mousses, providing definition through salt, sea minerals, or light polymers. Curly hair products (3A-4C patterns) are heavier, cream-based formulations with stronger hold agents and more moisture to manage tighter curl patterns and prevent frizz. Using curly-hair products on wavy hair usually results in flat, greasy-looking waves because the formulations are too heavy. Wavy hair needs texture and movement; curly hair needs moisture and hold.
Q: How often should I get The Mediterranean Wave Flow touched up?
A: Every 4-5 weeks is optimal. Wavy hair forgives longer intervals between cuts better than straight hair because the natural texture camouflages minor imperfections in the fade line. The waves also hide awkward grown-out lengths that would be obvious on straight hair. If you’re diligent about home maintenance (using clippers with a #1.5 guard around the ears at week 3), you can stretch to 6 weeks, but the overall shape will start to look overgrown. The sweet spot is 4 weeks for maintaining the precise wave pattern and clean fade.
4 of 10 — The Urban Shadow Taper
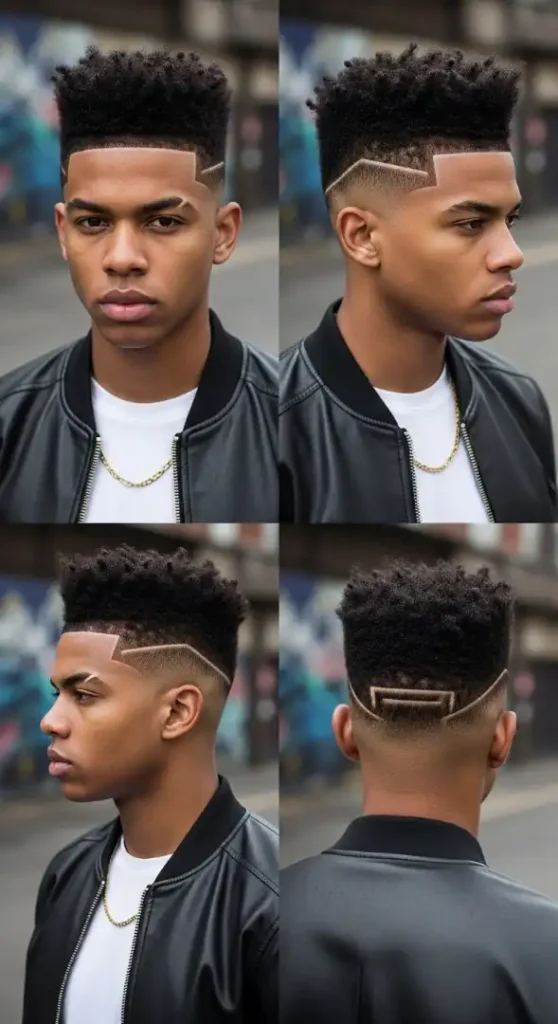
Which Face Shapes Work Best With This Cut
The Urban Shadow Taper is exceptionally powerful for Square and Diamond face shapes, though its geometric precision creates flattering structure for almost any face. For Square faces, the high-top crown with sharp temple corners works with rather than against the natural angular structure — it emphasizes masculinity and creates a cohesive geometric aesthetic where the face and hairstyle form one unified shape. The vertical height on top also elongates the face slightly, preventing the “box head” effect that some Square faces experience with low-profile cuts. For Diamond faces with prominent cheekbones, the shadow fade removes visual weight from the widest part of the face while the flat-top crown adds width at the forehead and crown, creating balanced proportions from top to bottom. Round faces benefit significantly from this cut if executed with enough height on top — the vertical lines of the high-top and the sharp rectangular frame created by the lineup visually lengthen the face. Oblong faces should approach this style cautiously; adding vertical height may overemphasize length unless balanced with slightly more width in the crown section. Oval faces wear this cut effortlessly as always, though the dramatic geometry may feel too bold for conservative environments.
Essential Grooming Tools & Products
Coily hair texture requires specialized tools that respect the unique structure of tightly curled hair. Start with the Andis Master clipper — its adjustable blade and powerful motor are essential for working with dense coily hair without pulling or snagging. The Wahl Detailer trimmer is mandatory for the sharp lineup work this style demands; its T-blade creates those crisp temple corners and edge definition that separate a good Urban Shadow Taper from a mediocre one. For home maintenance between cuts, you’ll need a quality edge-up tool — the BaByliss Pro FoilFX01 foil shaver creates professional-level lineup work at home. Product selection for coily hair focuses on moisture and hold: Shea Moisture Jamaican Black Castor Oil Leave-In Conditioner keeps coils hydrated and prevents dryness that leads to breakage. For styling the crown, Cantu Shea Butter Natural Hair Extra Hold Gel provides strong hold without flaking — use approximately a quarter-sized amount on damp hair. A pick comb (Denman D17) is essential for shaping the high-top crown and creating that perfect flat surface. Between washes, maintain moisture with daily application of Carol’s Daughter Hair Milk Original Leave-In Moisturizer. For lineup maintenance, keep replacement foils for your BaByliss shaver — dull foils create uneven lines.
Maintenance Requirements & Time Investment
The Urban Shadow Taper is High maintenance with weekly barber dependence for optimal appearance. This is the reality of sharp lineup work and shadow fades on coily hair — they look incredible when fresh but have a short window of perfection. Barber visits are required every 7-10 days, with week 1 being premium appearance and days 8-10 being the maximum stretch before the lineup looks grown out. Each visit runs $35-60 depending on your barber’s skill level and market. The shadow fade holds up reasonably well because it’s not as stark as a skin fade, but the lineup is what demands weekly attention. Daily styling requires 10-12 minutes: dampen hair with water spray, apply Shea Moisture leave-in conditioner throughout, work in Cantu gel with fingers, use the pick comb to shape the crown and create the flat-top profile, let it air-dry or use low heat from a blow dryer while picking upward. Home lineup maintenance with the BaByliss foil shaver is possible but requires steady hands and good mirror positioning — you can maintain the front hairline and temple corners every 4-5 days between barber visits, extending the professional look. This adds 5 minutes to your morning routine on maintenance days. The nape requires professional attention; attempting to edge your own nape typically results in uneven lines. This cut is for men who view their hairstyle as a key element of their personal brand and are willing to invest time and money weekly to maintain it perfectly.
How To Ask Your Barber For This Cut
Sit down and deliver this exact script: “I want an Urban Shadow Taper with a high-top and sharp lineup. Give me 2 inches of height on the crown with a flat-top shape — use a pick to shape it flat across the top, not rounded. The sides get a shadow fade starting at my temple — use a #00 blade at the bottom and graduate through #1 to #2 at the temple level, smooth blend with no lines. I want sharp temple corners at 90-degree angles, not rounded. Clean up around my ears with precision; guard work should follow the ear curve perfectly. The lineup is critical — hit my hairline with a T-blade trimmer and create sharp edges at the temples, across the forehead, and at the sideburn points. Make the corners crisp, not soft. Define my natural hairline shape but sharpen it; don’t push it back. For the back, taper the nape tight with a #0 guard and define the neck hairline with a straight razor in a clean horizontal line. I’m going clean-shaven on the face, so edge up my entire perimeter — temples, sideburns, and jawline should all be razor-sharp. Finish by hitting the whole lineup again with a foil shaver to make it glass-smooth.” Bring all four images from the reference set. The front view shows the temple corners and lineup; the side profiles demonstrate the shadow fade graduation; the back view shows the nape work. This is a precision cut where millimeters matter.
Think sharp lineups are too high-maintenance? Style 7 proves you can get geometric precision with longer intervals between cuts.
FAQs:
Q: How do I maintain my lineup sharp between barber visits?
A: Invest in a BaByliss Pro FoilFX01 foil shaver for home maintenance. Every 4-5 days, dampen your hairline, use the foil shaver to trace your existing lineup, working slowly along the temples and front hairline. Use a handheld mirror to check symmetry between left and right temple corners. The key is to follow your barber’s existing lines, not create new ones — you’re maintaining, not redesigning. For the temple corners, work the foil shaver in small circular motions to ensure the 90-degree angle stays crisp. Never attempt the nape at home; leave that for your barber. If you’re uncertain, practice on days when you’re staying home so mistakes aren’t public.
Q: Which face shape suits The Urban Shadow Taper best?
A: Square and Diamond face shapes benefit most from the Urban Shadow Taper. For Square faces, the high-top crown with sharp temple corners emphasizes natural angularity and adds vertical height that elongates. Diamond faces with prominent cheekbones benefit from the shadow fade that removes width at the temples, while the flat-top crown balances narrow foreheads. Round faces work well if the crown has significant height to create vertical lines. Oblong faces should request less height to avoid over-lengthening.
Q: What’s the difference between a shadow fade and a skin fade?
A: A shadow fade uses the #00 or #0 blade at its shortest point, leaving a “shadow” of visible hair rather than going down to bare skin. This creates a softer, more subtle fade with less dramatic contrast between the shortest and longest sections. A skin fade (or bald fade) uses a foil shaver or straight razor to take the lowest section down to completely bare skin. Shadow fades typically last longer between touch-ups (7-10 days vs. 5-7 days for skin fades) because the regrowth isn’t as stark. Shadow fades work especially well on coily hair textures where the #00 blade already creates a very tight, clean look without needing to go completely bald.
Q: How often should I get The Urban Shadow Taper touched up?
A: Every 7-10 days for premium appearance. The sharp lineup is what demands this frequency — temple corners and hairline edges start to blur around day 8 as new growth comes in. The shadow fade itself holds up reasonably well through day 10, but the geometric precision of the lineup is what makes this cut distinctive. If you maintain the lineup at home with a foil shaver every 4-5 days, you can stretch barber visits to every 2 weeks, though the overall shape and crown maintenance still benefit from weekly professional attention. Budget for 40-48 barber visits annually.
5 of 10 — The Classic Short Side Part

Which Face Shapes Work Best With This Cut
The Classic Short Side Part is the most universally flattering cut in this entire collection, working across virtually every face shape with minor adjustments. For Oval faces, this is the default setting — the side part adds asymmetry that prevents oval faces from looking too symmetrical and boring, while the slight pompadour volume creates subtle visual interest. For Round faces, the side part is transformative: it creates a diagonal line across the face that breaks up roundness, and the pompadour volume adds vertical height that elongates. The key for Round faces is requesting more volume on top (2 inches instead of 1.5 inches) and a slightly higher fade to create stronger vertical lines. Square faces benefit from the swept styling that softens angular corners without sacrificing masculinity. The side part’s diagonal angle counterbalances the horizontal lines of a strong jaw. For Diamond faces, this cut balances narrow foreheads and chins by keeping weight distributed across the full top section. Oblong faces should avoid excessive pompadour height and instead request a flatter profile to prevent further lengthening. Heart-shaped faces work perfectly with the side part as it balances wide foreheads with the swept volume distributing visual weight across the face rather than concentrating it centrally.
Essential Grooming Tools & Products
The Classic Short Side Part requires surprisingly specific tools despite looking simple. Your primary styling tool is a fine-tooth comb — the Kent 2T is the barber-shop standard with its precision spacing for creating that razor-sharp part line. Never use a wide-tooth comb for this style; the part will look sloppy. For the pompadour volume, you need a round boar bristle brush (Mason Pearson Pocket Bristle is worth the investment) for blow-drying the front section upward before sweeping it to the side. Product selection is critical for the polished finish: Layrite Original Pomade is the industry standard for this classic style, providing medium-high hold with a natural shine that looks professional under office lighting. Use a nickel-sized amount on damp hair. For extremely fine hair that struggles to hold the side part, Lockhart’s Heavy Hold pomade provides more grip. Keep a small travel-sized comb in your desk or car for mid-day part touchups. The low fade requires minimal home maintenance, but if you want to extend time between cuts, the Wahl Peanut clipper is compact enough for quick touch-ups around the ears. For the clean-shaven look that complements this style, the Braun Series 9 foil shaver provides the closest shave for morning grooming.
Maintenance Requirements & Time Investment
The Classic Short Side Part sits at Medium-Low maintenance with flexible scheduling. Barber visits are needed every 4-5 weeks — the style ages gracefully as it grows out, never hitting that awkward phase that plagues more geometric cuts. Each cut runs $30-45 at a quality traditional barbershop. Daily styling requires 8-10 minutes: after showering, towel-dry hair to about 60% damp, apply Layrite pomade throughout the top section (avoid the faded sides), use the round boar bristle brush while blow-drying the front section upward and backward to create that subtle pompadour volume, then switch to the fine-tooth comb to create the part line by combing from the crown forward to the front, separate the part line, sweep the larger section to the right with the comb, and finish with a light mist of hairspray if needed for all-day hold. The part line can be touched up mid-day in 30 seconds using your pocket comb and slightly damp hands. This cut requires daily washing or at minimum wetting the hair to reset the style — the pomade buildup from day 1 prevents clean restyling on day 2 unless you rinse it out. The clean-shaven face demands 5-7 minutes of morning shaving with your foil shaver. This is the optimal cut for professionals who want a polished appearance without weekly barber dependence or extensive daily routines. The time investment is front-loaded in the morning but requires zero touch-ups throughout the workday once set.
How To Ask Your Barber For This Cut
Sit in the chair and state this precisely: “I want a classic short side part with corporate polish. Create a side part on my left side using a comb and the corner of your clipper blade to cut a clean line — the part should be sharp and visible, not just pushed with a comb. Leave 1.5 inches of length on top, keeping it longer in the front for slight pompadour volume, and taper it shorter as you go toward the crown. Use scissors and comb-over technique on top; no clippers on the top section. Give me a low fade on the sides, starting just above my ears with a #2 guard at the bottom and blending up into the longer top section. The fade should be subtle and professional, nothing dramatic. Taper the back naturally with scissor-over-comb work, no shelf at the nape. Keep the sideburns short and squared off, not pointed. Line up my hairline cleanly with a trimmer but don’t push the hairline back — follow my natural line and sharpen it. I’m going clean-shaven, so make sure the style works with no beard. Finish by showing me how to comb and part it properly so I can replicate at home.” Bring the front-view reference image showing the part line and swept styling. The part line placement and pompadour volume are the defining characteristics your barber needs to see.
If you’re intrigued by this classic approach but want something with more modern texture, Style 8 shows you how to update the side part for 2024 with choppy layering.
FAQs:
Q: How do I recreate the sharp side part line at home every morning?
A: On damp hair after applying pomade, use a fine-tooth comb (Kent 2T). Starting at your crown, comb straight forward to your front hairline to establish the hair direction. Then position your comb at the crown where you want the part to begin — for this style, about 2 inches from the center toward the left side. Press the comb teeth firmly into the scalp and draw the comb forward in a perfectly straight line toward the front hairline. The comb creates a visible channel in the hair that becomes the part. Comb the hair on the larger side (right) across and slightly back. Comb the smaller side (left) flat against the head. The part line should be visible as a clean white line of scalp.
Q: Which face shape suits The Classic Short Side Part best?
A: This cut is universally flattering across all face shapes with minor adjustments. Oval faces wear it effortlessly as the asymmetric part prevents symmetry from looking bland. Round faces benefit from the diagonal part line that breaks up circular proportions, especially with added pompadour height. Square faces gain softness from the swept styling without losing masculinity. Diamond faces achieve balance as the weight stays distributed across the full top. Oblong faces should request flatter styling to avoid over-lengthening. Heart faces work perfectly as the part balances wide foreheads.
Q: What’s the difference between a side part and a hard part?
A: A side part (like this Classic Short Side Part) is created by combing the hair in opposite directions from a single line, creating a natural-looking division that’s maintained with product and daily combing. A hard part is a shaved line cut into the hair with clippers or a straight razor, creating a permanent visible line that doesn’t require daily recreation — it’s literally absent hair. Side parts look more traditional and professional; hard parts look more modern and edgy. Side parts disappear when hair is unstyled; hard parts remain visible even on uncombed hair. For corporate environments, side parts are generally more appropriate.
Q: How often should I get The Classic Short Side Part touched up?
A: Every 4-5 weeks is optimal. This cut ages gracefully — as the top grows out slightly, you can adjust the styling with more pomade and still maintain the professional appearance. The low fade stays clean-looking through week 4, and the top length doesn’t hit awkward stages like shorter geometric cuts do. If you’re stretching it, you can reach 6 weeks by doing home maintenance around the ears with a trimmer at the 3-week mark, but the overall shape and proportion start to look overgrown beyond 5 weeks. The flexibility makes this ideal for busy professionals.
6 of 10 — The Coastal Buzz Fade

Which Face Shapes Work Best With This Cut
The Coastal Buzz Fade is remarkably forgiving and works across most face shapes precisely because it’s so minimal — there’s no styling or length variation to create proportion issues. For Oval faces, this cut is effortlessly flattering as it maintains natural balance without adding or subtracting visual weight anywhere. For Round faces, the buzz fade is surprisingly effective: the skin fade on the sides creates strong vertical lines that elongate, while the uniform short length on top prevents the rounded dome effect that longer styles can create on Round faces. The key for Round faces is requesting a mid or high fade rather than low fade to maximize that vertical elongation. Square faces benefit from the uniform buzz because it doesn’t add bulk anywhere that might compete with the strong jawline — the simplicity lets the facial structure be the hero. Diamond faces work well with this cut as the fade removes width at the temples where Diamond faces are typically narrowest, while the uniform top avoids concentrating too much volume at the crown. Oblong faces should approach buzz cuts cautiously; without styling to add width, a buzz can emphasize length. However, pairing it with facial hair (like this goatee-mustache combination) adds horizontal visual weight that counterbalances.
Essential Grooming Tools & Products
The Coastal Buzz Fade’s appeal is its extreme low-maintenance simplicity, but that doesn’t mean zero tools. Your primary investment is a quality clipper set — the Oster Fast Feed provides the power needed for home buzz maintenance without the cord limitations. For the mid skin fade section, you’ll need the Andis Slimline Pro Li trimmer for detail work around the fade transition zone. Most importantly, invest in a Wahl 5-Star Balding Clipper for maintaining that skin fade at the very bottom — its #0000 blade gets closer than standard clippers. For the #3 buzz on top, you can maintain this yourself at home every 10-14 days; it’s straightforward clipper work. Product requirements are minimal: a basic scalp moisturizer like Jack Black Industrial Strength Hand Healer (works great on buzzed scalps) prevents dryness from sun and saltwater exposure. For the goatee-mustache, you need the Philips Norelco OneBlade for precise edge work and the Wahl Peanut trimmer for maintaining the 4mm length. Beard oil is mandatory for the goatee — Honest Amish Beard Oil keeps facial hair soft and prevents the wiry texture that short beards can develop. Keep a basic SPF facial moisturizer (Neutrogena Men Triple Protect) — buzzed scalps get sun exposure that longer hair protects against.
Maintenance Requirements & Time Investment
The Coastal Buzz Fade is Low maintenance bordering on ultra-low — this is the cut for men who’ve decided styling time is not their priority. Barber visits are needed every 3-4 weeks, though you can stretch to 5 weeks if you’re comfortable with slightly longer growth. Each visit runs $25-40 depending on your area. The beauty of this cut is that it never looks “grown out” in an unprofessional way; it just looks slightly longer. If you’re willing to buzz your own head at home, you can reduce barber visits to every 6-8 weeks solely for the skin fade maintenance. Home buzzing takes 10-12 minutes: use the #3 guard on your Oster clippers, start at the front and work backward in straight lines, overlap each pass by 50% to ensure uniform coverage, check in a handheld mirror for any missed spots, then switch to your Wahl Balding Clipper to touch up the skin fade section (this requires practice but is learnable). Daily styling time is literally zero — you wake up looking the same as when you fell asleep. Goatee maintenance is 3 minutes every other morning: run your Philips OneBlade around the edges to keep the shape clean, use the Wahl Peanut with a 4mm guard to trim any overgrown hairs, apply 3 drops of beard oil. This is the ideal cut for active men, coastal lifestyles, travelers, and anyone who refuses to stand in front of a mirror for 15 minutes each morning. Your grooming budget and time investment are minimal.
How To Ask Your Barber For This Cut
Walk in and be direct: “I want a low-maintenance buzz cut with a mid skin fade. Buzz the entire top with a #3 guard — keep it uniform from front to back, same length everywhere. For the sides, give me a mid skin fade that starts about an inch above my ears. Take it down to bare skin at the bottom using a #0000 blade, then blend it up smoothly through the fade zone into the #3 on top. The fade transition should be smooth and gradual, no harsh lines. Blend the back the same way — mid fade all around the head, symmetrical on both sides. Respect my natural hairline; don’t try to shape it or push it back. I’m keeping a short goatee and mustache — trim both to 4mm length with an adjustable guard, define the goatee edges cleanly along my jawline and under my chin, keep the mustache just above my upper lip line, and blend it naturally into the goatee at the corners. Line up the goatee edges with a trimmer but keep the shape natural, not overly sculpted. Taper my neckline with a #0 guard, no hard line. Finish by hitting the skin fade section with a foil shaver to get it completely smooth.” Show your barber both the front view and side profile so they can see how the fade graduates and where the goatee edge sits. This is an intentionally simple cut — resist any suggestion to complicate it.
Thinking buzz cuts are too military? Wait until Style 9 shows you the artistic buzzed designs that are turning heads on Pinterest right now.
FAQs:
Q: How do I maintain the buzz cut and skin fade at home between barber visits?
A: Buy a quality clipper set with guards. Every 10-14 days, buzz your entire top section with a #3 guard, working from front to back in straight overlapping passes. For the skin fade section, use a #0000 blade clipper or balding clipper to touch up the lowest part around your ears and nape. Work carefully in small upward strokes, blending into the longer section. Use a handheld mirror to check the back of your head. With practice, you can extend barber visits to every 6 weeks by doing the buzz yourself and only going to the barber for detailed fade work. The transition zone where the fade meets the buzz requires professional attention initially, but touch-ups are manageable.
Q: Which face shape suits The Coastal Buzz Fade best?
A: Oval and Round faces benefit most. Oval faces maintain natural balance with the uniform buzz length. Round faces gain vertical elongation from the skin fade’s strong vertical lines, especially when requesting a mid or high fade. Square faces work perfectly as the simple buzz doesn’t compete with strong jawlines. Diamond faces benefit from fade width removal at temples. Oblong faces should pair the buzz with facial hair to add horizontal width and avoid over-emphasizing length. The key is the fade height — higher fades create more vertical elongation.
Q: What’s the difference between a buzz cut with a fade versus just a uniform buzz?
A: A uniform buzz uses the same guard length all over the head, including the sides and back, creating a consistent length from hairline to nape. A buzz cut with a fade (like The Coastal Buzz Fade) keeps uniform length on top but graduates the sides and back shorter through a fade technique, creating a tapered effect. The fade version looks more polished and intentional, while a uniform buzz looks more military or utilitarian. Fades add dimension and modern styling to what would otherwise be a completely basic cut. The fade work is what you’re paying a barber for; a uniform buzz you can do yourself with one clipper guard.
Q: How often should I get The Coastal Buzz Fade touched up?
A: Every 3-4 weeks for professional maintenance. The buzz length grows uniformly, so it doesn’t look unprofessional as it grows — just slightly longer. The skin fade loses its crisp graduation faster, usually around week 4. If you maintain the buzz at home every 2 weeks with your own clippers and touch up the skin fade section, you can stretch professional barber visits to every 5-6 weeks. This is one of the most flexible cuts for scheduling around travel, busy periods, or budget constraints.
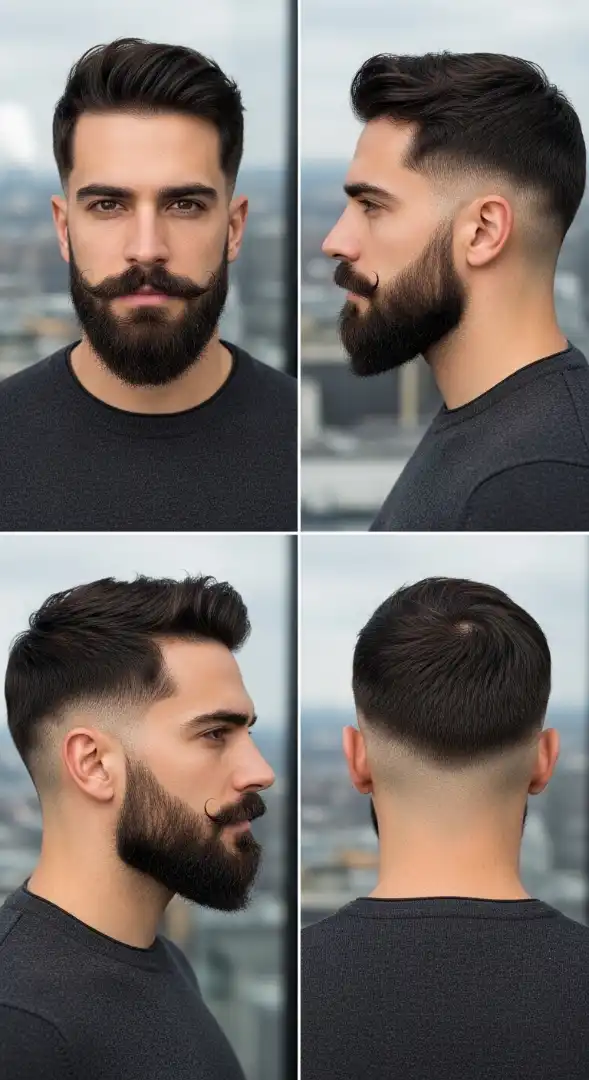
7 of 10 — The Precision Temple Fade

Which Face Shapes Work Best With This Cut
The Precision Temple Fade is engineered specifically for Square and Rectangular face shapes, though it works beautifully on Oval faces as well. For Square faces, the high temple fade creates a rectangular frame effect that actually emphasizes and celebrates the angular structure rather than trying to soften it — this is a confidence move that says “yes, I have strong features and I’m not hiding them.” The clean lines of the temple fade create geometric harmony with a square jawline. The boxed beard adds to this squared aesthetic, creating one cohesive geometric look from hairline to neckline. For Rectangular/Oblong faces, the temple fade’s horizontal emphasis at the temple level creates width perception that balances the vertical length of the face. The middle part also adds horizontal division that shortens the appearance. Diamond faces benefit from the temple fade removing visual weight at the cheekbone level (where Diamond faces are widest), while the volume on top balances the narrow forehead. Round faces should be cautious with this style unless they request significant height and volume on top to create vertical elongation; the horizontal temple lines can emphasize roundness. Oval faces wear this perfectly as the temple fade adds interesting angular detail without disrupting natural balance.
Essential Grooming Tools & Products
The Precision Temple Fade and boxed beard combination demands professional-level tools for home maintenance. Your clipper setup must include the Andis Master for the primary fade work and the Wahl Magic Clip for the top section length. The temple fade’s defining characteristic is that high, clean temple corner — maintaining this at home requires the Andis T-Outliner trimmer with fresh blades; dull blades create jagged temple lines instead of sharp corners. For beard maintenance, the BaByliss Pro FXFS2 foil shaver is mandatory for creating those 90-degree corners at your jawline — a regular trimmer can’t achieve the precision needed for a true boxed beard. Keep a quality pair of barber scissors (Jaguar Jay 2 5.5″) for trimming the longer top section yourself between cuts if needed. Product-wise, for thick straight hair like this, American Crew Fiber provides medium hold without weight. Use a dime-sized amount on towel-dried hair, work through with fingers, and comb into place with a fine-tooth comb. For the boxed beard at 7mm, use Beardbrand Utility Beard Oil to keep the beard soft and manageable — apply 4-5 drops daily after showering. The beard needs a wooden comb for training hairs to grow downward rather than outward, maintaining that boxed shape. Purchase a three-way mirror setup if you’re maintaining this at home; the temple fade and beard corners require seeing all angles.
Maintenance Requirements & Time Investment
The Precision Temple Fade is High maintenance specifically because of the temple fade’s sharp corners and the boxed beard’s precise edges. Barber visits are required every 2-3 weeks maximum — the temple fade loses its geometric precision rapidly as hair grows in. Each visit runs $45-65 at a skilled barber who specializes in precision fade work; not every barbershop can execute temple fades cleanly. Daily styling requires 12-15 minutes: dampen hair, apply American Crew Fiber, comb from crown forward to establish the middle part, sweep each side equally away from the part, ensure the front has subtle forward movement rather than slicked-back flatness. The temple fade itself requires no daily maintenance but benefits from home touch-ups with your T-Outliner around day 10 if you’re stretching to 3 weeks between professional cuts — spend 5 minutes carefully tracing the existing temple corners to remove new growth. The boxed beard is the high-maintenance element: daily edge maintenance with the foil shaver (5-7 minutes) to keep those 90-degree jawline corners sharp, trimming with a 7mm guard every 3 days to maintain uniform length, and daily beard oil application. This cut is for men who view grooming as an essential part of their personal presentation and are willing to invest both time and money in maintaining precision. If you’re not committed to weekly or bi-weekly barber visits, this style deteriorates into a generic short cut.
How To Ask Your Barber For This Cut
Sit in the chair and deliver this exact script: “I want a precision temple fade with a structured top and a boxed beard. For the temple fade, start the fade high at the temple corners — I want a clean rectangular frame around my face. Take it from #0 at the bottom up to #2 at the temple level, then blend smoothly into the 2.5 inches of length on top. The temple corners need to be sharp 90-degree angles, not rounded. Use a T-blade trimmer to create crisp lines at the temples. For the top section, leave 2.5 inches of length cut with scissors, keep it relatively uniform across the crown with subtle layering for texture. Create a subtle middle part — not a hard part, just a natural division so I can sweep it to both sides. Taper the back and sides smoothly; the fade should wrap around the head symmetrically. For my beard, I want a full boxed beard at 7mm length all around. Create sharp 90-degree corners at my jawline using a foil shaver — the corners should be crisp, not rounded. Define my cheek line about one finger-width below my natural line, keep it straight and symmetrical on both sides. The neckline should be horizontal and sharp, about one finger above my Adam’s apple. Blend the temple fade into my beard’s top edge seamlessly, no gap or disconnect. The beard shape is rectangular — sides are vertical, bottom is horizontal, corners are square.” Show your barber all three reference images, especially the front view showing the temple fade frame and the left profile demonstrating the jawline corner.
Loving the precision but intimidated by the maintenance? Style 10 delivers similar sharpness with 50% less weekly upkeep.
FAQs:
Q: How do I maintain the sharp temple corners between barber visits?
A: Use an Andis T-Outliner trimmer with fresh blades. Around day 10 after your barber visit, dampen the temple area slightly, identify the existing corner lines your barber created, and carefully trace over them with the T-Outliner to remove new growth. Work slowly in short strokes, checking frequently in the mirror. Don’t try to reshape or redesign the corners — you’re maintaining existing lines, not creating new ones. Hold the trimmer at a 45-degree angle to your head for the vertical temple line, then switch to horizontal for the line across the top. Use a three-way mirror to check symmetry between left and right temples. With practice, this 5-minute maintenance routine extends the professional look from 2 weeks to 3 weeks.
Q: Which face shape suits The Precision Temple Fade best?
A: Square and Rectangular face shapes benefit most. For Square faces, the high temple fade creates a geometric frame that celebrates angular features rather than softening them, creating cohesive aesthetic harmony. Rectangular faces gain width perception from the temple fade’s horizontal emphasis, balancing vertical length. Diamond faces benefit from width removal at the cheekbone level while maintaining volume on top. Oval faces wear this style effortlessly. Round faces should request significant top volume to create vertical elongation, as horizontal temple lines can emphasize roundness without that vertical counterbalance.
Q: What’s the difference between a temple fade and a regular fade?
A: A regular fade (low, mid, or high) starts the fade graduation at varying heights around the ear and temples, creating a gradual transition from longer to shorter. A temple fade specifically emphasizes the temple corners with high, sharp angular lines that frame the face geometrically, starting the fade work at the upper temple (where the hairline meets the temple area) and creating distinct corner angles rather than smooth curves. Temple fades prioritize geometric precision and sharp corners; regular fades prioritize smooth gradual blending. Temple fades are more architectural; regular fades are more organic.
Q: How often should I get The Precision Temple Fade touched up?
A: Every 2-3 weeks maximum. The sharp geometric corners and high temple placement mean new growth becomes visible quickly, usually around day 14. The boxed beard’s precise edges also require frequent maintenance to stay sharp. If you do home touch-ups on temple corners and beard edges around day 10, you can stretch to 3 weeks, but beyond that, the defining precision disappears. Budget for 20-24 barber visits annually at $45-65 per visit. This is a premium maintenance style that requires consistent investment.
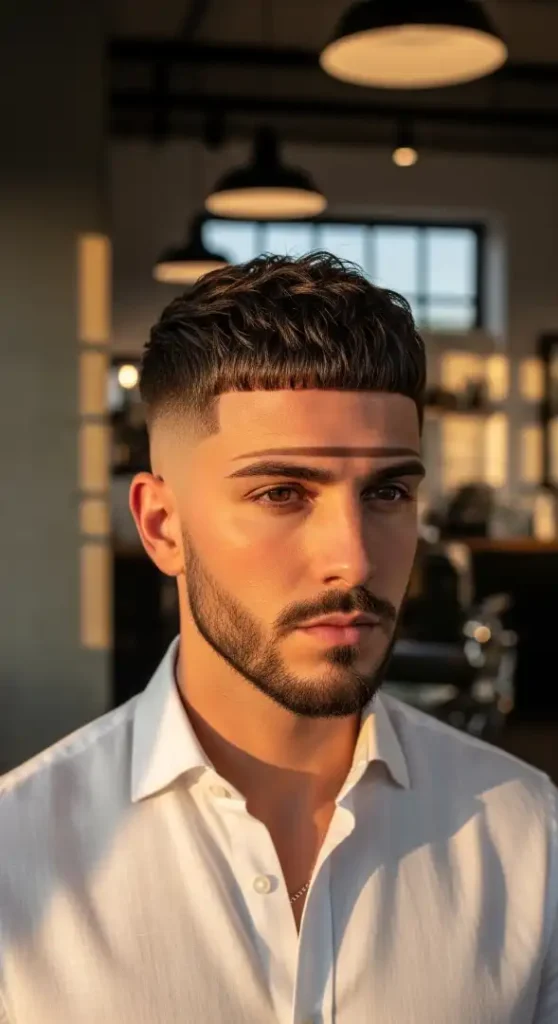
8 of 10 — The Modern Choppy Crop
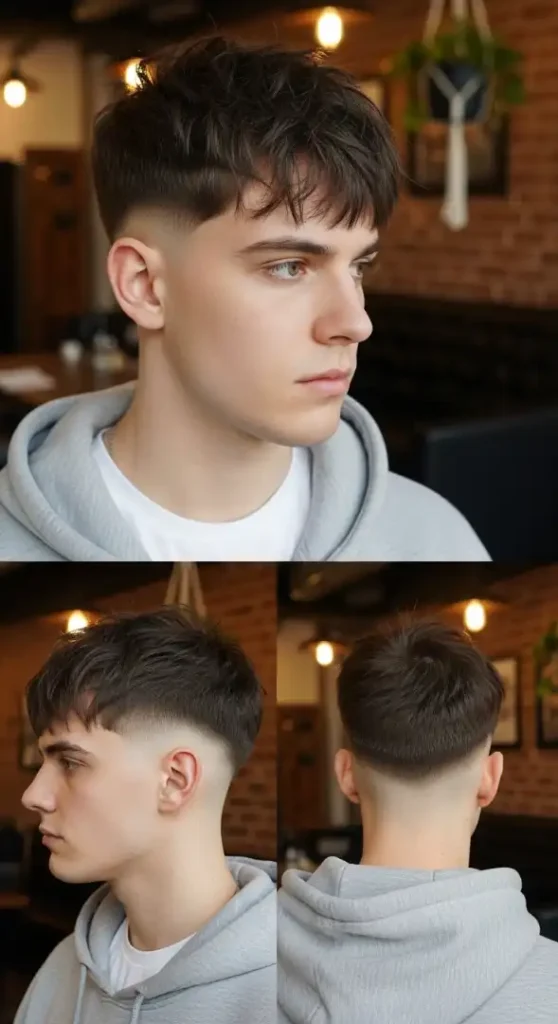
Which Face Shapes Work Best With This Cut
The Modern Choppy Crop is exceptionally flattering for Oval and Heart-shaped faces, though it adapts well to most geometries with proper customization. For Oval faces, the choppy texture and forward fringe add visual interest and casual style without disrupting natural balance — the messiness prevents Oval faces from looking too “perfect” or symmetrical. The piece-y layers create dimension that photographs incredibly well. For Heart-shaped faces with wider foreheads and narrower chins, the forward choppy fringe creates visual weight at the lower face while the textured volume disguises forehead width. The key is keeping enough length and texture in the fringe to create that forward movement. Round faces should request the choppy layers to be cut with more vertical orientation (standing upward rather than falling forward) to create height that elongates; the mid fade on the sides already helps by creating vertical lines. Square faces benefit from the soft, organic texture that counterbalances angular features — where geometric cuts can make Square faces look severe, the choppy messiness creates approachable casualness. Diamond faces work perfectly with this cut as the choppy crown volume balances narrow foreheads while the fade removes width at the cheekbones. The disconnected nature of the cut (sharp contrast between long choppy top and short faded sides) makes it inherently versatile.
Essential Grooming Tools & Products
The Modern Choppy Crop requires specific products that enhance texture rather than slicking it down. Your clipper should be the Oster Fast Feed for maintaining the mid fade at home. For styling the choppy texture, abandon traditional pomades and waxes — you need a matte clay or sea salt spray. Uppercut Deluxe Matte Clay is the professional standard for this exact style, providing strong hold with zero shine and excellent texture enhancement. Use approximately a dime-sized amount on towel-dried hair. For extra texture (especially if your hair is naturally straight and fine), layer Kevin Murphy Easy Rider salt spray under the clay — spray throughout damp hair, scrunch it to create texture, let it partially air-dry, then work in the clay. You need a texture-enhancing pre-styler: Hanz de Fuko Quicksand applied to damp hair before blow-drying creates grit and texture that makes the choppy layers more defined. For blow-drying, use a regular round vent brush (not boar bristle — you want lift, not smoothing) to direct hair forward and create the piece-y fringe. Don’t over-dry; leaving hair slightly damp when you apply product creates better texture than bone-dry hair. Keep a small travel tin of the Uppercut clay for mid-day texture refresh. If your hair is naturally wavy or coily, you may not need the salt spray — just the clay. For maintaining the mid fade at home, the Wahl Peanut trimmer handles detail work around the ears.
Maintenance Requirements & Time Investment
The Modern Choppy Crop sits at Medium maintenance with flexible styling options. Barber visits are needed every 4-5 weeks — the choppy texture actually looks intentional as it grows out, never hitting that “I forgot to get a haircut” appearance. Each visit runs $35-50 at a skilled barber who understands modern texturizing techniques (not every barbershop does). Daily styling requires 10-15 minutes: dampen hair thoroughly, spray Kevin Murphy salt spray if using, rough-dry with a blow dryer while using your fingers (not a brush) to create messy texture and direct the fringe forward, when hair is 80% dry, work Uppercut Matte Clay through with your fingers using a grabbing/pulling motion to create piece-y separation, finish by using your fingertips to pull and twist individual sections for that choppy definition. The beauty of this style is that “perfectly styled” isn’t the goal — intentional messiness is the aesthetic, which means slight variations day to day look natural rather than sloppy. On lazy mornings, you can skip the blow-dryer and just work the clay through damp hair, scrunch it forward, and let it air-dry for a more relaxed version. The mid fade requires minimal maintenance between cuts, though touching up around the ears with your trimmer at week 3 keeps it crisp. This cut is ideal for younger professionals, creative fields, and men who want style without the polished formality of slicked looks.
How To Ask Your Barber For This Cut
Walk in and say this exactly: “I want a modern choppy crop with heavy texture and a disconnected fade. For the top, leave about 2 inches of length but I want it cut with extreme texturizing — use point-cutting, razoring, whatever technique creates the most choppy, piece-y texture. I want disconnected layers with varying lengths throughout the top, not a uniform flat crop. Cut it so the hair naturally wants to fall forward toward my forehead. Create a messy forward fringe with piece-y separation, not a blunt line. For the sides, give me a mid fade starting at the middle of my ears, using a #1 guard at the bottom and blending up into the longer disconnected top section. The contrast between the top and sides should be dramatic — I want that modern disconnected look, not a smooth blend. Taper the back naturally; avoid creating a shelf at the nape. Keep the top section long enough that I can style it with texture products to create movement and mess. I’m going clean-shaven, so make sure the overall style works without a beard. Show me how to style the texture at home so I can recreate the choppy, piece-y look.” Bring all four reference images, but especially the front view showing the choppy fringe and the back view demonstrating how the texture works from all angles. The texturizing technique your barber uses is critical — if they just use scissors without point-cutting or razoring, you won’t get the choppy effect.
If you’re loving this textured messiness but want something even shorter for summer, Style 9 shows you the ultra-short textured buzz that’s taking over Instagram.
FAQs:
Q: How do I create the choppy, piece-y texture at home every morning?
A: Start with towel-dried hair (about 70% damp). Apply a small amount of sea salt spray (like Kevin Murphy Easy Rider) if your hair is naturally straight — this creates grit. Rough-dry with a blow dryer using your fingers to create messy texture, directing hair forward toward your forehead. Don’t comb or brush it smooth. When hair is 80-90% dry, take a dime-sized amount of matte clay (Uppercut Deluxe), emulsify it between your palms, then work it through using a grabbing motion — literally grab sections of hair and pull them in different directions to create separation. Focus on the fringe and crown areas. Finish by using your fingertips to twist and pull individual pieces, creating that choppy definition. The goal is controlled chaos, not perfect styling.
Q: Which face shape suits The Modern Choppy Crop best?
A: Oval and Heart-shaped faces benefit most. Oval faces gain visual interest from the choppy texture without disrupting natural balance. Heart faces benefit from forward fringe weight that balances wider foreheads with narrower chins. Round faces work well when choppy layers are cut with vertical orientation to create height and elongation. Square faces benefit from the soft organic texture that counterbalances angular features. Diamond faces achieve balance with choppy crown volume filling narrow foreheads while the fade removes cheekbone width.
Q: What’s the difference between a choppy crop and a French crop?
A: A French crop features a blunt horizontal fringe across the forehead with relatively uniform density and length across the top section, creating a cleaner, more structured look. A choppy crop uses heavy texturizing techniques (point-cutting, razoring, disconnected layers) to create intentional messiness with piece-y separation and varying lengths throughout. French crops look more polished and European; choppy crops look more casual and modern. French crops are styled smooth or with slight texture; choppy crops require matte clay and messy styling. Both have short sides, but the top section’s texture is completely different.
Q: How often should I get The Modern Choppy Crop touched up?
A: Every 4-5 weeks is optimal. The choppy texture looks intentional even as it grows out — unlike blunt cuts that have a clear “fresh cut” vs “grown out” appearance, this style maintains its textured aesthetic through longer growth periods. The mid fade starts to blur around week 4, but home maintenance with a trimmer around the ears extends the clean look to week 5. Beyond 5 weeks, the overall shape loses its proportion and starts to look generically grown-out rather than intentionally textured. The flexibility makes this ideal for inconsistent schedules.
9 of 10 — The Statement Undercut

Which Face Shapes Work Best With This Cut
The Statement Undercut is boldly flattering for Oval and Diamond face shapes, though it makes a powerful statement on most geometries when styled confidently. For Oval faces, the dramatic side-swept volume creates asymmetry and visual drama that prevents oval faces from looking too balanced or boring — this cut adds personality and edge. The 4-inch length allows for multiple styling variations, from slicked back to dramatically swept to textured volume. For Diamond faces with prominent cheekbones, the undercut removes all visual weight from the sides at the cheekbone level (where Diamond faces are widest), while the swept volume on top adds width at the forehead, creating balanced proportions from forehead to chin. The sharp disconnect line emphasizes facial structure rather than hiding it. Square faces work exceptionally well with this cut when the top is styled with some softness or wave — the organic movement counterbalances angular features while the dramatic contrast adds modern edge. Round faces should style this cut with maximum height and volume on top to create vertical elongation; the side-swept styling naturally creates diagonal lines that elongate. Oblong faces should approach this cautiously if styling it swept back; side-swept or textured styling works better to avoid adding more vertical length.
Essential Grooming Tools & Products
The Statement Undercut with thick wavy hair demands heavy-hold products and specific tools. Your clipper setup needs the Andis Master for the undercut maintenance — the sharp disconnect line requires precise work with no guard on the sides. For styling the dramatic length on top, you need a professional-grade blow dryer (the Dyson Supersonic handles thick wavy hair without frizz) and a large round ceramic barrel brush (Olivia Garden Ceramic + Ion) for creating smooth swept volume. Product selection is critical: for thick wavy hair that needs to hold a swept style all day, Lockhart’s Heavy Hold pomade provides the grip needed without looking wet or greasy. Use approximately a nickel-sized amount on towel-dried hair. For the initial blow-dry, apply Hanz de Fuko Scheme Cream as a pre-styler — it provides heat protection and helps control thick hair during drying. If you want a more natural finish with less shine, switch to Uppercut Deluxe Matt Clay after blow-drying, though it provides less hold than Lockhart’s. The wavy texture requires a wide-tooth wooden comb (never plastic) for detangling without disrupting wave pattern. For beard maintenance at 10mm with wave pattern, use the Brio Beardscape trimmer and apply Honest Amish Heavy Duty Beard Oil daily to prevent frizz in wavy facial hair. Keep a wooden beard comb for training beard waves downward.
Maintenance Requirements & Time Investment
The Statement Undercut is High maintenance in both time and skill requirement. Barber visits are needed every 3-4 weeks — the undercut’s sharp disconnect line blurs as the sides grow in, though it stays cleaner longer than blended fades. Each cut runs $40-60 at a barber skilled in undercuts (many traditional barbers struggle with the sharp disconnect technique). The real maintenance burden is daily styling: 18-22 minutes for the full routine. After shampooing (necessary daily with thick hair and heavy products), towel-dry to 60% damp, apply Hanz de Fuko Scheme Cream throughout, use your large round brush while blow-drying to create volume and direction — sweep hair from the left side dramatically over to the right, focusing on creating root lift at the crown. When 90% dry, apply Lockhart’s Heavy Hold pomade, work through with your wide-tooth comb, and style into the swept position. The thick wavy texture means you’re fighting natural curl pattern, so the blow-dry technique is critical. Between washes, the style holds reasonably well but requires product refresh. The undercut sides need home maintenance every 12-14 days: use your Andis Master with no guard to buzz the sides and keep that sharp disconnect visible — this requires a steady hand or a friend’s help for the back. Beard maintenance adds 4-5 minutes every other morning: trim with the Brio at 10mm, apply beard oil, comb through. This cut is for men who have the time, skill, and commitment to invest 20 minutes daily in styling and who view their hair as a key element of their personal brand.
How To Ask Your Barber For This Cut
Sit down and deliver this script: “I want a statement undercut with dramatic length on top. For the sides and back, buzz everything with a #0 guard all the way up to where my head curves at the top — I want a sharp disconnect line with zero blend or fade. The line should be high, about 2-3 inches above my ears. On top, leave 4 inches of length, keeping it longer toward the front and tapering slightly shorter toward the crown. Use point-cutting to work with my natural wave pattern, not fight it — I want the waves to show through. Create layers throughout the top for movement and dimension. The front should have enough length to sweep dramatically to the right side. Don’t blend the top into the sides at all — I want that sharp visible line where long meets buzzed. For my beard, maintain the full natural shape at 10mm length, define the cheek line to follow my natural line, and keep the neckline about one finger above my Adam’s apple. Line up my beard edges cleanly but don’t sculpt it too precise — I want it to look natural with my wavy texture. Show me how to blow-dry and style the top to create that swept volume and hold it in place all day.” Bring both the main front-view image and the inset left profile so your barber sees the disconnect line clearly from the side — that sharp line is the defining feature, and many barbers will instinctively try to blend it unless you specify otherwise.
Think undercuts are too bold for your industry? The final style in this collection proves you can have that modern edge in a workplace-appropriate package.
FAQs:
Q: How do I style the dramatic side-swept volume every morning?
A: On towel-dried hair (60% damp), apply a heat protectant pre-styler like Hanz de Fuko Scheme Cream. Use a large round barrel brush while blow-drying, starting at the left side roots. Lift the brush straight up to create root volume, then sweep across to the right as you pull the brush through. Work section by section from left to right, always lifting at the roots and sweeping across. When 90% dry, apply heavy-hold pomade (Lockhart’s), work through with a wide-tooth comb, and comb everything dramatically from left to right. The key is the blow-dry technique creating root lift — without that initial volume, the sweep falls flat by midday.
Q: Which face shape suits The Statement Undercut best?
A: Oval and Diamond face shapes benefit most from The Statement Undercut. Oval faces gain visual drama and asymmetry from the side-swept volume, preventing excessive balance. Diamond faces achieve proportion as the undercut removes width at the cheekbones while swept volume adds forehead width. Square faces work well when styled with wave softness to counterbalance angles. Round faces benefit from maximum top volume creating vertical elongation. Oblong faces should side-sweep rather than sweep back to avoid over-lengthening.
Q: What’s the difference between an undercut and a fade?
A: An undercut features a sharp disconnect line where long hair on top meets buzzed sides with zero transition or blend — it’s a dramatic visible line with contrasting lengths above and below it. A fade gradually transitions from short to long through smooth blending, creating a gradient effect with no visible line. Undercuts are more dramatic and edgy; fades are more subtle and classic. Undercuts work best with longer top sections (3+ inches); fades work at any length. Undercuts require less frequent maintenance on the sides since there’s no gradient to maintain, just a simple buzz.
Q: How often should I get The Statement Undercut touched up?
A: Every 3-4 weeks for professional maintenance. The undercut’s advantage over fades is longevity — since there’s no gradient to maintain, just a simple buzzed section, it stays cleaner longer. However, the sharp disconnect line blurs as side hair grows. Home maintenance with your own clippers (using a #0 guard on the sides) extends the professional look to 5-6 weeks if you’re comfortable buzzing your own sides. The top length maintenance is more flexible — you can stretch to 6 weeks on the cut if you’re skilled with product and styling. Budget 10-14 barber visits annually.
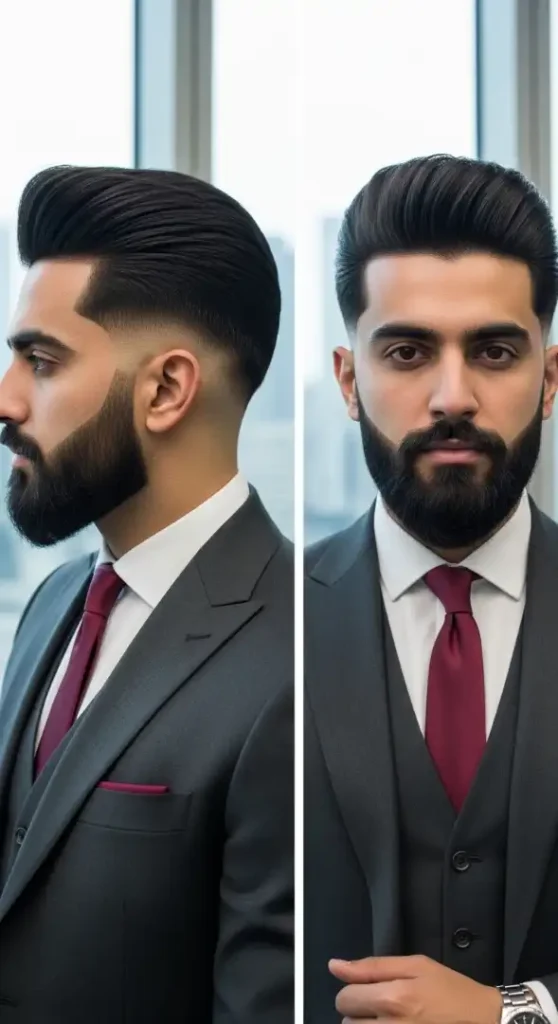
10 of 10 — The Refined Business Taper

Which Face Shapes Work Best With This Cut
The Refined Business Taper is the most universally appropriate cut in professional settings, working flawlessly across all face shapes with only minor adjustments. For Oval faces, this conservative taper maintains natural balance while projecting competence and reliability — exactly what boardrooms demand. The subtle side part adds just enough asymmetry to prevent monotony. For Round faces, the conservative approach still works effectively when paired with slightly more length on top (2.5 inches instead of 2 inches) and requesting the taper to start slightly higher to create subtle vertical lines. The combed side-styling creates diagonal movement that elongates round proportions. Square faces benefit from the refined simplicity — there’s no dramatic styling to compete with strong facial features, letting natural structure be the focus. The smooth taper softens the perimeter without feminizing. Diamond faces work perfectly as the conservative length distributes visual weight evenly across the top section without concentrating it at any single point. Oblong faces should keep the top at exactly 2 inches to avoid adding vertical length; the horizontal combed styling creates width perception. Heart-shaped faces benefit from the side-swept volume that distributes weight across the full forehead rather than concentrating it centrally. This cut succeeds by avoiding extreme proportions in any direction — it’s refined balance personified.
Essential Grooming Tools & Products
The Refined Business Taper requires classic professional tools rather than trendy products. Your clipper should be the Wahl Professional 5-Star Senior for home taper maintenance — its precision makes touch-ups around the ears manageable. For daily styling, you need a quality fine-tooth comb (Kent 2T) and a boar bristle brush (Mason Pearson Pocket Bristle) for blow-drying smooth volume. Product selection should prioritize natural finish over dramatic hold: Layrite Natural Matte Cream provides medium hold with virtually zero shine, creating that professional “not trying too hard” appearance that boardrooms respect. Use a dime-sized amount on towel-dried hair. If your hair is naturally very straight and fine, American Crew Forming Cream provides slightly more hold without adding shine. Avoid anything labeled “strong hold” or “high shine” — those signal you spent significant time styling, which undermines the effortless competence this cut projects. For maintaining the clean-shaven face that complements this style, invest in the Braun Series 9 foil shaver for close morning shaves. Keep a small travel comb in your desk or briefcase for mid-day touch-ups after removing headphones or adjusting glasses. The low taper requires minimal home maintenance, but touching up around the ears every 2-3 weeks with your Wahl clippers using a #2 guard keeps the professional appearance intact between barber visits.
Maintenance Requirements & Time Investment
The Refined Business Taper is Low-Medium maintenance with corporate-friendly flexibility. Barber visits are needed every 5-6 weeks — the conservative styling ages gracefully without hitting awkward phases. Each cut runs $30-45 at traditional barbershops that specialize in business cuts. The relaxed schedule means you can plan cuts around travel and busy periods. Daily styling requires 6-8 minutes, the shortest of any styled cut in this collection: after showering, towel-dry hair to 70% damp, apply Layrite Natural Matte Cream throughout, use your boar bristle brush while blow-drying to direct hair to the right side with subtle root volume, finish with your fine-tooth comb to create the neat side part and combed finish. That’s it. No texturizing, no piece-y separation, no dramatic volume work. The goal is refined simplicity. By 8 AM, you’re done styling for the day. Mid-day touch-ups take 20 seconds: slightly dampen your hands, run them through the hair to restore the side-swept direction, use your pocket comb to reinforce the part line. The low taper means the sides look clean through week 5 without home maintenance, though touching up around the ears at week 3 extends the premium appearance. This cut is optimized for senior professionals, consultants, finance, law, and any career where personal grooming should look effortless rather than time-consuming. Your appearance signals competence and attention to detail without suggesting vanity or excessive time in front of the mirror.
How To Ask Your Barber For This Cut
Sit in the chair and state this precisely: “I want a refined business taper — clean and professional without any dramatic styling or trendy elements. Leave 2 inches of length on top, cut with scissors using a classic taper technique. I want it long enough to comb to the side with a natural part but not so long it looks informal. For the sides, give me a low taper starting right at the top of my ears. Use a #2 guard at the bottom and blend smoothly up into the top section with a gradual transition — no harsh lines, no disconnect, no dramatic contrast. The goal is a smooth professional blend that doesn’t draw attention. Taper the back the same way, no shelf or harsh line at the nape. Keep everything conservative and workplace-appropriate. Create a subtle side part on my left side using scissors and a comb — not a hard part cut into the hair, just a natural division. I’m staying clean-shaven, so the style should work without a beard. Keep the sideburns short and neat, squared at the bottom. Line up my hairline cleanly but don’t reshape it — follow my natural line. Show me how to comb and style it so I can replicate the professional finish at home in under 10 minutes.” Show your barber both reference images, especially the front view showing the conservative combed styling. The key message is “professional refinement without trendiness” — this keeps barbers from adding modern touches that make the cut less boardroom-appropriate.
Q: How do I maintain the professional combed finish throughout a workday?
A: The key is the morning styling foundation. Apply Layrite Natural Matte Cream to towel-dried hair, blow-dry with a boar bristle brush to set the direction, and finish with a fine-tooth comb. This initial styling should hold 8-10 hours without touch-up. For mid-day refreshes after removing headphones, hats, or following gym sessions, slightly dampen your hands, run fingers through to restore the side direction, then use your pocket comb to reinforce the part line and smooth any disrupted sections. The conservative length and natural-finish product mean the style recovers easily from minor disruptions, unlike high-hold styles that harden and can’t be restyled.
Q: Which face shape suits The Refined Business Taper best?
A: This cut is universally appropriate across all face shapes, designed specifically for professional versatility. Oval faces maintain natural balance with subtle side-swept asymmetry. Round faces benefit from diagonal styling and requesting slightly more top length. Square faces let natural structure dominate without competing styling. Diamond faces achieve even weight distribution across the top section. Oblong faces should maintain exactly 2-inch length to avoid vertical elongation. Heart faces benefit from side-swept volume distribution. The conservative proportions work everywhere.
Q: What’s the difference between a business taper and a regular taper fade?
A: A business taper (like The Refined Business Taper) uses conservative blending starting low at the ears, maintains modest length on top (1.5-2.5 inches), avoids dramatic contrast between sections, and prioritizes workplace appropriateness over style impact. A regular taper fade can start at any height (low, mid, or high), may use skin-bald sections, often features dramatic contrast for visual impact, and prioritizes style over conservative professional norms. Business tapers look like you take grooming seriously without making it your focus; taper fades look like you made a style statement.
Q: How often should I get The Refined Business Taper touched up?
A: Every 5-6 weeks is optimal for maintaining professional appearance without excessive scheduling. The conservative cut ages gracefully — it never looks “grown out” in an unprofessional way, just slightly longer. Week 5 is the sweet spot where it still projects polish but you’re starting to approach your next appointment. If you touch up around the ears at home with clippers at week 3-4, you can stretch to 7 weeks, though the overall proportions start to look slightly overgrown. The flexible schedule is a feature, not a bug — this cut works for busy professionals whose calendars don’t accommodate bi-weekly barber dependence.