13 Bald Fade Combinations for Clean-Cut Look
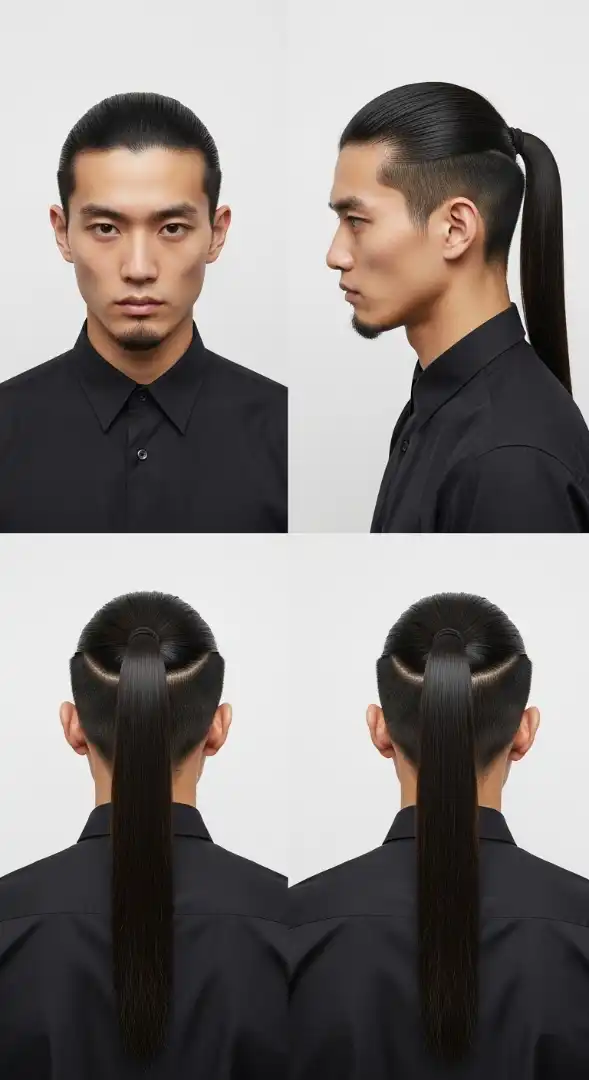
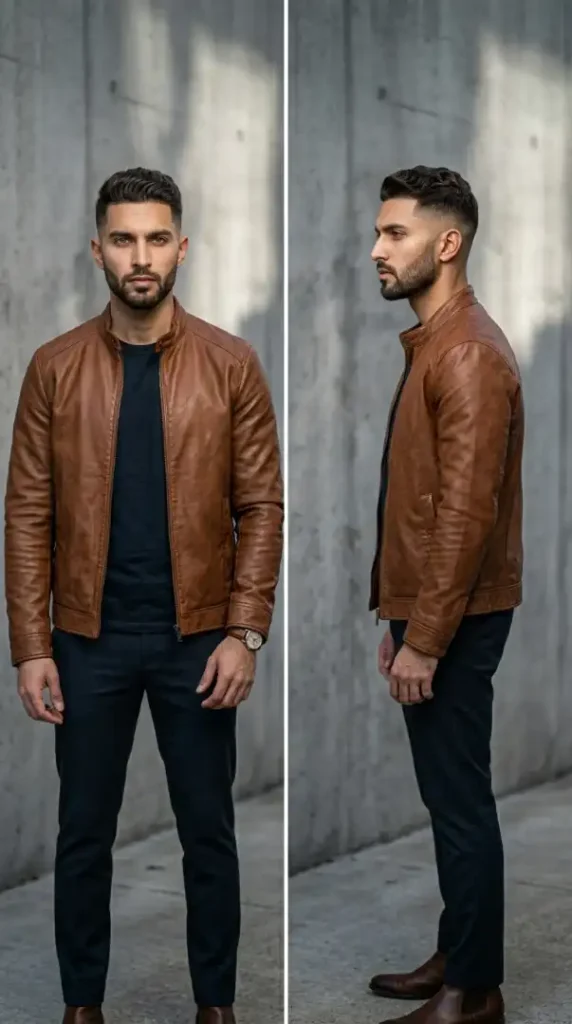
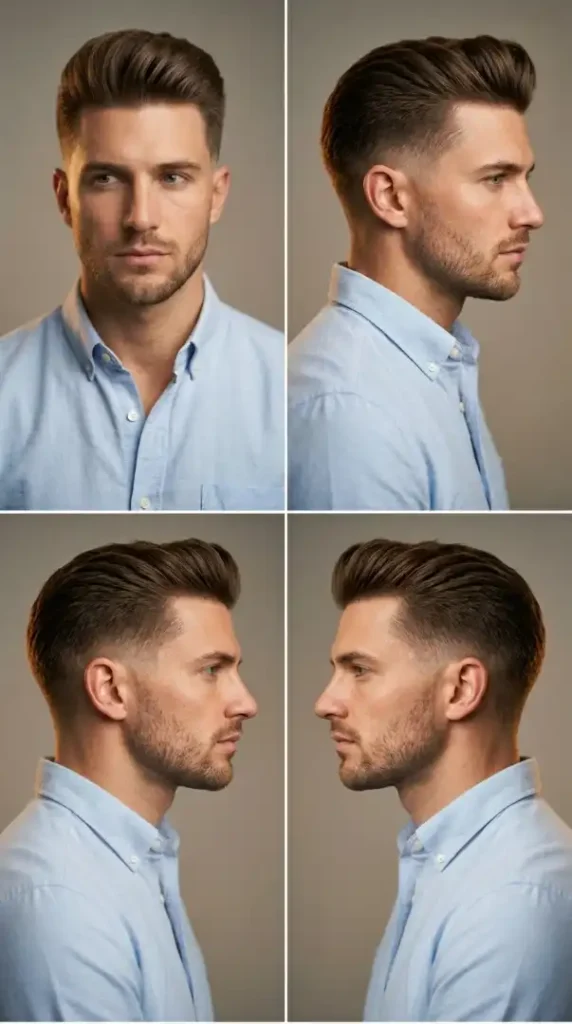
1 of 11 — The Shadow Fade Architect

What Makes This Cut Timeless
The Shadow Fade Architect represents the pinnacle of sophisticated fade work, combining ultra-clean edge work with a refined gradient that creates visual depth without aggressive length contrast. This style works equally well in corporate boardrooms and casual street settings because it communicates precision and intentionality. The key distinction from standard fades is the deliberate “shadow” effect created by blending through multiple clipper guard transitions rather than one abrupt line, giving the head a contoured, sculpted appearance.
Perfect For These Face Shapes
Square face shapes benefit most from The Shadow Fade Architect because the architectural precision of the gradient creates strong vertical lines that elongate the face while the textured top softens the heavier jawline characteristic of square faces. Oval faces see balanced proportions enhanced rather than corrected — this is an ideal default style for oval faces. Rectangle and oblong faces gain width perception from the tapered sides, making features appear more harmoniously proportioned. Round faces should pair this with slightly less bulk on the crown to avoid over-emphasizing width. Diamond-shaped faces find the structured sides help ground sharper cheekbones, creating visual balance.
Your Complete Grooming Kit
Essential tools for executing The Shadow Fade Architect:
Clippers: Wahl Magic Clip (Model 5049-400) or Andis Master (Model 01557) — both deliver precision necessary for clean fade lines without grabbing hair.
Trimmer/Outliner: Andis T-Outliner (Model 04710) for edge work and crisp lineup along the hairline, temples, and around the ears. This tool defines the shadow fade’s precision.
Finishing Tools: Kent 81T fine-tooth comb for parting precision and shadow fade gradient visualization. Denman boar bristle brush for polishing the top and directing hair for natural fall.
Styling Product: Layrite Original Pomade (medium hold, dime-sized amount) or American Crew Fiber (matte finish, high hold, pea-sized portion). The Shadow Fade works with either product depending on desired sheen.
Maintenance: Beard oil (Honest Amish or Viking Revolution, 2-3 drops) for facial hair conditioning and crisp edge maintenance.
Maintenance Timeline & Effort
Maintenance Level: MEDIUM
Barber/Salon Visit Frequency: Every 2-3 weeks for fade touch-up to maintain the shadow gradient precision. The fade line begins blurring after 14 days as hair grows out. By day 21, the shadow effect starts losing definition. The top can extend to 4-5 weeks between full cuts before length becomes unwieldy.
Daily Styling Time: 5-7 minutes. Apply damp product to the top section, comb through from front to back, brush for polish, and finish with slight hand-setting to lock texture in place.
Product Routine: Two steps — product application and brushing. No additional styling aids required for daily maintenance.
Growth Pattern Management: The shadow fade grows out relatively gracefully because the gradient design means no single “bad length” phase. However, the precision decreases noticeably by week 3. Most wearers find touch-ups at the 2-week mark maintain the intended aesthetic.
Cost Consideration: Approximately $35-50 per touch-up (every 2-3 weeks) = $140-200 monthly maintenance investment. This is moderate compared to high-fade styles requiring weekly visits.
Difficulty Rating: Intermediate home maintenance. The shadow effect requires understanding guard transitions, making this challenging for first-time DIY barbers but manageable for those with clipper experience.
Exact Words to Say to Your Barber
“I want a Shadow Fade Architect with a mid shadow fade starting at the temple line and blending upward through 2-3 clipper guard transitions to create depth without one harsh line. Start the blend at guard #1.5 at the very bottom, transition through guard #2 at mid-ear level, then #3 at the parietal ridge, creating a seamless gradient effect. Take the top to 2.5 inches with point cutting to create texture and movement. Keep the part line clean and sharp — I want it visible but not severe. For the hairline, give me a crisp lineup with squared-off corners at the temples and a clean curved line at the nape. Keep the beard at 5mm and taper it into the fade at the jawline with the same gradient precision. Finish with a clean edge on the sideburns and a slight taper on the neck.”
2 of 11 — The High-Contrast Executive
Strategic Length Contrast for Maximum Impact
The High-Contrast Executive abandons subtle gradient work in favor of dramatic length differentiation that commands attention. This style uses a clean high fade (starting above the ear at approximately the 2-inch line) paired with significant top length (3.5-4 inches), creating visual impact that reads instantly as “intentional” and “polished.” The strength of this style lies in its ability to transform casual settings into sharp environments — it works equally well with weekend jeans and Wednesday business casual. The high fade line creates a deliberate frame for facial features, making bone structure appear more defined.
Ideal Face Shape Pairings
Oval faces benefit most from The High-Contrast Executive because the dramatic height adds visual proportion without over-lengthening. Square faces gain height perception that softens the heavy jawline associated with square face shapes. Long/oblong faces benefit from the side taper reducing perceived face length. Round faces should be cautious — the top bulk can emphasize roundness, so keep the crown length moderate (3-3.5 inches maximum) to avoid adding width perception. Heart-shaped faces with narrow chins find the tapered sides balance a broader forehead, creating overall harmony.
Essential Grooming Arsenal
Tools required for precise execution of The High-Contrast Executive:
Clippers: Wahl Magic Clip (Model 5049-400) for clean fade lines and precision clipper work necessary to achieve the sharp high fade without lines showing through the top.
Trimmer/Outliner: Andis T-Outliner (Model 04710) for crisp edge definition on the high fade line, temple work, and hairline cleanup. Edge precision is critical for this style’s visual impact.
Finishing Tools: Denman boar bristle brush (size 7 or 9) for directing top texture toward natural part and polish. Kent 81T fine-tooth comb for parting precision and identifying any uneven lengths in top section.
Styling Product: American Crew Fiber (matte finish, high hold, pea-sized portion) or Hanz de Fuko Quicksand (matte, maximum hold, dime-sized amount). This style demands product with sufficient hold to maintain top texture throughout the day.
Maintenance: Beard oil (Jack Henry’s or Beardbrand, 2-3 drops) for beard conditioning and edge maintenance.
Maintenance Reality & Timeline
Maintenance Level: MEDIUM-HIGH
Barber/Salon Visit Frequency: Every 2 weeks for high fade touch-up to maintain the crisp contrast line. The high fade loses definition faster than mid or low fades because hair growing out from a high line becomes noticeably blurred by day 10. The top can stretch to 4 weeks between full cuts before length becomes too heavy.
Daily Styling Time: 6-8 minutes. Apply wet product to the top, blow-dry in natural direction (usually backward), then brush through and hand-set for hold. The drying step is essential for this style.
Product Routine: Two steps — product application and blow-drying. This is a slightly more involved daily commitment than minimal-hold styles.
Growth Pattern Management: The high fade grows out noticeably within 10 days as hair extends below the clean line. By day 14, the style begins reading as “overdue.” The top grows gracefully if you’re willing to let the fade blur — many wearers extend this into a grown-out undercut look by week 3-4.
Cost Consideration: Approximately $40-55 per visit (every 2 weeks) = $160-220 monthly investment. This is higher than low/mid fades due to more frequent trimming requirements.
Difficulty Rating: Advanced home maintenance. The high fade line position and precision required make this challenging for DIY barbers without significant clipper experience. Professional execution is recommended.
What to Tell Your Barber
“I want a High-Contrast Executive with a high bald fade starting above the ear at about the 2-inch line. Make the fade line clean and sharp — I want a defined transition, not a gradient. Blend from a skin line (guard 0.5) up to guard 1 at the start line, then guard 2 above that. No fuzziness at the line. Keep the top at 3.5 inches and cut it blunt with slight texturizing on the fringe to create movement without thinning. I want a visible part line that’s clean but natural-looking. Give me a sharp lineup at the temples and a crisp curved line at the nape. For the beard, keep it at 4mm and taper it into the fade with a clean angle at the jawline. Sideburns should be tapered and blend into the fade seamlessly.”
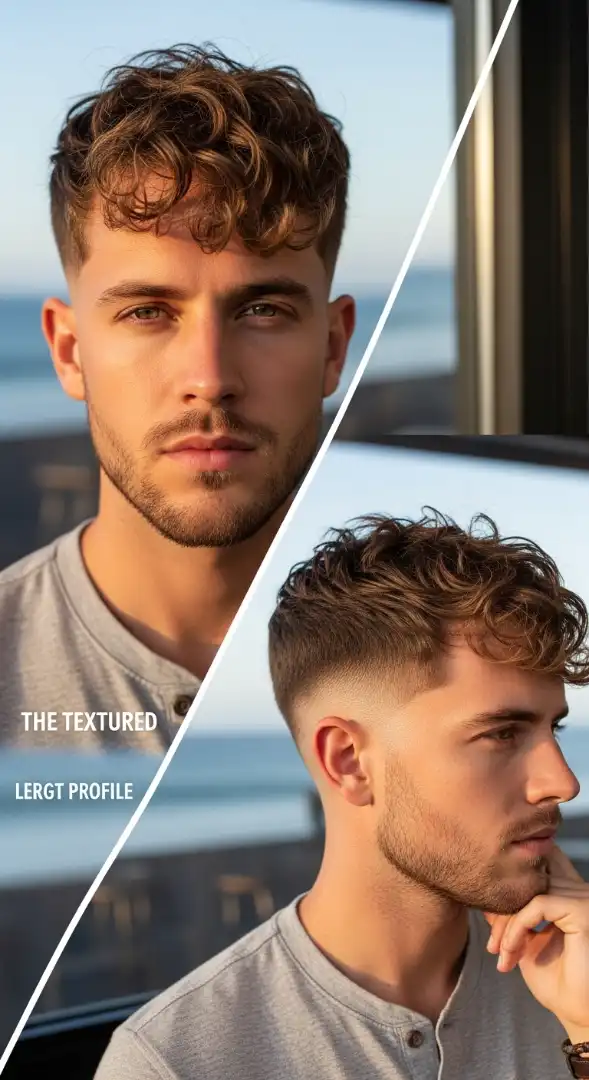
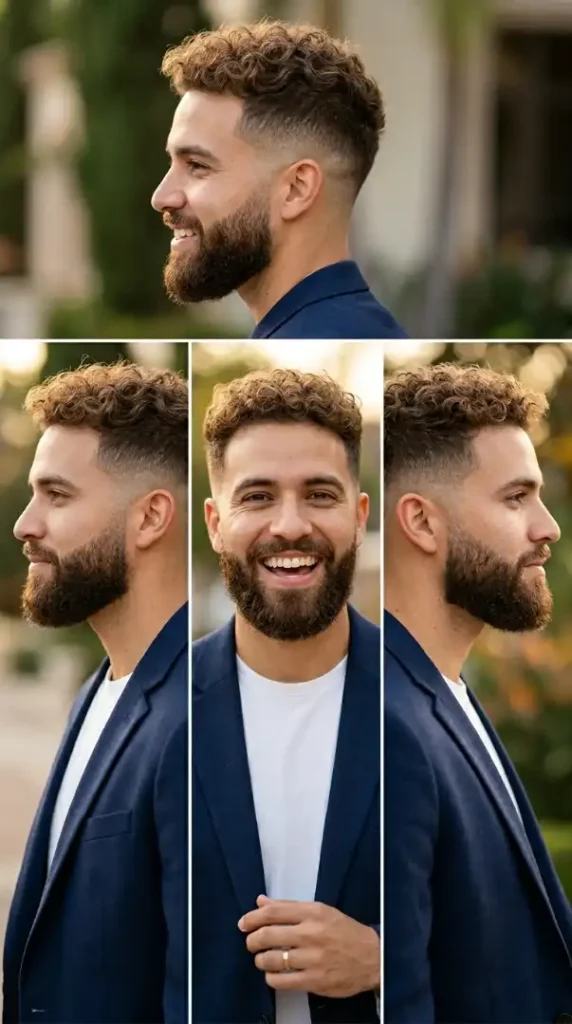
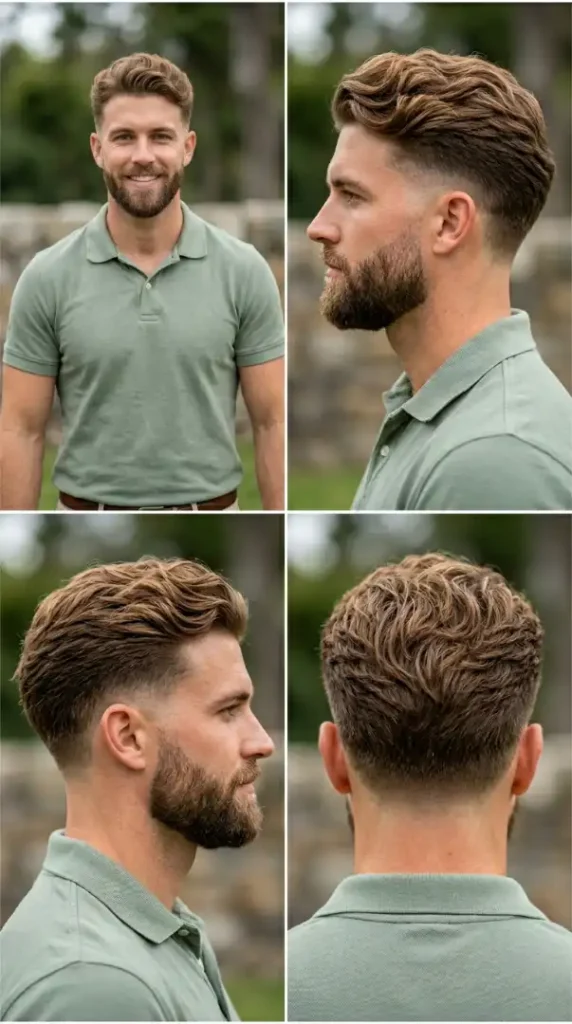
3 of 11 — The Textured Fade Blend
Mastering Curly Hair Fade Architecture
The Textured Fade Blend represents the gold standard for cut precision with curly, coily, or textured hair types. This style acknowledges that textured hair requires different clipper techniques, guard selections, and blending strategies than straight hair. The fundamental principle is that texture naturally “shrinks” when cut (curly hair cut at 2 inches dry may appear 1.25 inches when the curl retracts), so barbers must cut longer than straight-haired counterparts and account for this texture-related shortening. The fade blends the textured top into faded sides through careful guard transitions that respect the curl pattern while creating clean lines.
Face Shape Compatibility
Diamond face shapes see the strongest benefit from The Textured Fade Blend because the voluminous top and texture create width perception that balances a narrower chin. Oblong faces gain width perception that softens length. Round faces should request slightly reduced top volume (keep curl pattern but reduce overall bulk) to avoid emphasizing roundness. Square faces find the soft texture of curls balances the angular jawline, making this ideal. Oval faces can wear this style at full volume without proportion concerns.
Your Complete Textured-Hair Grooming Toolkit
Tools specifically selected for textured hair fade execution:
Clippers: Andis Master (Model 01557) with ceramic blades — ceramic blades are essential for textured hair as they cut cleaner through curly patterns without grabbing. Standard metal blades can cause breakage and uneven cutting on curly hair.
Trimmer/Outliner: Andis T-Outliner T-blade (Model 04710) — same ceramic consideration important. The T-blade is superior for textured hair edge work compared to standard blades.
Finishing Tools: Denman boar bristle brush (size 7) for defining curl pattern and directing curls. Kent 81T comb for parting and curl manipulation. A handheld diffuser or blow-dryer on low heat for curl activation post-cut.
Styling Product: Carol’s Daughter Black Vanilla Moisture & Shine Pudding (medium hold, walnut-sized amount) or Uncle Funky’s Daughter Curly Magic (high hold, matte finish, dime-sized portion). Textured hair requires curl-specific products that enhance texture rather than flatten it.
Maintenance: Shea Moisture Beard Oil (3-5 drops for beard conditioning and moisture maintenance) — textured beards require extra conditioning to prevent dryness.
Maintenance Level & Real Timeline
Maintenance Level: MEDIUM
Barber/Salon Visit Frequency: Every 3 weeks for fade touch-up. Textured hair fades actually age more gracefully than straight-haired fades because the curl pattern creates natural texture that disguises fade blur. By week 3, the fade begins showing growth, but the effect is less obvious than with straight hair.
Daily Styling Time: 7-10 minutes. Apply product to damp curl pattern, use fingers or brush to activate and define curls, air-dry or blow-dry with diffuser attachment. The drying step is crucial for textured hair styling.
Product Routine: Three steps — water/moisture application, product application, and curl activation/drying. This is more involved than straight-hair styling but essential for textured hair.
Growth Pattern Management: Textured hair grows out beautifully because the curl pattern maintains definition. By week 3, the fade blur is visible but the style still reads “intentional” rather than “overdue.” Many wearers extend to 4 weeks between cuts.
Cost Consideration: Approximately $45-60 per visit (every 3 weeks) = $180-240 monthly investment. Textured hair fades command premium pricing due to technique complexity.
Difficulty Rating: Advanced home maintenance. Textured hair cutting requires understanding curl pattern, ceramic blade selection, proper guard transitions, and technique modification. Professional execution strongly recommended.
Exact Barber Script for Textured Hair
“I want a Textured Fade Blend that respects my curl pattern. I’m cutting curly hair, so I need this longer than straight-hair equivalent. Take the top to 2-2.5 inches dry length — I know it’ll shrink when the curl retracts, so we’re building in shrinkage compensation. Use ceramic blades on clippers and trimmer because my hair breaks with standard blades. For the fade, blend from guard 0.5 at skin line, through guard 1 at the start line, then guard 1.5 above that, creating a smooth transition that respects curl density. Don’t over-blend — let my natural texture define some of the transition. Use a diffuser on low heat after cutting to activate the curl pattern so we can see the finished shape. For the edges, give me a clean lineup at the hairline but respect the curl at the fringe — don’t cut too aggressively or the curl will retract back further. Taper the beard using the same ceramic blade principle, keeping the beard at 4mm and blending into the fade at the jawline.”
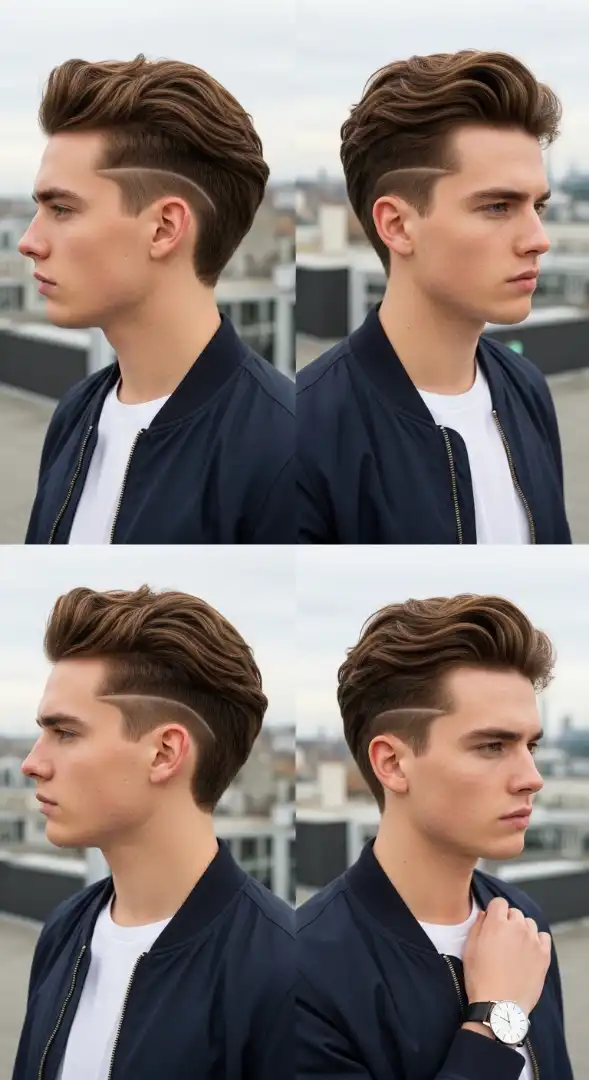
4 of 11 — The Disconnected Undercut Power
Bold Contrast Through Intentional Disconnection
The Disconnected Undercut Power abandons the subtle blending philosophy by creating a pronounced, visible line separating long top from faded sides. This style communicates intentionality through contrast — the gap between lengths is deliberate, sharp, and visually striking. Unlike fade styles where the transition is gradual, the disconnected undercut creates a defined “shelf” where top meets fade. This architectural choice suits sharp dressers and style-forward individuals who want their haircut to be a statement element rather than subtle polish. The disconnection line requires precision cutting and maintenance but delivers maximum visual impact.
Face Shape Analysis for Disconnection
Square and oval face shapes benefit most from The Disconnected Undercut Power because the defined vertical lines created by the disconnection enhance facial structure. Long/oblong faces gain width perception from the tapered sides and bulk reduction on length. Round faces should be cautious — the prominent top bulk can emphasize roundness, so request moderate top length (2.5-3 inches maximum). Diamond faces find the sharp transition lines complement angular cheekbones effectively. Heart-shaped faces with broader foreheads gain balance from the tapered sides.
Essential Tools for Precise Disconnection
Clippers: Wahl Magic Clip (Model 5049-400) for precise fade work and clean clipper lines necessary for sharp disconnection.
Trimmer/Outliner: Andis T-Outliner (Model 04710) for defining the disconnection line. This tool is critical — the line’s sharpness depends on precise outlining.
Finishing Tools: Denman boar bristle brush (size 7 or 9) for directing top texture and creating volume. Kent 81T fine-tooth comb for parting and identifying any length inconsistencies in the top section.
Styling Product: Hanz de Fuko Quicksand (matte finish, high hold, dime-sized amount) or Layrite Cement (strong hold, matte finish, pea-sized portion). The disconnected undercut’s bold aesthetic demands product that maintains shape and texture definition.
Maintenance: Beard oil (Viking Revolution or Beardbrand, 2-3 drops) for facial hair and skin edge maintenance.
Maintenance Timeline for Maximum Definition
Maintenance Level: MEDIUM
Barber/Salon Visit Frequency: Every 2-3 weeks to maintain the disconnection line sharpness. The line is where hair growing out becomes most obvious. By week 2, the disconnection begins blurring as sides grow. By week 3, the line becomes noticeably soft. The top can extend to 4 weeks before length becomes too heavy.
Daily Styling Time: 6-8 minutes. Apply product to damp top section, blow-dry backward and upward to create height, brush through for texture definition, and hand-set for final shape. The blow-dry step is essential to achieve the height that makes this style visually dramatic.
Product Routine: Two steps — product application and blow-drying. This is slightly more involved than basic styles but less complex than full-process styling.
Growth Pattern Management: The disconnection line is the first thing to blur as sides grow. Most wearers feel the style is overdue by day 14 when the line becomes soft. The top grows gracefully but the impact diminishes as the disconnection becomes less defined.
Cost Consideration: Approximately $40-55 per visit (every 2-3 weeks) = $160-220 monthly investment. The disconnection line precision requires skilled barber work, justifying professional pricing.
Difficulty Rating: Advanced home maintenance. The disconnection line demands understanding precise guard transitions and blade control. DIY execution risks visible line softness. Professional barber work recommended.
What to Tell Your Barber Exactly
“I want a Disconnected Undercut Power with a sharp, visible separation between my top and faded sides. Take the top to 3 inches with blunt cutting to create height and weight. For the disconnection line, start the fade at approximately 1.5 inches above my ear — I want a defined shelf where the top meets the fade, not a gradual transition. Blend the fade from a bald skin line (guard 0.5) up to guard 1 at the disconnection point, creating a sharp line. No gradient blur — make it crisp and defined. For the sides below the disconnection, use guards 1-1.5 to create a clean, tight fade without any heavy bulk. Keep a clean hairline with squared-off corners at the temples. For the back, taper the nape with a rounded or squared-off shape based on my preference — keep it tight and defined. Give me a crisp lineup at the hairline. If I have facial hair, taper the beard down cleanly and blend it into the fade at the jawline.”
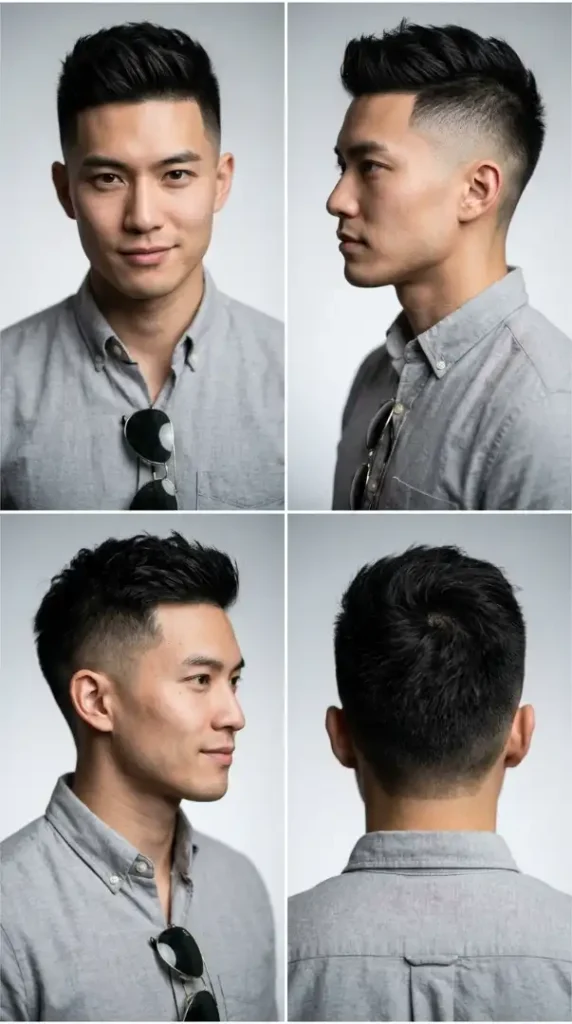
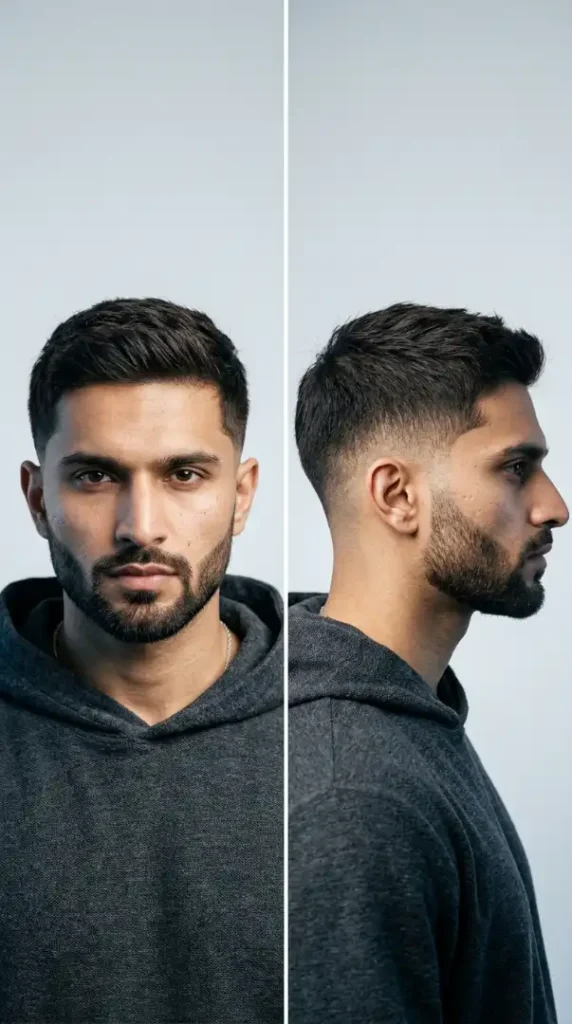
5 of 11 — The Mid-Fade Classic

The Goldilocks Standard for Versatile Sophistication
The Mid-Fade Classic occupies the sweet spot between high-impact contrast and understated elegance. By positioning the fade line at approximately ear-top level (rather than high at 2-inch or low at 3-inch), this style achieves balance that works in corporate boardrooms and weekend casual settings with equal effectiveness. The mid-fade starting point allows sufficient length contrast to look intentional without the aggressive visual statement of high fades. This is the default style for men seeking professional sophistication without making their haircut the focal point of their appearance. The mid-fade is universally flattering because it respects facial features without overcorrecting proportions.
Face Shape Versatility
Every face shape benefits from The Mid-Fade Classic because the moderate length contrast is inherently balanced. Square faces gain subtle height perception without over-emphasizing the sides. Oval faces see proportions preserved and enhanced. Round faces gain slight width reduction and height perception. Diamond faces benefit from the softly tapered sides that ground angular cheekbones. Oblong/rectangle faces gain width perception without awkwardness. Long/narrow faces find the fade provides just enough definition without making the face appear over-tapered. This style is genuinely universal.
Your Mid-Fade Grooming Essentials
Clippers: Wahl Magic Clip (Model 5049-400) or Andis Master (Model 01557) — standard professional-grade clippers are sufficient for mid-fade work.
Trimmer/Outliner: Andis T-Outliner (Model 04710) for edge definition and lineup work along the hairline and around the ears.
Finishing Tools: Denman boar bristle brush (size 7) for directing natural texture and polish. Kent 81T fine-tooth comb for parting work and identifying length consistency.
Styling Product: Layrite Original Pomade (medium hold, dime-sized amount) or American Crew Classic (medium hold, matte finish, pea-sized portion). Mid-fade styles work with either light-to-medium hold products depending on desired aesthetic.
Maintenance: Standard beard oil (3-4 drops) for facial hair conditioning and edge maintenance.
Realistic Maintenance Timeline
Maintenance Level: LOW-MEDIUM
Barber/Salon Visit Frequency: Every 3-4 weeks for fade touch-up. The mid-fade starting point means growth becomes visible more slowly than high fades. By week 3, the fade begins showing growth, but the mid-starting-point makes it less obvious. By week 4, touch-up is desirable but not urgent. The top can stretch to 5-6 weeks before length becomes unwieldy.
Daily Styling Time: 4-6 minutes. Apply damp product, comb through, and you’re done. This style requires minimal daily investment compared to blow-dry-dependent styles.
Product Routine: Single step — product application and combing. Minimal complexity makes this ideal for busy individuals.
Growth Pattern Management: Mid-fades age gracefully because the moderate contrast means the style doesn’t appear dramatically overgrown until week 4-5. This style is forgiving as it grows out.
Cost Consideration: Approximately $35-50 per visit (every 3-4 weeks) = $105-170 monthly investment. This is lower than high-fade costs due to less frequent touch-ups.
Difficulty Rating: Beginner-Intermediate home maintenance. Mid-fades are forgiving enough for barbers with moderate clipper experience. The fade line position is less critical than high or low fades.
Exact Script for Your Barber
“I want a Mid-Fade Classic that works for both professional and casual settings. Start the fade line at approximately ear-top level — I’m looking for a middle-ground approach, not a dramatic high fade or a subtle low fade. Blend from a skin line (guard 0.5) up to guard 1 at the starting line, then guard 2 above that, creating a smooth gradient. Take the top to 2.5 inches with texture cutting to create movement without excessive weight. For the hairline, give me a clean, natural-looking lineup — not overly sharp, just defined. Taper the beard to 6mm and blend it smoothly into the fade at the jawline. Keep the sideburns tapered and blended. This is my go-to style that needs to look polished but not overdone.”
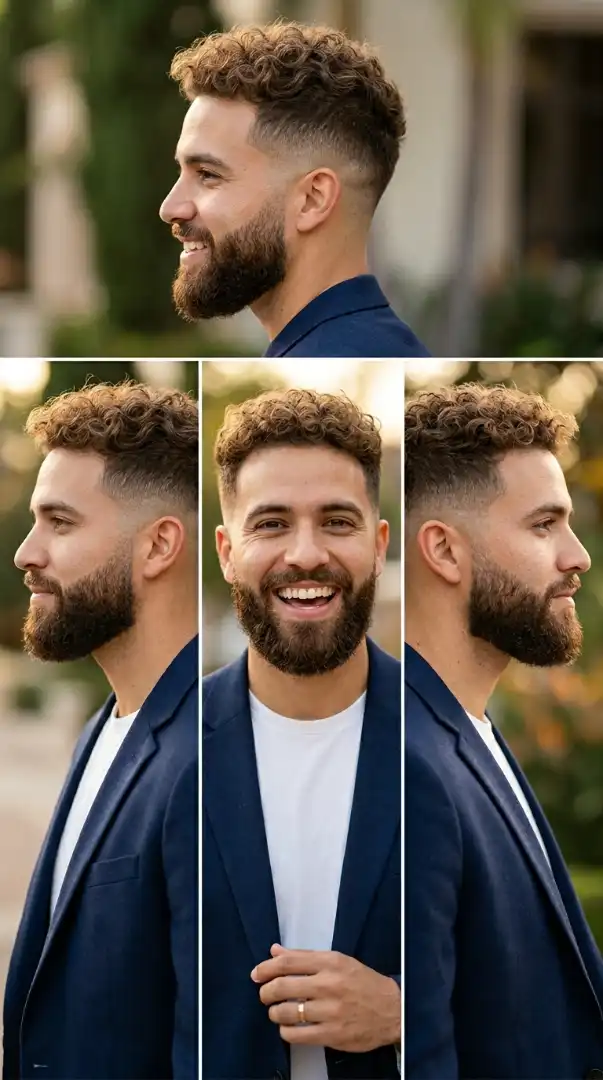
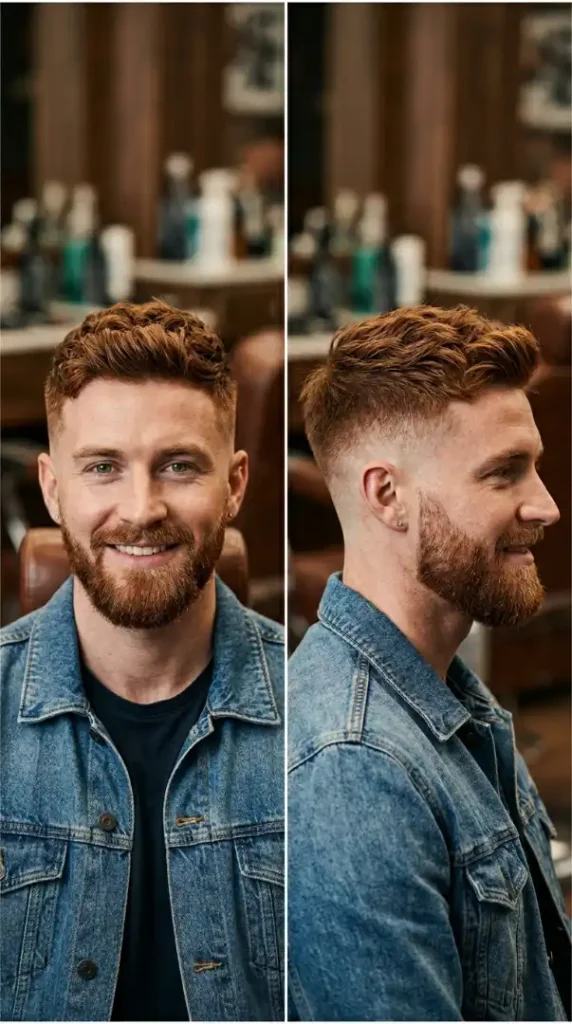
6 of 11 — The Textured Crop Fade
Short Texture for Minimal Maintenance, Maximum Definition
The Textured Crop Fade combines genuine wash-and-go styling capability with textured sophistication, achieving the impossible balance of minimal daily effort and intentional appearance. By keeping the top length to 1.5-2 inches and maintaining the natural texture through point cutting (not blunt cutting), this style allows natural texture to create definition without requiring styling products or blow-drying. The fade blends seamlessly into the textured sides, creating a cohesive look rather than the contrast-focused aesthetic of longer-top fades. This is the ideal style for men who travel frequently, exercise multiple times daily, or simply prefer not to manage hair as a daily task.
Face Shape Analysis
Square faces see softening from the short textured top that creates less angular definition than longer styles. Oval faces benefit from the clean proportions this style naturally provides. Round faces gain shape definition from the tapered fade without excessive top bulk. Oblong faces benefit from width perception the short crop provides. Heart-shaped faces with broader foreheads find the tapered sides balance proportions effectively. All face shapes work with this style because the short length is inherently humble and proportional.
Essential Grooming Kit for Texture Work
Clippers: Wahl Magic Clip (Model 5049-400) for clean, precision work essential for short textured cuts without lines showing.
Trimmer/Outliner: Andis T-Outliner (Model 04710) for crisp edge definition on a shorter style where precision is visually obvious.
Finishing Tools: Kent 81T fine-tooth comb for parting work and identifying uneven lengths in short crop. Denman boar bristle brush is optional for this length — many wearers skip brushing entirely.
Styling Product: OPTIONAL. This is one of the few styles that genuinely works without product. If you prefer added definition, use a light-hold product like American Crew Fiber (pea-sized amount) or skip product entirely for true wash-and-go.
Maintenance: Beard oil (2-3 drops) for facial hair conditioning and edge maintenance.
Honest Maintenance Reality
Maintenance Level: LOW
Barber/Salon Visit Frequency: Every 3-4 weeks for fade and crop touch-up. The short length means growth is subtle — by week 3, the cut maintains its intentional appearance. By week 4, the fade blurs noticeably and touch-up is recommended. The short top never becomes “too long.”
Daily Styling Time: 2-3 minutes or ZERO if you prefer complete wash-and-go. Run fingers through damp hair, let air-dry, and you’re done. This is the lowest daily commitment available.
Product Routine: Zero steps. Shower, dry with towel, leave. This style genuinely requires nothing.
Growth Pattern Management: The Textured Crop Fade ages beautifully because the short length never appears drastically overgrown. Even at week 4, the style remains visually intentional. This is the most forgiving growth pattern of all fade styles.
Cost Consideration: Approximately $35-45 per visit (every 3-4 weeks) = $105-180 monthly investment. This is lower-mid-range pricing due to moderate touch-up frequency and shorter length.
Difficulty Rating: Beginner home maintenance. Short textured cuts are among the most forgiving for DIY barbers. The short length makes guard transitions less critical.
Exact Words for Your Barber
“I want a Textured Crop Fade with genuine wash-and-go simplicity. Take the top to 1.5-2 inches and use point cutting to create texture and definition without thinning the hair too much. I want the texture visible and working for me, not needing product to look intentional. For the fade, blend from a skin line (guard 0.5) to guard 1.5 at ear-top level, creating a smooth transition into the textured sides. I don’t want a disconnection line — I want a cohesive crop that flows naturally. For the edges, give me a clean lineup at the hairline but respect the texture — not an overly sharp line. Taper the beard to 5mm and blend it smoothly into the fade. The whole point of this cut is that I can shower, dry my hair with a towel, and I’m done — no product, no styling, no fuss.”
7 of 11 — The Pompadour Fade Fusion
Classic Pompadour Meets Modern Fade Precision
The Pompadour Fade Fusion resurrects the timeless pompadour silhouette while respecting contemporary barbering sensibilities by replacing the heavily slicked-back 1950s aesthetic with a modern fade foundation. This hybrid maintains the pompadour’s signature height and volume at the crown while using a fade (rather than a traditional taper) to create contemporary relevance. The styling remains sophisticated and intentional rather than the slicked-excess of vintage pompadours, making this style work in modern professional and casual contexts. This is the ideal choice for men who appreciate classic aesthetics but want contemporary execution.
Face Shape Compatibility
Round and square face shapes benefit most because the height and backward volume of the pompadour elongates the face while the fade tapers sides to enhance definition. Diamond and heart-shaped faces find the crown volume balances a narrower chin, creating overall proportion. Oval faces wear pompadours at full volume without concern. Oblong faces should keep crown height moderate to avoid over-elongating. All face shapes can wear this style — proportion depends on crown height relative to face length.
Complete Grooming Toolkit for Pompadour Execution
Clippers: Wahl Magic Clip (Model 5049-400) for precise fade work and clean blending into the longer top.
Trimmer/Outliner: Andis T-Outliner (Model 04710) for crisp edge definition around the ears, hairline, and nape work.
Finishing Tools: Denman boar bristle brush (size 7 or 9) for polishing the pompadour and directing volume backward and upward. Kent 81T fine-tooth comb for parting precision and identifying length consistency.
Styling Product: Layrite Cement (strong matte hold, pea-sized amount), Hanz de Fuko Quicksand (matte, high hold), or Pomade De Luxe Slick (medium-strong hold with shine). Choose based on desired finish — matte for modern aesthetic, slight shine for classic look.
Maintenance: Beard oil (2-3 drops) for beard conditioning and edge maintenance, optional depending on beard style choice.
Realistic Maintenance Investment
Maintenance Level: MEDIUM-HIGH
Barber/Salon Visit Frequency: Every 2-3 weeks for fade touch-up and length maintenance. The pompadour’s volume relies on length precision — overgrown top loses the structured silhouette. The fade blurs noticeably by week 2, requiring touch-up for visual sharpness.
Daily Styling Time: 7-10 minutes. Apply product to damp hair, blow-dry backward and upward to create height, brush for polish, hand-set for finish. The blow-dry step is essential — this style doesn’t air-dry well.
Product Routine: Three steps — product application, blow-drying with directional styling, and brushing/hand-setting. This is a fully involved daily commitment.
Growth Pattern Management: Pompadours begin losing their defined silhouette by day 7-10 as the crown length extends and weight increases. By week 2, the style flattens noticeably. Growth pattern requires consistent refresh.
Cost Consideration: Approximately $40-55 per visit (every 2-3 weeks) = $160-220 monthly investment. Pompadour precision commands professional pricing.
Difficulty Rating: Advanced home maintenance. The pompadour structure and blow-drying technique require significant skill. Professional execution strongly recommended.
Exact Pompadour Script for Your Barber
“I want a Pompadour Fade Fusion with structured height at the crown without the over-slicked vintage excessive look. Take the crown to 3-3.5 inches with blunt cutting to create weight and structure. The fringe should be tapered slightly shorter (2-2.5 inches) so it sits naturally without excessive bulk at the front. For the fade, blend from a skin line (guard 0.5) up through guard 1 at ear-top level, creating a smooth transition into the longer top. I want the fade sharp enough that the pompadour appears to float on top, but blend it naturally — not a disconnected undercut. For the hairline, give me a clean, crisp lineup but keep it natural-looking. For the back/nape, I want a rounded taper that supports the pompadour’s height without bulk at the base. This is a styled cut — I’ll be blow-drying and using product daily, so cut it accordingly. Make the layers and weight distribution support backward styling.”
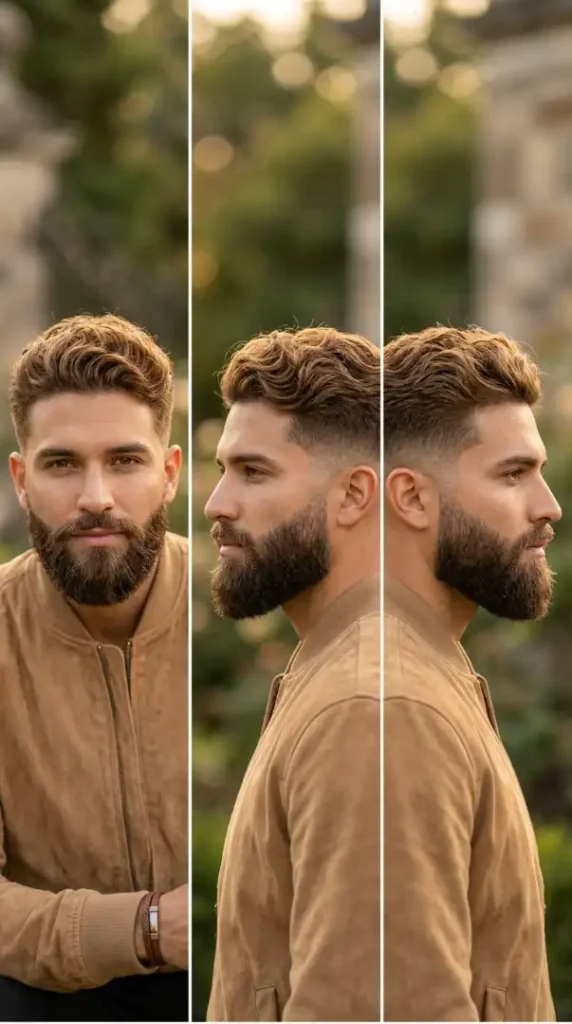
8 of 11 — The Texture Stack Fade
Medium-Length Texture with Precision Layering
The Texture Stack Fade achieves the “expensive haircut” aesthetic through intentional layering that creates internal texture and movement without requiring heavy styling products or blow-drying. The stack technique uses shorter layers underneath longer lengths, creating dimension when hair moves while maintaining a clean silhouette. This style respects natural texture and wave patterns while using precise barbering to create apparent structure and style direction. The low fade foundation keeps the style contemporary while the stacked texture creates visual interest that longer unstructured cuts cannot match.
Face Shape Analysis
Diamond and heart-shaped faces benefit most from The Texture Stack Fade because the textured volume can be concentrated at the sides (below the ears) to add width perception that balances narrower chins. Square faces see softening from the textured layers that create visual movement. Round faces should request the texture concentrated more at the crown to create height rather than horizontal bulk. Oval faces wear this style at full volume without concern. Oblong faces benefit from width perception the texture provides.
Essential Tools for Texture Stack Execution
Clippers: Andis Master (Model 01557) or Wahl Magic Clip (Model 5049-400) for precise fade work and clean blending.
Trimmer/Outliner: Andis T-Outliner (Model 04710) for crisp edge definition and precise hairline and nape work.
Finishing Tools: Denman boar bristle brush (size 7 or 9) for polishing texture and directing layers. Kent 81T fine-tooth comb for parting and identifying layering precision. Thinning shears for point-cutting texture (barber’s tool, not your responsibility, but good to understand your barber is using these).
Styling Product: OPTIONAL to LIGHT. Texture stack works with minimal product — use American Crew Fiber (pea-sized amount) or light pomade (dime-sized amount) for enhanced definition. Many wearers skip product entirely and let natural texture work.
Maintenance: Beard oil (2-3 drops) for facial hair conditioning and beard definition maintenance.
Realistic Maintenance Timeline
Maintenance Level: MEDIUM
Barber/Salon Visit Frequency: Every 3-4 weeks for fade touch-up and layer refresh. The stacked layers begin losing internal structure by week 3 as hair grows and the precision fades. By week 4, the layers are less defined and the style appears more uniform. The fade blurs noticeably by week 3.
Daily Styling Time: 4-5 minutes or zero if you prefer product-free styling. Shower, towel-dry, and you’re done. If using product, 4-5 minutes to apply and direct texture.
Product Routine: One optional step — product application. This style genuinely works without daily product investment, making it lower-maintenance than most medium-length styles.
Growth Pattern Management: Texture stacks grow out more gracefully than blunt cuts because the layers create natural texture distribution. By week 3, the internal structure softens but the style remains visually intentional. By week 4, the stack blur is noticeable but not dramatic.
Cost Consideration: Approximately $40-55 per visit (every 3-4 weeks) = $160-220 monthly investment. Stack precision commands professional pricing due to layering complexity.
Difficulty Rating: Advanced home maintenance. Stacking requires understanding layer placement, point-cutting technique, and texture work. Professional execution strongly recommended.
Exact Barber Script for Texture Stack
“I want a Texture Stack Fade with precise internal layering that creates movement and visual depth. Take the top to 2.5-3 inches for overall length. The key is stacking: cut shorter layers underneath (1.5-2 inches) so when longer outer layers move, the internal texture creates dimension. Use point cutting throughout — no blunt lines that would look choppy. I want the stack concentrated slightly more at the crown and back for height. For the fade, use a low starting point (below ear level) and blend smoothly from skin line (guard 0.5) through guard 1, creating a clean transition. I want texture throughout — don’t thin it out too much. For the fringe, taper it slightly shorter (2-2.5 inches) so it sits naturally without bulk. For the edges, give me a clean lineup but respect the texture. The whole aesthetic is movement and dimension created by layering, not heavy styling or product. Make this cut work for wash-and-go styling or with light product depending on my mood that day.”
9 of 11 — The Sharp Line Burst Fade

Geometric Styling for Bold Visual Statement
The Sharp Line Burst Fade elevates basic fade work into deliberate pattern styling by creating defined geometric lines through intentional parting and grooming direction. This style uses precise part-lines radiating from a central point (creating a “burst” pattern) combined with a sharp fade to deliver maximum visual impact for style-forward individuals. The sharp lines require consistent daily styling to maintain definition but create a distinctive, memorable look that reads instantly as intentional and sharp. This is the choice for men who view their hair as an accessory and styling statement rather than functional grooming.
Face Shape Compatibility
Square and oval face shapes benefit from the geometric pattern which adds visual interest without overcorrecting proportions. Round faces can wear this style but should avoid excessive crown volume that emphasizes horizontal dimensions. Diamond faces find the sharp lines complement angular cheekbones effectively. Oblong faces gain width perception from the horizontal line elements. The burst pattern’s geometric nature makes it flattering across most face shapes because the visual focus is on pattern rather than correcting features.
Grooming Essentials for Sharp Line Work
Clippers: Wahl Magic Clip (Model 5049-400) for precise fade work that creates clean canvas for line work.
Trimmer/Outliner: Andis T-Outliner (Model 04710) for line definition and crisp hairline/nape work. This tool is critical for maintaining sharp line precision.
Finishing Tools: Denman boar bristle brush (size 7) for defining line patterns and directing hair along geometric direction. Kent 81T fine-tooth comb is optional — most line work uses brushing rather than combing.
Styling Product: ESSENTIAL. Layrite Original Pomade (medium-strong hold, dime-sized amount), Hanz de Fuko Quicksand (high hold, pea-sized portion), or Lockhart’s Authentic Pomade (medium-strong hold). Line definition requires hold to maintain pattern throughout the day.
Maintenance: Beard oil (2-3 drops) for facial hair maintenance and edge definition.
Maintenance Reality for Geometric Lines
Maintenance Level: MEDIUM-HIGH
Barber/Salon Visit Frequency: Every 2-3 weeks for fade and line refresh. Sharp lines lose definition by day 5-7 as hair grows and the geometric pattern begins blurring. By week 2, the pattern softens noticeably. Most wearers prefer fortnightly touch-ups to maintain sharp definition.
Daily Styling Time: 8-10 minutes. Apply product to damp hair, use brush to define lines and create pattern, blow-dry or air-dry while maintaining line direction, hand-set to lock pattern. The blow-dry step is essential.
Product Routine: Two steps — product application and brush-directed styling (with optional blow-drying). This is a fully involved daily commitment.
Growth Pattern Management: Sharp lines blur quickly as hair grows because the geometric definition depends on length precision. By week 2, the pattern softens noticeably. By week 3, the burst pattern becomes less visually distinct. This style requires consistent maintenance commitment.
Cost Consideration: Approximately $45-60 per visit (every 2-3 weeks) = $180-240 monthly investment. Sharp line work commands premium pricing due to precision demands.
Difficulty Rating: Advanced home maintenance. The geometric line work requires understanding line placement, precise outliner control, and daily styling skill. Professional execution strongly recommended.
Exact Script for Your Barber on Sharp Lines
“I want a Sharp Line Burst Fade with defined geometric pattern through line work and styling direction. Start with a mid-to-high fade blended from skin line (guard 0.5) through guard 1 at ear-top level, creating a clean foundation. For the top, take it to 2.5-3 inches. Here’s the critical part — I want a burst pattern created through part lines and styling direction. Create a central parting point slightly behind my crown, then define 3-4 lines radiating outward toward the front, creating a burst or starburst effect. Use your outliner to create crisp line definition. For the fringe, keep it shorter (2-2.5 inches) so it sits naturally in the forward burst direction. For the edges, give me a sharp, crisp lineup at the hairline and temples that connects into the burst pattern. This is a styled cut — I’ll be using product and styling daily to maintain line definition. Make the cut support geometric styling. For the beard, taper it cleanly and blend it into the fade with sharp precision.”
10 of 11 — The Low-Fade Smooth Taper
Extended Length with Gentle Transition
The Low-Fade Smooth Taper prioritizes side length and gradual blending over dramatic contrast, creating a style that reads “polished” rather than “aggressive.” By starting the fade well below ear level (at the 3-inch mark or lower), this style maintains generous side length while tapering smoothly into the short fade. The smooth gradient transition creates visual richness and dimension without the stark line definition of higher fades. This is the choice for men seeking sophistication through subtlety rather than high-impact contrast — a style that reveals its quality upon closer inspection rather than announcing itself immediately.
Face Shape Compatibility
Long/oblong faces benefit from the extended side length which adds width perception and softens perceived length. Square faces see softening from the smooth, gradual taper. Diamond faces find the extended sides balance narrower chins effectively. Round faces should be cautious — the side length can add horizontal bulk, so request the taper concentrated more at the front. Oval faces work with full side length without proportion concerns. Heart-shaped faces with broader foreheads benefit from the extended sides adding width balance.
Essential Tools for Smooth Tapering
Clippers: Wahl Magic Clip (Model 5049-400) or Andis Master (Model 01557) for smooth, blended fade work that creates gradual transition without visible lines.
Trimmer/Outliner: Andis T-Outliner (Model 04710) for crisp edge definition and clean lineup work on hairline and nape.
Finishing Tools: Denman boar bristle brush (size 7 or 9) for smoothing taper transitions and polishing. Kent 81T fine-tooth comb for parting and identifying length consistency in taper area.
Styling Product: Layrite Original Pomade (medium hold, dime-sized amount) or American Crew Classic (medium hold, optional). Low-fade styles work with or without product depending on desired finish.
Maintenance: Beard oil (2-3 drops) for facial hair maintenance and edge definition.
Realistic Maintenance Timeline
Maintenance Level: LOW-MEDIUM
Barber/Salon Visit Frequency: Every 4 weeks for fade touch-up. The low-fade starting point means growth becomes visible more slowly. By week 3, the fade begins showing blur, but the effect is subtle because the taper is gradual. By week 4, touch-up is recommended but not urgent. The top can extend to 5-6 weeks before length becomes unwieldy.
Daily Styling Time: 3-5 minutes. Apply light product (optional), comb through, and you’re done. Minimal daily commitment.
Product Routine: One optional step — product application. This style works equally well with or without product, making it flexible for daily lifestyle.
Growth Pattern Management: Low-fades age beautifully because the gradual taper means no “awkward stage.” The style remains visually acceptable throughout weeks 1-4 as it grows. The fade softens gradually rather than becoming obviously overgrown.
Cost Consideration: Approximately $35-50 per visit (every 4 weeks) = $140-200 monthly investment. Low-fade less frequent touch-ups reduce total cost compared to high-fades.
Difficulty Rating: Beginner-Intermediate home maintenance. Low-fades are among the most forgiving for DIY barbers because the gradual taper is less sensitive to guard transitions than high-fade precision work.
Exact Script for Your Barber on Low Fades
“I want a Low-Fade Smooth Taper that prioritizes side length and smooth blending over dramatic contrast. Start the fade well below ear level — at approximately the 3-inch point. I want a smooth, gradual transition from the full-length sides down to the fade, not a sharp line or dramatic blend. Use guard transitions (maybe starting at guard 2.5 at the fade line, blending down to guard 1.5, then to guard 1, then skin line) to create this smooth gradient. Take the top to 2.5-3 inches. Keep the styling natural — I want this to work with minimal daily effort. For the hairline, give me a clean, natural-looking lineup that’s defined but not overly sharp. For the nape, taper it smoothly to complement the side taper. For the beard, trim to 4-5mm and blend it smoothly into the taper without harsh lines. The whole aesthetic is subtle sophistication through smooth blending, not dramatic contrast.”
11 of 11 — The Gentleman’s Fade Classic
Maximum Volume With Refined Integration
The Gentleman’s Fade Classic represents the ultimate expression of extended side length by starting the fade so low (at the 4-5 inch mark or even lower on sides) that maximum volume is achieved while still maintaining clean, intentional barbering. This style prioritizes the “gentleman” aesthetic — full presence, dignified volume, and refined grooming — over contemporary minimalism. The very low fade creates extended sideburn length and neck coverage while maintaining a smooth, professional blend. This is the choice for men who appreciate full, textured presence and want their hair to convey confidence and authority through sheer quality of grooming rather than aggressive styling.
Face Shape Compatibility
Oblong and rectangle faces benefit most from The Gentleman’s Fade Classic because the extended side volume adds horizontal width perception that balances longer face shapes. Diamond faces find the full sides ground angular cheekbones effectively. Round faces should request slightly less bulk concentration on sides to avoid emphasizing horizontal dimensions. Square faces see softening from the extended volume. Oval faces work with full volume without proportion concerns. This is the most universally flattering fade for men seeking full, substantial presence.
Complete Grooming Arsenal for Gentleman’s Standard
Clippers: Wahl Magic Clip (Model 5049-400) for precise work and smooth blending throughout extended fade area.
Trimmer/Outliner: Andis T-Outliner (Model 04710) for crisp edge definition on hairline, nape, and sideburn work with extended lengths.
Finishing Tools: Denman boar bristle brush (size 7 or 9) for polishing and directing extended sides. Kent 81T fine-tooth comb for parting and identifying blend consistency across larger fade area.
Styling Product: Layrite Original Pomade (medium hold, dime-sized amount) or American Crew Classic (medium hold, optional). Extended-side styles work equally well with or without product depending on desired finish — matte or slight shine both work.
Maintenance: Beard oil (2-3 drops minimum for full beard, 3-5 drops for extended facial hair) for conditioning full beard and maintaining edge definition.
Realistic Maintenance Timeline for Full Coverage
Maintenance Level: LOW
Barber/Salon Visit Frequency: Every 4-5 weeks for fade and detail work. The very low-fade starting point means growth is subtle and the style ages gracefully. By week 4, the fade begins showing softness, but the extended sides mean the style still reads “intentional.” By week 5, touch-up is recommended but not urgent. The top can extend to 6+ weeks before length becomes unmanageable because the extended sides support longer crown.
Daily Styling Time: 2-4 minutes. Run fingers through damp hair, optional light product, and you’re done. Minimal daily commitment.
Product Routine: One optional step — product application. This style works equally well product-free or with light styling product depending on daily lifestyle.
Growth Pattern Management: Gentleman’s Fade Classic styles age beautifully because the extended volume means no “awkward stage.” The style remains visually intentional throughout weeks 1-5 as it grows. The extended sides support longer crown lengths gracefully.
Cost Consideration: Approximately $40-55 per visit (every 4-5 weeks) = $120-165 monthly investment. Less frequent touch-ups reduce total cost. Longer intervals between cuts mean lower overall maintenance expense.
Difficulty Rating: Intermediate home maintenance. The extended fade area and low starting point require barber skill and precision. DIY execution risks visible lines or uneven blending in the larger fade zone. Professional barber work recommended.
Exact Barber Script for Gentleman’s Fade
“I want a Gentleman’s Fade Classic that maximizes side volume and presence while maintaining refined barbering. Start the fade very low — at the 4-5 inch mark on the sides. I want maximum coverage and presence, but I also want this to look intentional and professionally groomed, not grown-out. Use smooth, gradual blending through the extended fade area. Start maybe at guard 3 at the very starting line, then guard 2.5, then guard 2, then guard 1, then skin line — create a smooth gradient across this larger area. Take the top to 2.5-3 inches. Keep the styling natural — I want full presence without requiring daily product or styling effort. For the sides, the extended length is the whole point. For the hairline, give me a clean, professional lineup that defines the front but respects the extended sideburn length. For the nape, taper it smoothly and keep it extended for full neck coverage. For the beard, take it to full length with precision trimming and edge definition — this is a full-beard look that requires maintenance. The whole aesthetic is gentleman refinement: full presence, extended coverage, and refined grooming.”