
12 Straight Hairstyle Ideas For Men To Try This Year
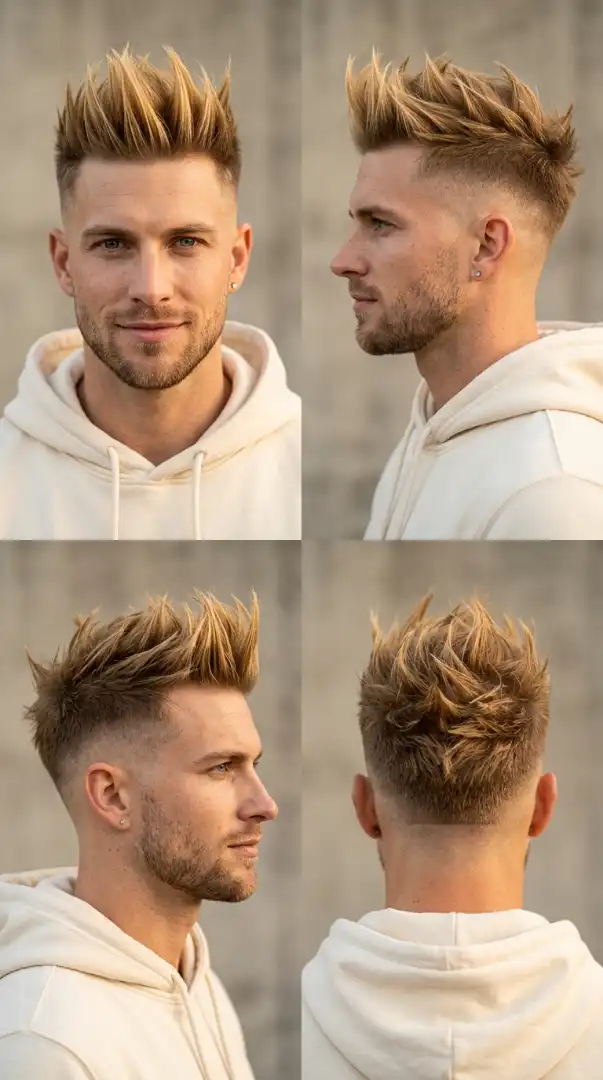
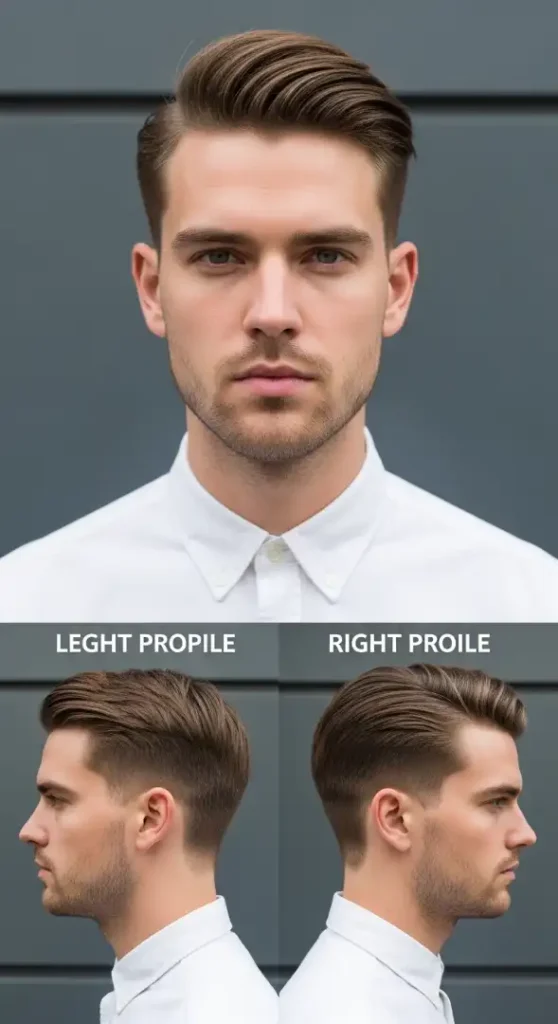
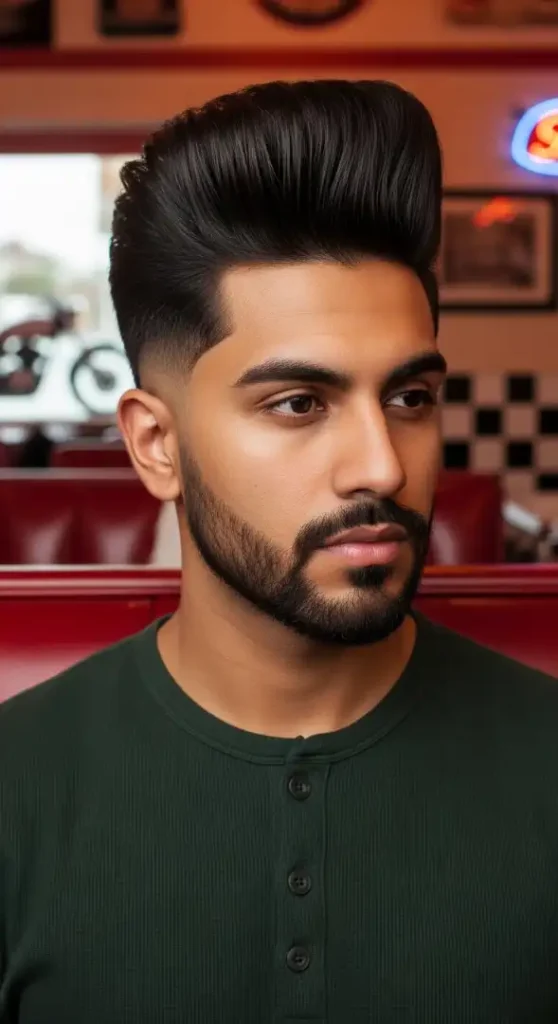
1 of 12 — The Continental Sweep

FACE SHAPE MATCH
The Continental Sweep is architecturally engineered for Square and Oblong face shapes, though it performs exceptionally well on Strong Jaw Rectangulars too. Here’s the anatomical logic: the backward-swept volume adds height at the crown while pulling the eye vertically upward, which elongates a Square face and counterbalances the strong horizontal jaw line. Unlike a high-volume pompadour that can feel costume-like, the Sweep’s continuous directional flow keeps proportions understated and editorial. For Oval faces, this style is essentially plug-and-play — no structural correction needed, the natural symmetry simply gets elevated. Avoid this cut if you have a very narrow Oblong face with a weak chin, as the volume at the crown can inadvertently exaggerate vertical length.
GROOMING KIT
- Clippers: Wahl Senior (for maintaining length and removing bulk at the sides if a soft taper is requested)
- Trimmer/Outliner: Andis T-Outliner for precise neckline and cheekline work
- Finishing Comb: Kent 20T Moustache Comb for directing the sweep in sections
- Brush: Mason Pearson Junior Bristle & Nylon for distributing product evenly through thick straight hair
- Styling Product: Layrite Superhold Pomade — 3/4 pump through damp hair, blow-dry backward with a paddle brush, finish with a very light mist of Kenra Platinum Silkening Mist for glass-smooth strand alignment
- Hold Level: Medium-high; re-activates with water, no mid-day re-application needed
MAINTENANCE LEVEL: MEDIUM
- Salon visit frequency: Every 4–5 weeks for neckline cleanup and perimeter shaping; the top length can go 6–8 weeks between recuts if the sweep is the primary movement
- Daily styling time: 6–8 minutes (3 min blow-dry with paddle brush, 2 min product application, 1–2 min finishing with a fine-tooth comb)
- Product routine: Towel-dry to 70% dryness → apply pomade → blow-dry backward at 45° angle → lock with a cold-air shot → light finishing spray
Not ideal for: frequent travelers who skip styling tools, or men with very fine, limp straight hair who find the sweep collapses within 2 hours without strong hold product.
BARBER TALK SCRIPT
“I want a Continental Sweep. Keep the top at 3 to 3.5 inches — no texture cuts, no point cutting, I want clean blunt weight through the top section to keep the sweep dense. On the sides and back, use a #3 guard tapering down to a #1.5 at the ear level, soft low fade, nothing skin. Blend the back with a #2 into the nape. Neckline: tapered, slightly rounded. Leave the fringe long enough to sweep fully back without clips. For the beard, keep my cheekline sharp — straight razor on the line — and fade the sideburn into the taper at the #1 level. Finish with the blow-dry backward while I’m in the chair, please.”
FAQs
Q: How do I style a swept-back hairstyle for men without it looking stiff or overdone?
A: Use a medium-hold pomade — not wax, not gel — applied to 70%-dry hair, then blow-dry backward using a paddle brush. The key is the heat direction: always aim the dryer nozzle toward the crown, not straight up. Finish with a cold shot to lock the shape. The result should move slightly, not sit like a helmet. Total styling time: under 8 minutes.
Q: Which face shapes suit a swept-back straight hairstyle best?
A: Swept-back styles suit Square and Oval face shapes best. The backward directional movement draws the eye toward the crown, visually elongating a Square jawline and complementing the balanced proportions of an Oval face. Round faces can wear this style with a higher-volume sweep, but should avoid flat, close-to-the-head variations.
Q: What is the difference between a Continental Sweep and a Slick Back?
A: A Slick Back lies flat and tight to the skull, usually held with gel or strong pomade for a wet finish. The Continental Sweep maintains volume and lift through the crown — the hair arcs backward rather than plastering down. The Sweep looks more casual and editorial; the Slick Back reads more formal and intentional.
Q: How often should I get The Continental Sweep touched up at the barber?
A: Every 4–5 weeks for neckline and perimeter cleanup. The top length grows out gracefully — you can stretch to 6–7 weeks if you don’t mind slightly more length in the sweep. A stale neckline is the first visual sign this style has outgrown its cut, so prioritize that visit when you notice it.
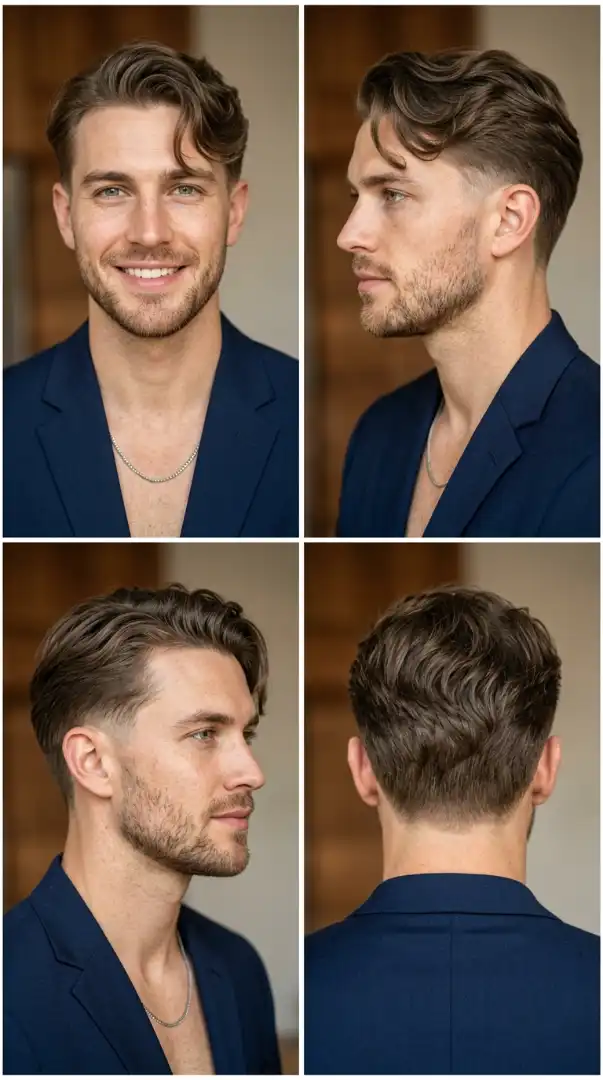
2 of 12 — The Polished Undercut
FACE SHAPE MATCH
The Polished Undercut is one of the most versatile structural cuts in men’s hair, but it performs best on Oval, Diamond, and Heart face shapes. The disconnected shaved side removes visual bulk from the temporal region, which is particularly beneficial for Heart-shaped faces where the forehead is the widest point — the shaved sides create a visual narrowing of the upper face that brings proportions into balance. For Diamond faces, the exposed cheekbones are framed beautifully by the contrast between the buzzed sides and the flowing top. Oval faces get the full editorial benefit with zero correction needed. Avoid this style if you have a very Round face without strong bone structure — the hard disconnection can create an unwanted square-block silhouette without proper styling.
GROOMING KIT
- Clippers: Andis Master (corded) for the tight side buzz — the zero-overlap blade gives the cleanest #1.5 finish on South Asian hair which tends to be dense
- Trimmer/Outliner: BaByliss Pro FX787 for hairline definition and neckline outlining
- Comb: Kent 81T Coarse-tooth comb for directing the top section while blow-drying
- Brush: Denman D3 7-Row Styling Brush — ideal for South Asian straight hair types to smooth the top without frizz
- Product: American Crew Fiber (pea-sized amount through damp hair, blow-dry into direction) + Baxter of California Clay Pomade for matte finish on top. On high-humidity days, substitute with Kevin Murphy Hair Resort Spray for hold without the weight.
MAINTENANCE LEVEL: HIGH
- Salon visit frequency: Every 3 weeks — the disconnection line loses its visual impact after 3 weeks of growth on dense hair types
- Daily styling time: 7–10 minutes (blow-dry with comb, 3–4 minutes; product application and direction, 3 minutes; finishing comb-through, 1–2 minutes)
- Product routine: Towel-dry → apply clay through the top section from root to mid-shaft → blow-dry with directional tension → once dry, use fingertips to define the flow direction → optional light-hold spray for humidity control
Not ideal for: men who prefer low-maintenance routines or those who exercise early morning and need a wash-and-go option, as wet undercut hair without product appears undefined.
BARBER TALK SCRIPT
“I want a disconnected undercut — hard disconnection, no blending or fading into the top. Shave the sides and back with no guard or a skin pass up to the parietal ridge. Above the parietal ridge, leave at least 3 inches so the top has movement and can be directed to one side. No texture on the top — I want blunt, clean weight lines that hold the sweep. Hairline: natural, no shaping or lining. Neckline: squared off, trimmed with the outliner. No beard — just clean up the sideburns flush with the skin fade. Finish the top blow-dried to the left.”
FAQs
Q: How do I maintain a disconnected undercut at home between barber visits?
A: Use your trimmer at the same guard setting as your barber (usually #0 or #1 on the sides) to clean up any growth along the shaved portion every 7–10 days. The top needs no trimming at home — just styling. The neckline is the most visible part to maintain: use an outliner with no guard to keep it crisp. If you’re unsure about the disconnection line, wait for your barber.
Q: Which face shapes suit the Polished Undercut best?
A: The disconnected undercut looks best on Oval, Diamond, and Heart face shapes. These shapes benefit from the visual contrast between close-shaved sides and the voluminous top, which adds height without adding width. Rounder faces can wear this style but need the top to have height and volume — a flat, close-lying top on a round face will make the head appear wider.
Q: What is the difference between a disconnected undercut and a regular undercut?
A: A regular undercut blends or fades the sides into the top gradually using graduated guards. A disconnected undercut has a hard, unblended line where the closely cropped sides meet the long top — the two sections do not transition into each other. The disconnected version is more dramatic, more editorial, and requires more precise maintenance.
Q: How often should I visit the barber for an undercut with straight hair?
A: Every 2–3 weeks for the sides; the top only needs trimming every 6–8 weeks. Dense, straight hair shows growth at the sides faster than wavy or textured hair — after 3 weeks, the contrast that makes the undercut look intentional starts to soften and the style loses its signature impact.
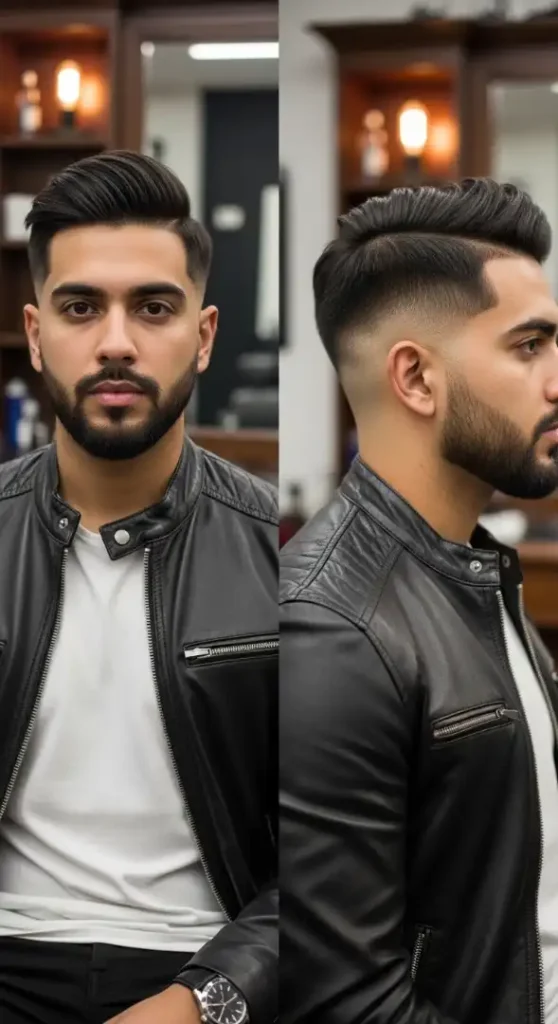
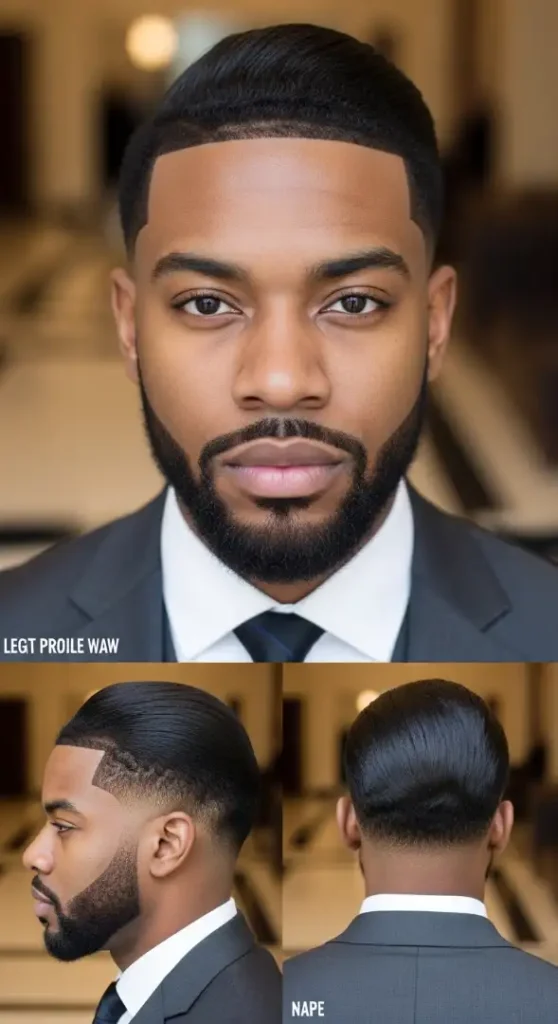
3 of 12 — The Executive Slick
FACE SHAPE MATCH
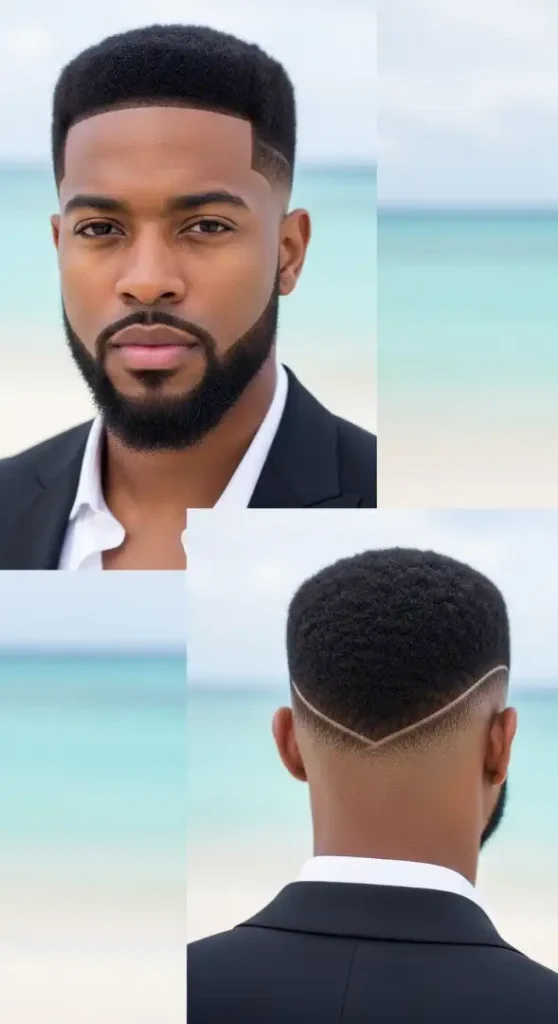
The Executive Slick is purpose-built to work against width — making it the go-to correction cut for Round and Full face shapes. The slicked-back direction channels the eye from the forehead straight to the crown, creating a vertical visual line that counteracts the horizontal breadth of a round face. Combine this with a low-to-mid fade on the sides and you’ve removed the widest third of the head’s silhouette. For African-American men with chemically relaxed or blown-out straight hair, the texture responds beautifully to this technique — the added weight of relaxed strands gives the slick-back more visual density than fine or naturally wavy hair types. Square faces can also wear this cut, as the backward movement softens the angularity without completely eliminating it — leaving just enough structure for authority.
GROOMING KIT
- Clippers: Wahl Magic Clip Cordless — exceptional for blending on type 4 hair without pulling; use with #1.5 guard for the low fade
- Trimmer/Outliner: Andis T-Outliner (corded) — the industry gold standard for lineup precision on African-American hairlines; the T-blade follows the hairline contour with accuracy no cordless trimmer can match
- Brush: Denman D4 Large Cushion Brush for blow-out prep, then a Torino Pro Wave Brush for the final slick-back compression
- Finishing Comb: Hercules Sägemann 4-inch Fine-Tooth Comb for comb-track definition
- Product: Murray’s Superior Hair Dressing Pomade (traditional, medium-hold) for the authentic slick-back press. For lighter modern finishes: Paul Mitchell Super Skinny Serum on damp hair before blow-dry, then Suavecito Original Pomade on dry hair for the final sleek.
- Beard: Bevel Beard Oil (2–3 drops on palm, pressed into the grain) to keep the faded beard looking defined and non-flaky.
MAINTENANCE LEVEL: MEDIUM-HIGH
- Salon visit frequency: Every 2–3 weeks for lineup freshening and fade tightening; relaxed hair grows out at the hairline quickly and a stale lineup is the first sign this look has aged
- Daily styling time: 8–12 minutes (blow-dry with paddle brush 4–5 min, product apply and comb 3 min, lineup mirror-check 1 min)
- Product routine: Pre-style serum on damp hair → blow-dry on medium heat with tension using Denman brush → apply pomade section-by-section from front to crown → comb-track pass from left-of-center backward → lock with cool air shot
Not ideal for: men who prefer the natural 4C texture without chemical relaxers (this style requires straight, pressed texture for the slick-back to lie flat correctly). Also not ideal for humid climates without a humidity-blocking finishing spray.
BARBER TALK SCRIPT
“I want an Executive Slick — clean, corporate, no texture or messy finish. Low fade on the sides — start at a #2 guard about an inch above the ear, blend down to skin by the sideburn. Keep the back tight with a low fade into a tapered nape — V-shape at the neckline, not a rounded U. On top, leave at least 3.5 to 4 inches so I have enough to slick back with pomade. No layers, no choppy ends — I want clean blunt weight that holds the slick. Lineup: fresh edge along the hairline, temples, and sideburns — surgical. For the beard: low fade from chin stubble blending into the cheekline, sharp hard line from the mustache corner to the cheek. Finish with a blow-dry backward while I’m still in the chair.”
FAQs
Q: Can African-American men wear a slick-back hairstyle with straight hair?
A: Yes — African-American men can absolutely wear a slick-back using chemically relaxed, permanently straightened, or blow-dried type 4 hair. The key is blow-out prep with a smoothing serum before heat styling, followed by a medium-hold pomade for the backward press. Daily wrapping (using a wave cap overnight) maintains the flat, sleek position without requiring a full re-style every morning.
Q: How do I keep a slicked-back hairstyle from reverting to its natural texture?
A: Use a hold-locking technique: apply pomade to damp (not wet) hair, blow-dry using tension in the backward direction, then wrap the hair tightly in a durag or wave cap for 20 minutes after styling. This sets the direction into the hair. A light humidity-blocking spray over the finished style helps in warmer months.
Q: How short should the sides be for an Executive Slick?
A: For the Executive Slick, a low fade is the sweet spot — #2 guard at the parietal ridge tapering down to skin at the sideburn. Mid or high fades can work but push the style toward more casual territory. The low fade keeps the authority and formality intact while still giving a clean modern edge.
Q: How often should I touch up the lineup on a slicked-back style?
A: Every 10–14 days. The lineup is the most visible technical element of this style — when the hairline edge begins to soften or grow out, the entire look loses its sharp authority. Many barbers offer a “shape-up only” appointment at a lower cost between full cuts, which is the most efficient maintenance system for this style.
4 of 12 — The Modern Caesar Drape
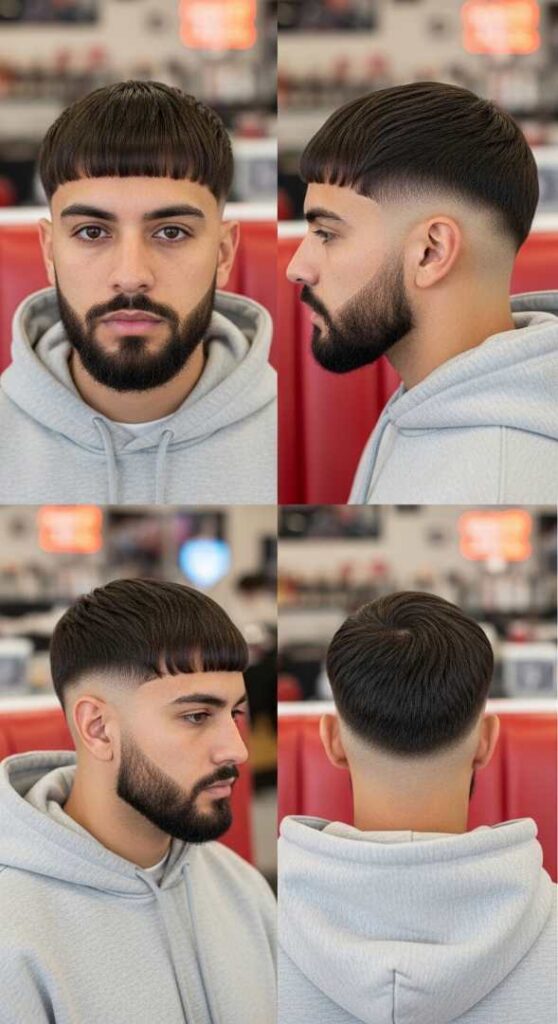
FACE SHAPE MATCH
The Modern Caesar Drape is a horizontal-dominant style — and that is precisely why it performs best on Oblong, Diamond, and Oval face shapes. The blunt horizontal fringe acts as a visual curtain across the forehead, reducing perceived vertical length in Oblong faces with surgical efficiency. For Diamond faces, the fringe minimizes the forehead-temple width while keeping the natural jawline prominence intact. On Oval faces, the Caesar’s horizontal weight adds the one element this face shape occasionally lacks: a strong top-frame. Avoid this style on very Round faces — the horizontal fringe parallels the widest part of the face, reinforcing roundness rather than correcting it. If you have a Round face and love the Caesar, ask for a slight arc in the fringe rather than a flat horizontal cut — this introduces diagonal movement that better suits rounder bone structures.
GROOMING KIT
- Clippers: Wahl Magic Clip Cordless — for the low fade graduation; the taper lever gives precise control on the blend from #1.5 down to skin
- Trimmer/Outliner: Andis T-Outliner — for the beard lineup and neckline precision; the boxed beard requires four hard corner points that only a T-blade can deliver accurately
- Scissors: Kamisori Diamond II 6.5″ — for the blunt fringe cut; scissors-over-comb on the crown to remove bulk without losing the horizontal weight line
- Comb: Hercules Sägemann 401 Wide-Tooth + Fine-Tooth combo comb for sectioning and fringe direction
- Product: Suavecito Matte Clay (half a dime) for a matte, clean hold on the fringe without shine. For the beard: Honest Amish Classic Beard Balm worked into the boxed beard post-trim to define the shape and reduce flyaways.
MAINTENANCE LEVEL: MEDIUM
- Salon visit frequency: Every 3–4 weeks — the horizontal fringe line is the defining element; once it grows past the brow, the Caesar identity is lost
- Daily styling time: 4–6 minutes (apply matte clay to damp fringe, comb forward horizontally, blow-dry forward at low heat with a flat brush, done)
- Product routine: Damp hair → matte clay fingertip application on the fringe → flat brush forward → low heat blow-dry → optional small amount of clay for the crown’s texture on top
Not ideal for: men with cowlicks at the hairline (the blunt fringe will flip or lift unevenly without daily heat styling). Also not ideal for men who prefer very minimal product — this style needs at least a light clay to maintain the horizontal shelf.
BARBER TALK SCRIPT
“I want a Modern Caesar — blunt fringe falling straight across mid-forehead, heavy horizontal weight, no layers or texture in the fringe itself. Leave the fringe at about eyebrow length. On the sides: skin fade — low, starting at the ear level, graduating to skin at the sideburn point. Blend the top into the sides smoothly — I don’t want a hard disconnection here, just a clean gradual fade. Crown length: about 2 to 2.5 inches, lying flat, minimal texture. Neckline: squared off, sharp. For the beard: keep the box shape — hard corners at the jaw. Blend the sideburn into the skin fade at a #1 guard. Cheekline straight with an outliner. Mustache trimmed to the lip line.”
FAQs
Q: What is the difference between a Caesar haircut and a modern Caesar?
A: The classic Caesar (popularized in the 1990s) is an all-over short uniform length with a blunt horizontal fringe, often worn without any fade. The Modern Caesar Drape adds a low skin fade on the sides, slightly more length on top for movement and texture, and a more refined fringe that can have subtle directional drape rather than lying completely flat. The modern version is more tailored and adaptable to current style codes.
Q: How do I stop my Caesar fringe from sticking up or flipping?
A: Blow-dry the fringe on low to medium heat using a flat paddle brush or a vented round brush, directing heat and tension forward and downward simultaneously. The heat breaks any natural cowlick tension. Apply a small amount of matte clay to damp hair before blow-drying — this gives the fringe product memory that holds the horizontal position for 8–10 hours even on stubborn textures.
Q: How often should I trim a Caesar haircut?
A: Every 3–4 weeks. The fringe is the most time-sensitive element — once it grows past the eyebrow line, the clean architectural quality of the Caesar reads as overgrown rather than intentional. The sides on a low skin fade also need refreshing by week 3 to maintain the clean graduation.
Q: Does the Caesar cut work on wavy or straight hair only?
A: The blunt horizontal fringe works best on straight to slightly wavy hair. Strongly wavy hair will cause the fringe to curl upward at the ends rather than lie flat. If you have natural wave, a smoothing balm applied before heat styling (such as Redken Iron Shape 11) can press the fringe straight for the day. Very curly hair is not suited to this style without significant chemical or heat straightening
5 of 12 — The Ice Curtain
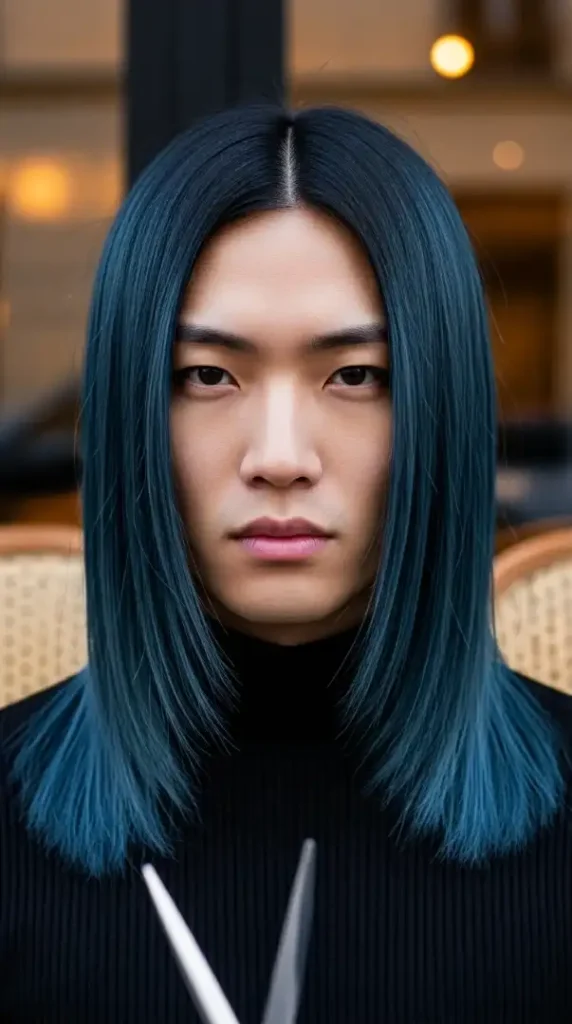
FACE SHAPE MATCH
The curtain haircut — particularly executed in a pin-straight texture — is one of the most structurally intelligent men’s styles because it works symmetrically and universally across nearly all face shapes through one simple mechanism: the side curtains visually narrow the forehead and cheek width by drawing a vertical line down each side of the face. For Oblong faces, the center part and downward-falling curtains create horizontal eye movement that balances vertical length. For Heart faces, the curtains soften a wide forehead by framing it with downward-falling hair. For Square faces, the gentle diagonal of the falling curtains counters hard jaw angles. The only shape this style challenges is very Round faces with no strong bone structure — the symmetrical center part can create a mirror-image roundness that emphasizes width without correcting it.
GROOMING KIT
- Clippers: Oster Classic 76 with #1 guard for the very light taper at the nape and sides — the Ice Curtain requires minimal clipper work, mostly scissors-based
- Trimmer: BaByliss Pro FX Skeleton Trimmer for the neckline only — no heavy outlining, just a clean natural nape edge
- Scissors: Kasho Japanese Steel 6.0″ Point-Cut Scissors — the curtain ends should be micro-point-cut to achieve the feathered ends that prevent blunt stiffness
- Comb: Hercules Sägemann 402 Fine-Tooth Comb for parting and directing the curtain sections
- Product (minimal): The Ice Curtain demands restraint — over-product is the enemy. Use 1 pump of Kevin Murphy Smooth Again Rinse (a leave-in smoothing serum) on towel-dry hair, air-dry or diffuse on low, then finish with a drop of Oribe Glimmer Serum for the glass-strand luminosity effect. No pomade, no clay — this style lives or dies by hair health.
- Hair Health: Moroccanoil Treatment Original (3 drops post-wash) — the argan oil base penetrates pin-straight East Asian hair types exceptionally well, preventing the frizz-fringe that can break the ice aesthetic.
MAINTENANCE LEVEL: LOW
- Salon visit frequency: Every 5–7 weeks — the curtain grows out gracefully; longer curtains are equally valid as shorter ones, the main trim trigger is when the center part becomes uneven or the ends become too blunt
- Daily styling time: 2–4 minutes (literally: apply serum, part down the center, air-dry or a 2-minute diffuse blast)
- Product routine: Post-wash leave-in serum → center part with a fine comb → air-dry → optional finishing drop of gloss serum before heading out
Not ideal for: men with very fine hair that goes limp without volume product (the curtain will lie flat and shapeless against the face). Also not suitable for very thick, dense hair types without thinning — without texture removal, the curtain will bush out rather than fall cleanly.
BARBER TALK SCRIPT
“I want a curtain haircut — keep the parting in the center, medium-length curtains falling just below my cheekbones. Use scissors predominantly — I don’t want heavy clipper work. On the sides, just a very light natural taper at the back and nape using scissors-over-comb or a #2 guard — nothing shaved, nothing faded, just a natural taper so it’s clean at the collar. Point-cut the ends of the curtains slightly — I don’t want a blunt horizontal line, I want the ends to be slightly feathered and soft. Leave the crown full — no thinning at the top. Neckline: natural, not outlined with a trimmer, just a light scissors cleanup. No beard work needed today.”
FAQs
Q: How do I style a curtain haircut to keep the center part straight all day?
A: The center part stays cleaner when set in damp hair using a fine-tooth comb. Applying a light leave-in serum before parting gives the hair memory, so the part resists shifting as the hair dries. Avoid touching the part with your fingers during the first 15 minutes of drying — the cuticle is most pliable when wet and sets into position as it dries.
Q: Does the curtain haircut suit straight hair specifically?
A: Straight hair is the ideal texture for the curtain cut — the strands fall with natural gravity-compliance, creating the clean vertical drape that defines the style. Wavy hair can achieve a curtain effect with air-drying techniques or light smoothing products. Curly hair requires heat straightening or chemical services to achieve the pin-straight curtain look.
Q: How long should the curtain haircut be to look best?
A: The most versatile curtain length sits between cheekbone level (shorter, more structured) and chin level (longer, more romantic). For East Asian straight hair, the cheekbone-length curtain works exceptionally well because the natural silkiness keeps the panels close to the face without requiring extra product. Lengths below the chin begin to shift the style into medium-length territory and require stronger product to prevent the curtain from flying outward.
Q: What is the difference between a curtain cut and a two-block cut?
A: The curtain cut maintains hair length evenly across the top and sides (with minimal tapering), with the defining feature being the center-parted symmetrical drop. The two-block cut (popular in Korean men’s grooming) has a sharper side-to-top weight change — shorter sides with a clearly heavier top section — creating a structural contrast without a traditional fade. Both suit straight hair, but the two-block reads more structured; the curtain reads more natural and European.
6 of 12 — The Desert Prince Taper

FACE SHAPE MATCH
The Desert Prince Taper is strategically built for Heart and Oval face shapes — and it’s particularly transformative for Heart shapes where the forehead is significantly wider than the jaw. The mid-fade removes lateral visual mass from the temporal region, narrowing the widest point of a Heart face without sacrificing length or volume on top. The full beard then performs its counter-correction: by adding visual mass at the chin and jaw, the beard rebalances the Heart shape toward a more diamond-like proportion. This beard-plus-taper combination is one of the most powerful structural corrections in men’s grooming, precisely because it works in two directions simultaneously. For Oval faces, this combination needs no correction — the taper and beard simply amplify the natural balance. Diamond faces benefit significantly too: the mid-fade softens wide cheekbones while the full beard adds width at the jaw.
GROOMING KIT
- Clippers: Wahl Senior (taper lever fully open for the mid-fade blend — the analog lever gives tactile feedback that digital clipper adjustments cannot)
- Trimmer/Outliner: Andis T-Outliner for the geometric cheekline — the straight, flat T-blade delivers ruler-straight cheekline definition on dense beard hair
- Straight Razor: Dovo Bergischer Löwe 6/8″ Straight Razor for cheekline and neckline finishing (or a Feather Artist Club SS razor for those preferring disposable blade safety)
- Beard Brush: Kent BRD2 Beard Brush — boar bristle, ideal for distributing oil through the full beard and training the grain direction
- Product (Hair): Suavecito Original Pomade — medium hold, medium shine; ideal for the elevated-comb-back direction required on straight Middle Eastern hair
- Product (Beard): Cremo Beard Oil (3 drops) post-trim + Beardbrand Utility Balm for beard shape memory and frizz control; the full beard structure stays defined for 10–12 hours
MAINTENANCE LEVEL: MEDIUM-HIGH
- Salon visit frequency: Every 2–3 weeks for both fade tightening AND cheekline shaping — the beard is the most time-sensitive element; a stale cheekline on a full beard looks significantly more unkempt than on a light beard
- Daily styling time: 10–14 minutes (5 min beard routine: comb, oil, shape; 4–5 min hair: product application, blow-back, comb finish; 1 min neckline check)
- Beard daily routine: Morning rinse (no shampoo daily) → pat dry → 3 drops beard oil pressed in palm → work through grain from sideburn to chin → comb in grain direction → press shape with palms → optional beard balm for hold in the chin section
Not ideal for: men who prefer minimal grooming time (this style’s dual-element maintenance — both hair and full beard — requires consistent daily attention); also not suited to patchy beard growers who cannot achieve dense cheek coverage.
BARBER TALK SCRIPT
“I want The Desert Prince Taper. On the hair: keep the top at about 3 inches, combed backward with a slight elevation — no hard part. Mid-fade on the sides: use a #2 guard at the occipital bone, blend down through #1 to skin above the ear. Neckline: tapered, natural arch. For the beard: keep the full length — trim the beard to about 1.5 inches uniform length, rounded at the chin. The cheekline I want sharp and geometric — use the straight razor, angle straight from the corner of the mustache to the earlobe. Fade the sideburn from the cheekline beard with a #1 guard so it connects to the mid-fade. Under the chin neckline: clean, natural curve about a finger above the Adam’s apple. Finish with a hot towel on the beard.”
FAQs
Q: What is a mid-fade and how is it different from a low or high fade?
A: A mid-fade begins its graduation at the midpoint of the head — roughly level with the top of the ear — and tapers to skin at or below the ear. A low fade starts the graduation lower, just above the sideburn, creating a subtler transition. A high fade starts above the temples, removing more volume and creating a more dramatic contrast. The mid-fade is the most versatile — it works for both formal and casual contexts and suits most face shapes.
Q: How do I maintain a straight hairstyle with a full beard?
A: The key is balancing the hair’s backward direction with the beard’s forward presence. Style the hair first (product + comb), then oil the beard and comb it in grain direction. The two elements should visually complement each other — the hair shouldn’t overpower the beard or vice versa. A barber who understands both elements together as a unified design is essential for this style.
Q: What beard length works best with a taper haircut?
A: A medium-length beard (1 to 2 inches) paired with a mid-fade creates the most balanced silhouette. Short stubble can look underdeveloped next to a precise mid-fade. Very long beards (3+ inches) can overwhelm the clean geometry of the taper. The sweet spot is dense, shaped, and defined — enough volume to balance the fade, enough structure to look intentional.
Q: How often should I oil my beard to keep it healthy?
A: Apply beard oil daily, particularly in the morning after your face wash. 2–3 drops is enough for a medium-length beard; increase to 4–5 drops for longer beards or in dry climates. Over-application leaves the beard looking greasy rather than healthy. The goal is moisturized skin underneath and flexible, soft beard hair on top.
7 of 12 — The Nordic Comb-Over
FACE SHAPE MATCH
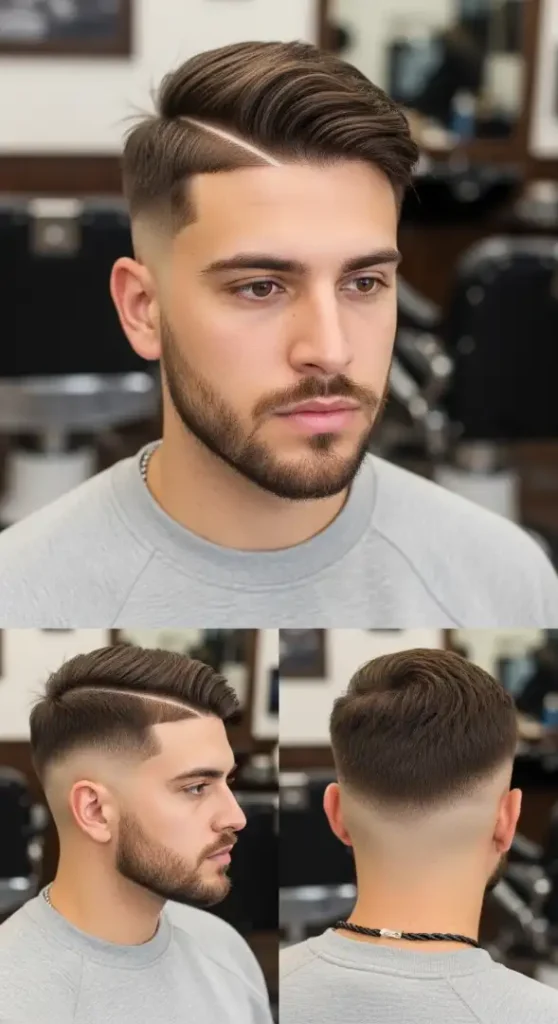
The Side-Part Comb-Over is anatomically most effective on Square, Diamond, and Oval face shapes. For Square faces, the asymmetric sweep of the comb-over breaks the bilateral symmetry of a strong jaw — the directional movement from part to sweep creates a diagonal visual line that softens the block-like quality of Square proportions. For Diamond faces, the comb-over’s volume on one side counterbalances prominent cheekbones by adding width at the crown-temple area in a controlled, directional way. The asymmetric parting also creates visual asymmetry that makes Diamond-shaped faces appear more oval. For Oblong or rectangular faces, however, this style should be used with lower volume on the sweep — the tall, arching comb-over can elongate an already long face if the volume peaks too high.
GROOMING KIT
- Clippers: Wahl Magic Clip (cordless) with #1.5 guard for the low fade graduation on Caucasian hair, which tends to show fade lines very cleanly on lighter scalps
- Trimmer/Outliner: Andis Slimline Pro Li for the hairline and neckline cleanup — the slim cordless design is ideal for detail work around the sideburns and natural neckline
- Comb: Kent 20T Fine-Tooth with handle — essential for the precise parting line; a rattail comb creates too narrow a part; a wide-tooth comb creates too soft a part
- Brush: Mason Pearson Pocket Bristle Brush for the final comb-over sweep — boar bristle smooths the cuticle of straight hair and adds a natural light-reflecting sheen without product
- Product: Layrite Natural Matte Cream — water-based, medium hold, matte finish. Ideal for the Nordic Comb-Over’s natural, non-lacquered look. Apply a dime-size amount to damp hair, blow-dry with a round brush building the comb-over volume, then use a comb to set the part and direction. No need for a second product.
MAINTENANCE LEVEL: LOW-MEDIUM
- Salon visit frequency: Every 4–5 weeks — the comb-over grows out gracefully; the low fade is the only element that reads “stale” first
- Daily styling time: 5–7 minutes (blow-dry with round brush while directing the sweep, 3–4 minutes; product application, 1 minute; comb-set the part, 1 minute)
- Product routine: Towel-dry to 60% dryness → apply matte cream at the roots of the top section → blow-dry with round brush from part toward the right, building volume at the arch → once dry, use a fine comb to define the part cleanly → done
Not ideal for: very fine, limp straight hair where the comb-over volume collapses within 2 hours without stronger hold product. If you have fine hair, substitute Layrite Natural Matte Cream for Kenra Platinum Silkening Mist plus a light-hold mousse at the roots for lifting support.
BARBER TALK SCRIPT
“I want a classic side-part comb-over — left-side hard part, parting from the natural hairline back about 3 to 4 inches. Low skin fade on both sides — start with a #2 at the ear arch and graduate to skin at the sideburn. Keep the top at 3 to 4 inches so I have enough length for a full, voluminous comb-over sweep. No texture or point-cutting on the top — I want clean, blunt weight so the sweep holds its shape. The parting line: use a rattail comb to create it clean before the fade, so I can see where the fade level sits. Neckline: natural, tapered, no outliner shape-up — just a clean scissors taper. Light stubble on the face — just trim the beard down to a uniform 2–3mm with a guard. Blow-dry the comb-over on the left side before I leave the chair.”
FAQs
Q: How do I get volume in a comb-over hairstyle without it looking stiff?
A: Volume without stiffness comes from blow-drying with a round brush — not from heavy product. Apply a matte cream to damp hair, then use a round brush to lift and direct the hair as you dry. The round brush creates air-filled volume at the root without the lacquered finish that gel creates. Finish with a cold-air shot to lock the shape, then mist with a very light finishing spray. The result moves naturally.
Q: What is the best product for a side-part comb-over with straight hair?
A: A water-based matte cream or light pomade gives the best result for straight-haired comb-overs. Products like Layrite Natural Matte Cream or American Crew Pomade deliver medium hold with natural movement. Avoid oil-based pomades for the comb-over unless you specifically want a classic wet look — they’re harder to wash out and heavy daily use can affect scalp health.
Q: What is a hard part in a comb-over and do I need one?
A: A hard part is when the barber shaves a razor-thin line into the scalp at the parting point, creating a high-contrast white line against the hair. It’s an optional style choice — the standard comb-over uses a natural part (combed in with a comb, no razor line). The hard part makes the style sharper, more dramatic, and requires the barber to refresh it at every visit. Choose it if you want a more structured, barbered look; skip it for a more natural, European-casual feel.
Q: Does a comb-over suit men with thinning hair?
A: Yes — the comb-over is one of the most historically effective cuts for men with thinning crowns because the directional sweep moves hair from a fuller area toward a thinner one, naturally increasing visual density. The key is not to sweep too much hair over too large a bald area — keep the top length moderate (3–4 inches) and use a thickening matte product rather than shine-based pomades that make thin strands clump together and highlight gaps.
8 of 12 — The Obsidian Flow
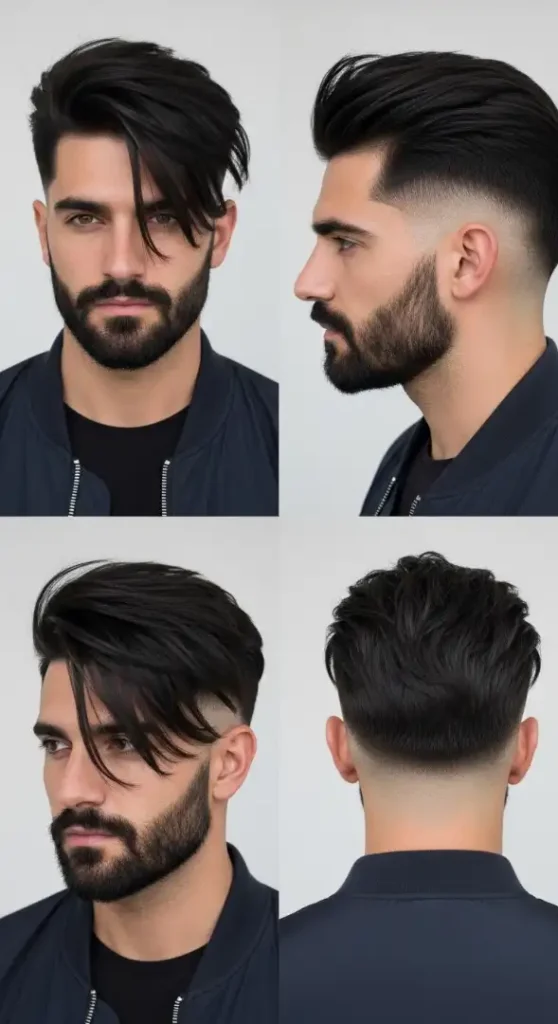
FACE SHAPE MATCH
The Obsidian Flow — a long-top, close-faded-sides style with dramatic directional movement — performs best on Oval and Oblong face shapes due to the length weight distribution. The flowing top creates vertical depth and forward movement that frames an Oval face with a cinematic quality. For Oblong faces, the key is ensuring the forward-falling forelock is angled diagonally — not straight back — which introduces horizontal movement that offsets vertical length. Heart faces benefit significantly from this style: the weight at the forehead narrows the visual width of the upper face by covering part of the hairline and temples, while the side taper eliminates additional temple width. Square faces can wear this style but need to avoid the hair falling too flat against the forehead, which can create a brow-shelf effect — a slight pompadour arch at the forehead section maintains the necessary height.
GROOMING KIT
- Clippers: Andis Master (corded) — the consistent motor torque is non-negotiable for the tight mid-taper graduation on thick Mediterranean straight hair
- Trimmer/Outliner: BaByliss Pro FX Skeleton for neckline outlining and beard cheekline definition
- Scissors: Kamisori Jewel 6.5″ Offset-Handle — for the top section length management; slide-cutting technique through the straight top sections to remove bulk while preserving length
- Product (Primary): Oribe Rough Luxury Molding Wax — the finest product on the market for thick, straight hair that needs direction and definition without weight collapse. Apply on completely dry hair, work through from mid-shaft to ends, define the flow direction with fingers.
- Product (Secondary): Bumble and Bumble Brilliantine (1 drop on the palms, run through the finished style) for the glass-black luminosity that gives this cut its “obsidian” quality
- Beard: Ursa Major Stellar Shave Cream for the clean neckline razor work; Beardbrand Beard Softener for daily conditioning of the salt-and-pepper close beard
MAINTENANCE LEVEL: MEDIUM
- Salon visit frequency: Every 5–6 weeks — the long top grows very gracefully; the sides are the only time-sensitive element, requiring tightening at week 4–5
- Daily styling time: 6–8 minutes (apply wax on dry hair: 2 min; define direction with fingers: 2 min; beard oil and comb: 2 min; mirror check: 1 min)
- Crucial styling note: this style is product-sequenced — the wax goes on DRY hair, not damp. Damp hair plus heavy wax = clumpy, separated strands, not a fluid flow.
Not ideal for: men who wash their hair daily (the matte wax is best washed out every 2 days; daily washing strips the natural oils that help straight hair flow). Also not ideal for active lifestyles where sweat causes the flowing section to collapse and mat to the forehead.
BARBER TALK SCRIPT
“I want the long-top, close-faded sides look — think cinematic, flowing, a bit dramatic. Keep the top at 4.5 to 5 inches — long enough to flow forward across the forehead. I don’t want layers — just a slight slide-cut to remove bulk, but keep the length intact. Mid-fade on the sides — #1 mid-fade, blending to skin at the sideburn. The length differential is what makes this work, so please don’t cut too much off the top. Neckline: rounded, low-taper, natural curve — no squared-off outline. Beard: keep the length, just clean up the cheekline with the outliner — sharp straight line from mustache to cheekbone. Fade the sideburn into the #1 taper on the same level. No full shave anywhere. Blow-dry the top forward and to the left while I’m in the chair.”
FAQs
Q: How do I style long straight hair on top without it looking flat and lifeless?
A: The key is working on completely dry hair with a wax or molding clay — not a pomade. Matte wax applied to dry straight hair creates separation and texture between the strands, preventing the flat, sheet-like appearance. Use your fingers to lift and direct the hair rather than a comb, which tends to flatten it. A small amount of dry texture spray at the roots before product application also boosts root lift significantly.
Q: What is the best haircut for men with thick straight black hair who want length on top?
A: A mid-fade with a long, disconnected top (often called a “bro flow” or “long top fade”) is the most practical choice. The fade cleans up the sides and back while allowing the top to grow to 4–6 inches. The contrast between the close sides and the long top creates structure without requiring the top to be layered or cut. This style works especially well for Mediterranean and East Asian hair types, where the natural weight of straight hair keeps the top from frizzing at length.
Q: How do I manage the silver temples look — should I color or embrace it?
A: Embrace it — silver temples on jet-black hair are one of the most distinctive and compelling visual signatures in men’s grooming. The contrast is naturally appealing and reads as distinguished rather than aged. If you want to enhance the definition, a semi-permanent hair gloss treatment on the black sections (not the silver) deepens the color contrast. Coloring the silver out is a personal choice but the trend is firmly in favor of the natural silver-black contrast.
Q: How long does the Obsidian Flow need to grow before it looks intentional?
A: The top section needs a minimum of 3.5–4 inches to achieve the directional flow. From a standard men’s haircut (typically 2–2.5 inches on top), expect 8–12 weeks of growth before the flow direction becomes controllable. During this grow-out period, use a medium-hold product to train the hair in the desired direction each day — this builds hair memory and reduces styling time once the length goal is achieved.
9 of 12 — The Midnight Pompadour
FACE SHAPE MATCH
The Pompadour is one of the most powerful face-shape correction tools in men’s hairstyling, particularly for Round and Square face shapes where vertical height is the structural goal. The high-rising arch of the pompadour adds significant crown height — visually elongating the face from forehead to apex, which counterbalances the horizontal breadth of both Round and Square bone structures. For South Asian men with naturally straight, dense black hair, the pompadour is particularly effective because the hair’s natural weight and straight texture provide the structural memory needed to hold the arch all day without the heavy product loads required by thinner hair types. Heart faces benefit moderately — the high crown draws the eye upward and away from the wider forehead, but the volume at the top can sometimes amplify perceived forehead size; request a pompadour with slightly reduced front volume and more emphasis on mid-crown height to correct this.
GROOMING KIT
- Clippers: Wahl Senior with #1 guard for the high skin fade foundation; the lever-controlled graduation is essential for the sharp fade line under the pompadour’s arch
- Trimmer/Outliner: Andis T-Outliner (corded) for the surgical hairline definition — the pompadour’s height makes the front hairline extremely visible, requiring razor-crisp edge work
- Brush: Kent Visuel 2000 Boar Bristle Round Brush (medium diameter) — the round shape is non-negotiable for building the pompadour’s arch during blow-drying
- Comb: Hercules Sägemann 633 Professional Styling Comb for the final direction set
- Product: Murray’s Superior Hair Dressing Pomade (heavy hold) as the base layer on damp hair, then Suavecito Firme Hold Pomade as the final surface application for peak arch architecture. The double-product technique — water-soluble base + oil-based topper — is the professional barber’s method for long-lasting pompadour height. Daily re-activation: spray water mist on the arch, re-comb, and it bounces back.
MAINTENANCE LEVEL: HIGH
- Salon visit frequency: Every 2–3 weeks — the high skin fade is the most maintenance-intensive element; the pompadour’s visual impact is directly dependent on the fade line’s sharpness
- Daily styling time: 10–15 minutes (base pomade application on damp hair: 2 min; blow-dry with round brush building the arch: 6–8 min; surface pomade and comb finish: 2 min; hairline mirror check: 1 min)
- Morning routine: Apply base hold product to 60% dry hair → section the front forelock separately → blow-dry the forelock section upward and backward with the round brush → once the arch is built, blow cold air to lock → apply a thin surface layer of Suavecito Firme → comb the sides smooth → done
Not ideal for: men who sleep without protecting their style (the pompadour collapses overnight; use a silk pillowcase or wrap with a wave cap to preserve the arch). Also high maintenance in humidity — the arch softens in humid air; a finishing pomade with humidity resistance is essential in tropical or summer climates.
BARBER TALK SCRIPT
“I want a classic pompadour. High skin fade on the sides — start at the parietal ridge and fade down to skin. I want a sharp, high contrast fade line — the height of the fade should align with where the pompadour arch begins so there’s maximum contrast between the shaved sides and the high top. Keep the top at 4 to 4.5 inches — I need the forelock section to be long enough to build a 3–4 inch arch. No texture on the top: I want clean, heavy straight hair so the pompadour holds its architectural shape without collapsing. Hairline: fresh lineup — clean sharp edge all the way around. Neckline: squared off, trimmed. Beard: just clean up the neckline under the chin, keep the stubble natural otherwise. Blow-dry the pompadour arch for me before I leave.”
FAQs
Q: How do I build a pompadour at home with straight hair?
A: Start with 60% dry hair. Apply a medium-to-firm hold pomade at the roots of the forelock section. Then blow-dry using a round brush, pulling the hair upward and backward simultaneously — it’s the tension between upward brush pull and backward air direction that builds the arch. Once the arch is shaped, hit it with cool air from the dryer to lock it in. Finish with a small amount of product swept over the surface for shine and control.
Q: Is a pompadour high-maintenance for everyday wear?
A: Yes — a full, structured pompadour requires 10–15 minutes of daily styling. If you want the pompadour silhouette with less daily effort, ask for a “pompadour-inspired top” — longer at the front, tapering toward the crown — rather than a full architectural pompadour. This grows more naturally and can be pushed up on “styled” days but worn more casually on others. A true pompadour requires commitment to daily build and product.
Q: What products make a pompadour last all day?
A: A double-layer product technique: apply a water-soluble base pomade (like Murray’s Superior or Layrite Superhold) to damp hair and blow-dry the arch. Then apply a light top layer of Suavecito Firme or Anchors Away Heavy Hold Pomade on the finished dry surface to lock the shape. The base gives hold memory; the top layer gives surface smoothness and shine. This combination can hold a pompadour for 12–16 hours in normal conditions.
Q: How high should a pompadour be?
A: For balanced proportions, the pompadour arch should be roughly equal to the vertical height of your face from chin to brow — approximately 2.5 to 4 inches depending on facial length. Too high looks theatrical and costume-like; too low reads as an overgrown forelock. For Round faces, push toward the taller end (3.5–4 inches) to maximize the vertical elongation effect. For Oblong faces, keep the arch at 2.5–3 inches to avoid over-elongating.
10 of 12 — The Urban Sleek
FACE SHAPE MATCH
The Urban Sleek — a flat, pressed, close-lying straight style with a high taper fade — is engineered for Diamond and Oval face shapes due to its minimal volume profile. For Diamond faces, where the cheekbones form the widest point, the flat close-crop of the sleek top removes competing width at the crown, allowing the naturally prominent cheekbones to function as the visual anchor. The high taper fade further tightens the temporal width, creating a beautifully tapered crown-to-jaw silhouette. For Oval faces, the sleek top is simply elegant — no structural correction needed, just pure proportional confidence. Round faces can adapt this style by requesting slightly more height at the front (a subtle lift at the hairline rather than completely flat), which introduces vertical movement that counteracts roundness.
GROOMING KIT
- Clippers: Wahl Magic Clip Cordless — for the high taper fade; on African-American hair types, the Magic Clip’s close-cutting blade delivers fade graduation with exceptional precision
- Trimmer/Outliner: Andis T-Outliner — for the neckline squared-off outline and the goatee precision shaping; the T-blade’s flat edge is essential for the goatee’s straight chin line definition
- Flat Iron: BaByliss PRO Nano Titanium 1″ Flat Iron — for the pressed-straight texture on natural hair; titanium plates distribute heat evenly without hot spots that cause damage
- Heat Protectant: Kenra Platinum Silkening Mist (applied before flat iron on damp hair)
- Product: Luster’s SCurl Wave Control Pomade for the sleek compression after pressing, or Crème of Nature Argan Oil Perfect 7-in-1 Leave-In for daily maintenance. For the goatee: Bevel Beard Oil (2–3 drops) + a precision goatee comb for shaping direction.
- Finishing: A light mist of Kenra Platinum Shine Spray over the finished sleek for the signature blue-black luminosity.
MAINTENANCE LEVEL: HIGH
- Salon visit frequency: Every 2 weeks for the high taper fade and neckline — on type 4 natural hair, the fade line grows out quickly and a stale high taper looks significantly unkempt at week 3+
- Daily styling time: 8–12 minutes (heat-protect and press: 5 min; product application and sleek compression: 2 min; goatee oil and comb: 2 min)
- Heat protectant is non-negotiable for type 4 hair that is being pressed straight — daily flat ironing without protectant causes protein loss and breakage within 3–4 weeks.
Not ideal for: men who want to avoid heat styling tools or chemical processing — this style requires either a flat iron, blow-out, or silk press to maintain the straight pressed texture. Also not ideal for men who prefer wash-and-go natural textures.
BARBER TALK SCRIPT
“I want The Urban Sleek — clean, pressed straight, high taper fade. High taper on the sides and back: #2 guard at the top of the temporal region, blending down through #1 to skin — tight at the nape. Neckline: squared off, sharp, outlined clean with the trimmer. On the top: keep about 2.5 inches, no layers — I want it to lie flat once I press it at home. For the hairline: fresh lineup all the way around — sharp edges, no soft blending at the front. Goatee: outline the chin triangle sharp — hard lines around the chin area, fade the cheeks up to nothing, clean up the mustache line. Leave the chin growth at about 1.5 inches. Finish with a hot towel on the face.”
FAQs
Q: How do African-American men straighten their hair for a sleek hairstyle?
A: The three main methods are: (1) Silk Press — using a professional flat iron on natural hair with heat protectant; (2) Chemical Relaxer — permanently reduces the curl pattern for longer-lasting straight texture; (3) Blow-out — using a blow dryer with tension and a brush. The silk press is the most popular for natural hair enthusiasts because it’s temporary and preserves hair health when done correctly with proper heat protectant.
Q: How do I keep straight hair from reverting to natural curl in humidity?
A: Apply a humidity-blocking finishing spray (like Kenra Platinum Silkening Mist or Paul Mitchell Super Skinny Serum) as the final step after pressing. These products create a film around the hair shaft that slows moisture absorption. Sleeping with a silk durag or bonnnet to protect the silk press also significantly extends the straight texture’s lifespan.
Q: What is a high taper fade and who suits it best?
A: A high taper fade begins its graduation at or above the temples — the topmost third of the head — and tapers down to skin at the sideburn or nape. It creates maximum contrast between the close-shaved sides and the top length, making it ideal for styles where you want the crown or top section to visually dominate. It suits Diamond and Oval faces best; rounder or heart-shaped faces may find the high fade too visually sharp at the temples.
Q: How long should the top be for a straight sleek hairstyle?
A: The sweet spot for a pressed sleek style is 2 to 2.5 inches on top — long enough to lie flat with natural weight and short enough to maintain the close, architectural profile. Shorter than 2 inches risks looking too cropped; longer than 3 inches requires more product to keep the sleeked-down profile and may lift or expand naturally as the day progresses.
11 of 12 — The Gentleman’s Hard Part
FACE SHAPE MATCH
The hard-part side-part style is one of the most classic structural cuts in men’s grooming, and it suits Oval, Square, and Oblong face shapes with particular authority. For Square faces, the hard part’s diagonal line across the head introduces asymmetry that breaks the bilateral mirror-symmetry of a strong jaw — the result is a more sophisticated, less “block-like” silhouette. For Oblong faces, the hard part’s horizontal emphasis draws the eye across the head rather than down the face, reducing perceived facial length. The low-to-mid fade on the sides removes temporal width, which benefits both face shapes. The clean, graphic quality of the razor part also creates a “groomed intention” signal that communicates professionalism — this is a style that reads as deliberate and pulled-together in any context from a first date to a board presentation.
GROOMING KIT
- Clippers: Wahl Senior for the low-to-mid fade graduation; the corded version provides consistent motor speed for the precise graduation on chestnut straight hair
- Razor (for the hard part): Feather Artist Club SS with a fresh disposable blade — the hard part must be cut with a razor, not a trimmer; a trimmer creates a jagged edge; a razor creates a glass-clean scalp line
- Comb: Kent 20T Fine-Tooth for setting the hard part direction and maintaining the comb-over flow
- Brush: Kent CH1 Pocket Comb Brush combo for finishing
- Product: Layrite Super Shine Cream — a light-hold, high-shine water-based product that gives chestnut hair its warmest optical response. Apply a dime-sized amount to 70% dry hair, comb part clean, blow-dry the combed section flat. For the beard: Rocky Mountain Barber Company Beard Oil (cedar and pine scent) for daily conditioning.
MAINTENANCE LEVEL: LOW-MEDIUM
- Salon visit frequency: Every 3–4 weeks for the fade tightening; the hard part itself must be re-cut at each visit — it grows over within 2 weeks and without the fresh razor line, the style defaults to an ordinary side part
- Daily styling time: 4–6 minutes (comb part with fine comb, apply super-shine cream, blow-dry flat, done)
- The hard part is the lowest-effort high-impact element in men’s hair: one razor line creates a dramatically different aesthetic from a soft natural part, and all it requires daily is tracking it with a fine-tooth comb
Not ideal for: men with very fine or thinning hair, as the razor part creates a high-contrast white scalp line that can highlight thin density on either side. For fine hair, use a soft natural part instead — it creates a similar side-part aesthetic with much less scalp exposure.
BARBER TALK SCRIPT
“I want a hard part — razor-cut the part on the left side, about 2.5 inches back from the hairline, running parallel to my natural part line. Low-to-mid fade on both sides: #2 at the top of the ear, graduating down to a #0.5 at the sideburn — not skin, just very close. Keep the top at about 2.5 to 3 inches, combed flat to the right. No texture — I want it to lie smooth. Neckline: squared off, outlined clean. Beard: just clean up the neckline under the chin, trim the cheekline even with the outliner — hard line from mustache to cheekbone. I want the sideburn to taper into the fade at a #1 level — no hard disconnect between the beard sideburn and the fade. Finish with the super-shine cream combed in and the part reset before I leave.”
FAQs
Q: What is a hard part in a men’s haircut and how is it done?
A: A hard part is a thin, razor-shaved line cut directly into the scalp at the natural parting point. The barber uses a straight razor or a detail trimmer to shave a 1–2mm wide white line through the hair, creating a graphic, high-contrast part line against the surrounding hair. It typically lasts 1–2 weeks before grow-in softens it. It must be re-cut at each barber visit to maintain the sharp, defined look.
Q: Does a hard part suit all hair types?
A: The hard part shows best on medium-to-thick hair density, where the contrast between the white scalp line and the surrounding hair color is maximum. It works on both straight and wavy hair. Very fine hair creates an overly prominent part line that can emphasize thin density; men with fine hair achieve a similar aesthetic with a strong, deeply combed natural part and light-hold product rather than a razor part.
Q: Can I do a hard part at home?
A: Only with experience. A misplaced part line is very difficult to correct without waiting for grow-in. Most barbers charge a small fee for a hard part addition to any cut. If you want to try at home, use a handheld mirror to locate the natural part, apply shaving cream to the parting zone, and use an electric detail trimmer with no guard to trace the line — never attempt this with a straight razor without professional training.
Q: How do I keep a side-part comb-over flat all day?
A: Apply product to damp hair, comb the part clean while hair is wet, then blow-dry the combed section flat using a paddle brush on medium heat. The heat sets the direction into the hair. Once dry, do not run your fingers through the top section — fingertip contact lifts the cuticle and causes the flat lying sections to puff. A light finishing spray over the final combed style adds humidity resistance for 8–10 hour hold.
12 of 12 — The Samurai Fringe
FACE SHAPE MATCH
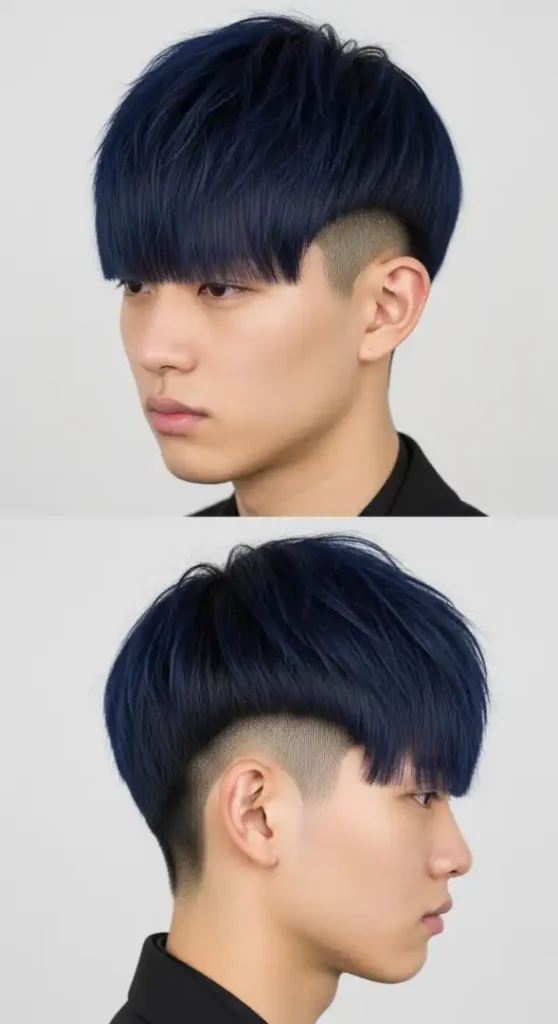
The Samurai Fringe is one of the most dramatically effective face-framing tools in men’s hair — and it has been engineered by East Asian grooming culture (particularly in Korean and Japanese barbering) to work on the bone structures it most frequently encounters. The heavy blunt fringe excels on Heart, Oval, and Diamond face shapes. For Heart faces, the blunt fringe covering the widest point of the face (the forehead) is a direct structural correction — it reduces the visual width of the upper face immediately. For Diamond faces, the fringe narrows the forehead-temple area while the long top adds crown height, counteracting the wide cheekbone spread. For Oval faces, the Samurai Fringe adds a dramatic, editorial quality without needing any structural correction. Round faces should approach this style with caution — a straight blunt fringe across a round face can create a graphic “circle within a rectangle” visual effect; if you have a round face and want the fringe, request a slight arc or curtain split in the fringe to introduce diagonal lines.
GROOMING KIT
- Clippers: Wahl Super Taper II for the high undercut — consistent power for the dense, heavy East Asian hair types that can stall lower-torque clippers on the skin pass
- Trimmer: BaByliss Pro FX Skeleton for the clean nape taper and ear-around undercut line — the slim body of this trimmer navigates behind the ear cleanly
- Scissors — CRITICAL: Kasho Japanese Steel CMS6 6.0″ — the fringe must be cut with premium Japanese shears. The blunt horizontal cut across heavy straight hair requires ultra-sharp scissors; dull scissors will split the ends, blunt the line visually, and create micro-fraying that catches light uncleanly. One pass of a sharp blade; do not saw.
- Comb: Wide-tooth rat-tail comb for sectioning the fringe separate from the top body
- Product: For this style, less is explicitly more. The Samurai Fringe’s visual power is the natural weight of the hair. Use only: Kérastase Nutritive Nectar Thermique (heat protectant, applied before any blow-dry) + CHI Silk Infusion (1–2 drops on dry hair over the fringe for the silky fringe clarity). No hold products — the weight of the hair holds itself.
- Hair Health: Shiseido Tsubaki Premium Hair Oil — weekly overnight treatment for ultra-straight blue-black hair; the camellia oil base penetrates dense East Asian hair with exceptional efficacy.
MAINTENANCE LEVEL: MEDIUM
- Salon visit frequency: Every 4–5 weeks — the blunt fringe is the maintenance trigger; it grows over the eyes after 3–4 weeks and at that point the original Samurai precision is lost
- Daily styling time: 3–5 minutes (the beauty of this style is its simplicity — apply 2 drops of silk serum to damp fringe, blow-dry the fringe forward on low heat with a flat brush, done; the rest of the hair air-dries naturally)
- The Samurai Fringe is actually one of the lowest-effort straight styles in this list once your hair is at the right length — the weight of the hair does the work.
Not ideal for: men who prefer their face fully unobstructed (the fringe covers part of the forehead by design). Also not suitable for men with oily scalps who find front fringe accumulates oil quickly at the brow line — daily dry shampoo at the fringe roots and a light-absorbent pre-style product can manage this.
BARBER TALK SCRIPT
“I want The Samurai Fringe. Keep the top and fringe section long — fringe length to reach the bridge of my nose, blunt cut, horizontal line, no layers no texture in the fringe. Use scissors only on the fringe — no razor, no point-cutting. The rest of the top section: 3.5 to 4 inches, natural fall. Sides: disconnected undercut — skin pass from just above the ear up to the parietal ridge, no blending into the top, hard disconnection. Back: nape taper continuing from the undercut wrapping around — skin at the nape, natural arch at the neckline. No beard today — just leave the face completely clean-shaven looking. I don’t need any product — just blow-dry the fringe forward and straight before I leave, please.”
FAQs
Q: What is the Samurai Fringe haircut and why is it trending?
A: The Samurai Fringe combines an undercut or disconnected-sides cut with a long, heavy blunt fringe that falls to or below the brow line. It draws from Japanese and Korean barbering traditions where long, heavy straight fringes have been a signature style for decades. It’s trending globally because it’s a bold, visually distinctive choice that stands apart from the more uniform taper fade looks that have dominated men’s hair for the past decade.
Q: How long does hair need to be to get the Samurai Fringe?
A: The fringe section needs a minimum of 4–5 inches of front length to achieve the proper blunt drop to the brow line. The top body can be slightly shorter (3–4 inches). From a typical men’s cut, expect approximately 12–16 weeks of growth to reach the necessary fringe length. During the grow-out, style the fringe forward and downward with a light serum each day to train the direction and prevent it from splitting to the sides.
Q: How do I style straight hair so the fringe doesn’t split to the sides?
A: The split is caused by a natural crown growth pattern that radiates hair outward. To prevent fringe-splitting, apply a small amount of lightweight balm or silk serum to the damp fringe, then blow-dry it straight down with a flat brush using downward tension against the natural radial direction. The heat and tension break the growth memory temporarily. Repeat daily to progressively strengthen the forward-trained position.
Q: What face shape does the blunt fringe suit best?
A: The blunt horizontal fringe suits Heart and Diamond face shapes best because it visually narrows the forehead, which is the widest point on both these shapes. Oval faces wear it effortlessly. Round faces should request a slightly curved or curtained version of the fringe rather than a purely horizontal blunt cut to avoid emphasizing roundness.