12 DREADLOCK HAIRSTYLES FOR MEN TO TRY OUT
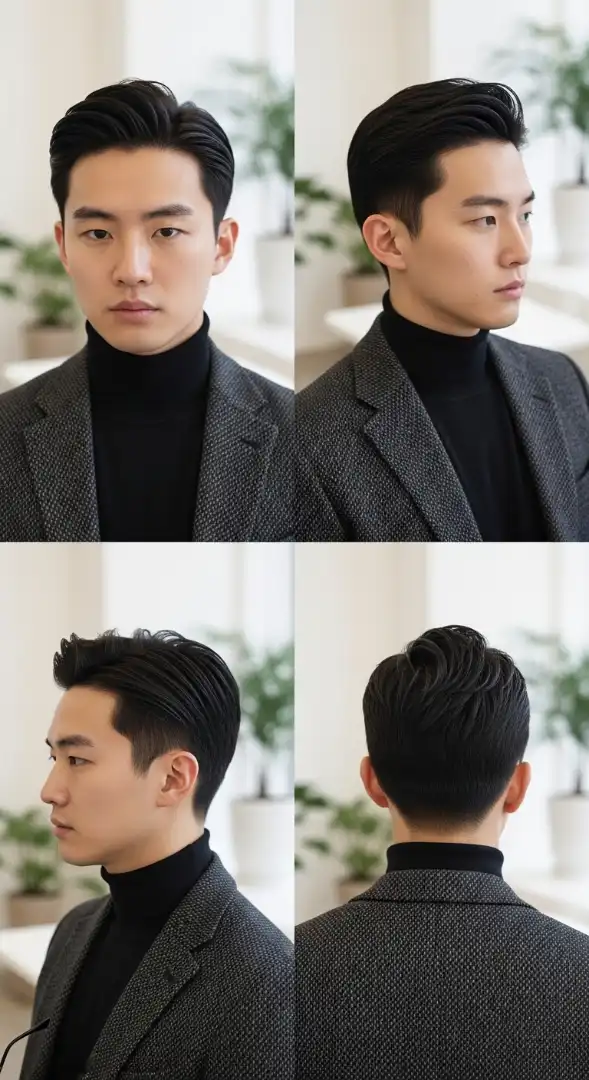
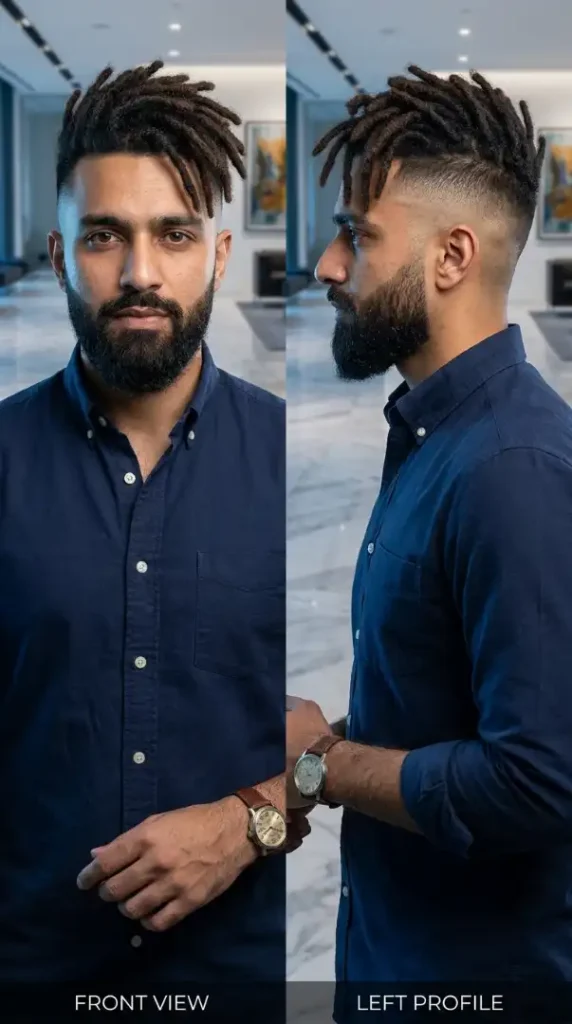
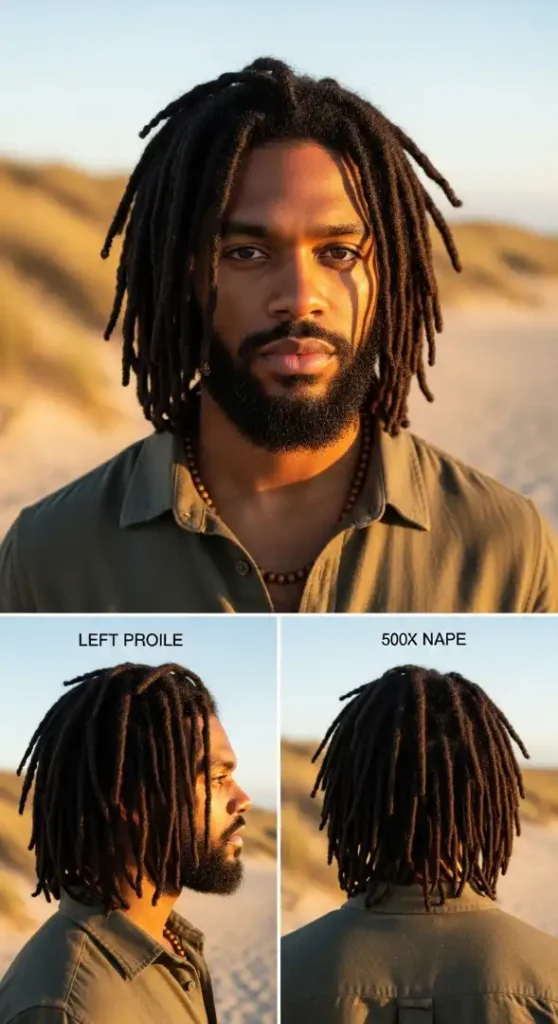
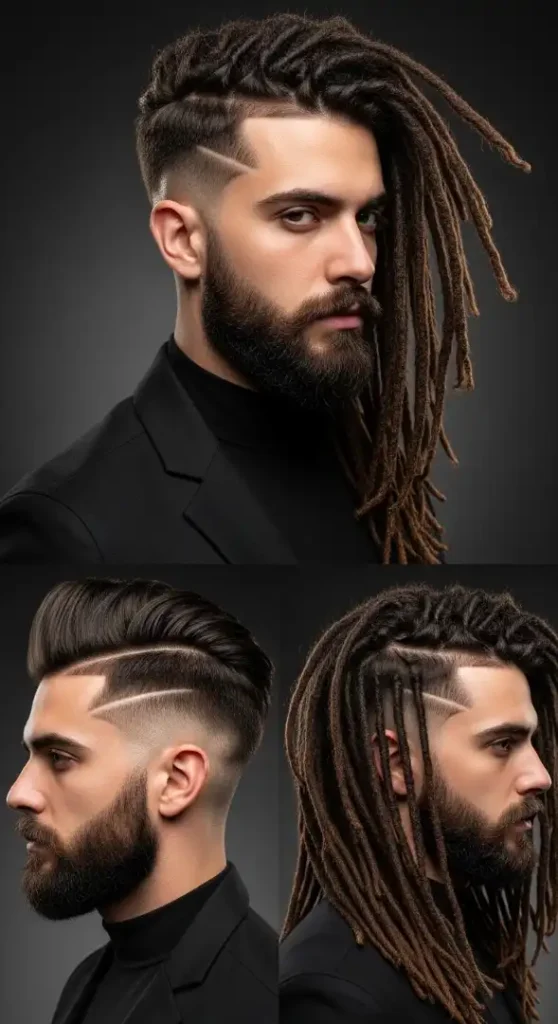
1 of 12 — The Crown Architect Locs

Which Face Shapes Work Best With The Crown Architect
The Crown Architect works exceptionally well for oval and diamond face shapes. The high crown bun creates vertical height that elongates the overall facial structure while the full beard adds width to the lower half, creating balanced proportions. For diamond faces, the crown positioning draws attention upward away from wider cheekbones, while the beard softens the pointed chin. Round faces benefit from the vertical emphasis created by the upward bun placement, which counteracts facial width. Square faces can pull this off confidently — the crown bun adds softness to angular jawlines. Avoid this style if you have an oblong face, as the additional vertical height can make your face appear even longer.
Essential Grooming Tools & Products You’ll Need
Maintaining the Crown Architect requires specific tools. You’ll need a Wahl Professional 5-Star Magic Clip for beard shaping and temple cleanup, an Andis T-Outliner for precise edge work around the hairline, and a high-quality boar bristle brush for smoothing locs before tying. For products, invest in Jamaican Mango & Lime Locking Gel to control flyaways, Knotty Boy Patchouli Oil for loc moisture (use 3-4 drops per session), and Murray’s Black Beeswax for extra hold on the crown section. Keep a set of black elastic hair ties specifically designed for locs — regular rubber bands will break your hair. A satin or silk durag is essential for overnight maintenance to prevent frizz.
How Often You’ll Need Maintenance
This is a medium-maintenance style. Expect to visit your loctician every 4-5 weeks for retwisting at the roots — this keeps the locs tight and prevents buildup at the base. Daily styling takes approximately 8-10 minutes: brush your locs, apply a small amount of locking gel to smooth the surface, gather into a high ponytail, twist into a bun, and secure with two hair ties. Temple and neckline edge-ups should happen every 10-14 days to maintain the clean contrast between the locs and skin. Beard trimming is weekly using your clippers with a guard — maintain your cheek line and neckline fade consistently.
What To Tell Your Barber — The Exact Words
Walk into the barbershop and say exactly this: “I want to keep my locs at their current length but need a temple fade and neckline cleanup. Give me a skin fade at the temples starting at a 0.5 guard, blending up to where my locs begin. Keep the fade tight — about 1.5 inches above my ears. Clean up my hairline front and back with the T-Outliner, make it sharp but natural-looking, not too boxy. For my beard, use a number 3 guard overall, but fade the cheek line from a 2 to a 3, and do a skin fade on my neckline. Blend the beard into the temple fade seamlessly — I don’t want a visible line where they meet. Leave the crown and length untouched.”
If you’re ready to commit to the loc journey but want something more versatile for different occasions, the next style shows you how to rock shorter locs with maximum edge.
FREQUENTLY ASKED QUESTIONS
How do I maintain Crown Architect locs at home between salon visits?
Brush your locs daily with a boar bristle brush to distribute natural oils and prevent lint buildup. Apply 3-4 drops of loc oil to your palms, rub together, and run through the length of your locs every 2-3 days. Before bed, tie your locs down with a satin durag to prevent frizz. Wash your locs every 7-10 days with a residue-free shampoo — avoid products with heavy oils or conditioners that cause buildup. When tying your bun, rotate the positioning slightly each day to prevent stress breakage at the same point on each loc.
Which face shape suits the Crown Architect best and why?
Oval and diamond face shapes suit this style best because the high crown bun creates vertical emphasis that elongates facial proportions naturally. Diamond faces benefit specifically because the upward styling draws attention away from wider cheekbones toward the crown, while the full beard balances a pointed chin. Round faces also benefit from the vertical height created by the bun, which counteracts facial width and creates the illusion of length. The key anatomical principle: vertical styling elements elongate, horizontal elements widen.
What’s the difference between a crown bun and a regular man bun?
A crown bun sits at the highest point of your head — directly at the crown — creating maximum vertical height and a regal, commanding presence. A regular man bun typically sits at the back of the head near the occipital bone, creating a more casual, relaxed look. Crown buns require longer locs (minimum 6-8 inches) and create more dramatic styling, while man buns can work with shorter lengths and blend more subtly. Crown buns also put more tension on the scalp, so you must rotate positioning to prevent traction alopecia.
How often should I get my Crown Architect style touched up?
Visit your loctician every 4-5 weeks for root retwisting to maintain tight, uniform locs and prevent excessive new growth buildup. Get temple and neckline edge-ups every 10-14 days from your barber to keep the fade fresh and the contrast sharp. Beard trimming should happen weekly at home using your own clippers to maintain your cheek line and neckline fade between professional visits. If you notice significant frizz or loose locs before the 4-week mark, book an earlier retwist appointment.
2 of 12 — The Executive Fade Locs
Best Face Shapes For The Executive Fade
The Executive Fade Locs work perfectly for square and oval face shapes. The high skin fade removes bulk from the sides, which softens the angular jawline characteristic of square faces while the forward-styled locs add subtle width at the forehead, creating balance. For oval faces, this style maintains natural proportions without disrupting the already-balanced facial structure. Heart-shaped faces also benefit significantly — the fuller loc styling at the top balances a wider forehead while the fade tapers toward a narrower chin. Round faces should approach this style cautiously; the forward loc sweep can add width where you don’t want it. Instead, consider styling the locs with more vertical height rather than forward volume.
Your Complete Grooming Arsenal
For the Executive Fade Locs, you need professional-grade equipment. Invest in Andis Master Cordless Clippers for the initial fade work, Wahl Professional Detailer for temple cleanup and hairline precision, and BaByliss Pro FX Skeleton Trimmer for beard outlining. Product-wise, you’ll need Carol’s Daughter Loc Butter for daily moisture (pea-sized amount per application), Knotty Boy Dreadlock Wax in natural for hold without residue, American Crew Fiber (small amount) to texture the forward-swept sections, and Honest Amish Beard Balm for beard conditioning. Purchase a wide-tooth wooden comb specifically for loc separation and a spray bottle for water retwisting. A satin pillowcase prevents frizz and maintains the fade’s sharpness overnight.
Maintenance Schedule & Time Investment
This is a high-maintenance style designed for professionals who understand that appearance is investment. Visit your loctician every 3-4 weeks for precision retwisting — the forward styling requires tighter maintenance than longer hanging locs. Barber visits for fade touch-ups should happen every 7-10 days; the high skin fade grows out quickly and loses its sharp contrast fast. Daily styling requires 12-15 minutes: spritz locs with water, apply loc butter, twist each loc individually with your fingers, then brush forward and upward. Style using a small amount of fiber on your fingertips to create the textured forward sweep. Beard grooming is daily — 5 minutes each morning using beard balm and a boar bristle brush.
Barber Chair Script — Say This Word-For-Word
Tell your barber precisely: “I need a high skin fade — start with a 0 guard at the temple and neckline, then blend to a 1 at one inch above my ears, and 1.5 at two inches up. Where my locs start, transition from the 1.5 fade into the loc density gradually — I don’t want a harsh line. Keep the fade tight on the sides and back, but make sure it’s gradual enough that there’s no obvious shelf. For my hairline, use the T-Outliner or trimmer to square it off slightly at the corners — not rounded, not too boxy, professional square. My beard needs a 4 guard overall length, with a 3-to-4 fade on the cheeks. The neckline should be a skin fade starting one finger-width above my Adam’s apple. Blend the beard fade into the temple fade seamlessly — no visible separation line. Don’t touch the locs — just clean up any stray hairs at the fade transition.”
Once you master the corporate loc aesthetic, you’ll want to explore how to bring more edge while maintaining professionalism — our next style bridges both worlds.
FREQUENTLY ASKED QUESTIONS
How do I ask my barber for an Executive Fade with locs?
Say “I want a high skin fade starting at 0 at my temples and neckline, blending to a 1.5 where my locs begin — make the transition gradual with no harsh line. Square off my hairline but keep it natural, not too boxy. Fade my beard at the neckline and blend it seamlessly with the temple fade.” Bring this image and point to the fade height and loc styling direction. Most barbers understand “high skin fade” but adding specific guard numbers eliminates confusion and ensures you get exactly what you want.
Can I wear Executive Fade Locs in a conservative workplace?
Yes, this style is specifically designed for professional corporate environments. The high fade creates a clean, polished appearance that meets most workplace dress codes, while the forward-styled locs maintain natural hair texture without appearing unkempt. Keep your locs well-moisturized to prevent frizz, retwist every 3-4 weeks, and maintain your fade weekly. If your workplace has strict grooming policies, show HR this image beforehand — the polished aesthetic typically satisfies even conservative dress code requirements.
What’s the difference between a high fade and a mid fade with locs?
A high fade starts 2+ inches above your ears and creates maximum contrast between your skin and locs, resulting in a bold, modern look that’s ideal for professional settings and making a statement. A mid fade starts at or just above ear level, creating a subtler transition that works well for casual environments. High fades require more frequent maintenance (every 7-10 days) because the large skin area shows growth quickly. Mid fades can go 10-14 days between touch-ups. High fades also create more vertical elongation, which benefits round and square faces.
How long do my locs need to be for the Executive Fade style?
Your locs need to be at minimum 4-5 inches in length to achieve the forward-swept styling shown here. Ideal length is 5-7 inches, which allows for enough weight and flexibility to style forward while maintaining upward lift. If your locs are shorter than 4 inches, they’ll stick straight up rather than sweep forward. If they’re longer than 8 inches, they become too heavy and will fall flat unless you use significant product, which contradicts the natural professional aesthetic this style requires
3 of 12 — The Twisted Warrior Locs
Face Shape Compatibility Analysis
The Twisted Warrior Locs are ideal for heart and oval face shapes. The half-up styling creates volume at the crown while the shaved sides remove width, which perfectly balances a wider forehead characteristic of heart-shaped faces. The hanging locs add slight width at the jawline, preventing the face from appearing too pointed at the chin. Oval faces naturally accommodate this style because the balanced proportions don’t require correction — the warrior knot adds interest without disrupting harmony. Round faces should approach carefully; the shaved sides do remove some width, but the hanging locs can add bulk at the lower face. For round faces, consider tying more locs up (70-80% instead of 50%) to maintain vertical emphasis. Avoid if you have a very long oblong face, as the top knot creates additional vertical length.
Essential Tools & Premium Products
The Twisted Warrior requires specific grooming tools. Purchase Wahl Professional 5-Star Senior Clippers for maintaining the shaved sides at a consistent 1 guard length, Andis GTX T-Outliner for edge-up precision around the hairline and transition line, and professional hairdressing scissors for trimming loc ends if needed. Product arsenal: Knatty Dread Dreadlock Cream for loc moisture and definition, Dollylocks Tightening Gel for retwisting the warrior knot section to keep it tight, Cantu Shea Butter Leave-In Conditioning Repair Cream (quarter-sized amount) applied to hanging locs to prevent dryness, and hair elastics designed for thick hair — avoid thin rubber bands that cause breakage. Keep a spray bottle with rose water for daily refreshing. A satin-lined cap or durag maintains the style overnight.
Time Commitment & Upkeep Reality
Medium-to-high maintenance is the reality here. Visit your barber every 10-14 days to maintain the shaved sides at a clean 1 guard length — any longer and the contrast dulls significantly. Loctician appointments every 4-5 weeks for retwisting at the roots, with special attention to the locs used for the warrior knot since they experience more manipulation stress. Daily styling takes 10-12 minutes: separate the top section (50% of locs), gather into a ponytail at the crown, twist the ponytail around itself to form a bun, secure with two elastics, then spray the hanging locs lightly with rose water and apply leave-in cream. The knot should be retied every 2-3 days to prevent the elastic from causing damage to the same locs repeatedly — rotate which locs are included in the knot.
Barber Instructions Word-For-Word
Walk in and say: “I want to keep my locs at their current length but need the sides shaved down. Use a 1 guard on both sides from my temple all the way back to behind my ears and down to my neckline. Blend the 1 guard up into where my locs start — make it a gradual transition, not a hard line. The blend should happen over about half an inch of growth. Keep the top and back locs untouched — don’t cut length, don’t thin them. Use the T-Outliner to clean up my hairline front and back, and make a sharp line at the bottom of the shaved area where it meets my neckline. I want the sides completely clean but the transition to my locs natural-looking. Don’t fade it lower than a 1 — I want this guard length consistently maintained.”
For those who want the warrior aesthetic but need something even more versatile for both formal and street settings, the next style delivers exactly that balance.
FREQUENTLY ASKED QUESTIONS
How do I maintain the Twisted Warrior knot without damaging my locs?
Retie the warrior knot every 2-3 days, deliberately rotating which specific locs you include in the bun to prevent repetitive stress on the same strands. Use hair elastics designed for thick hair, never thin rubber bands. When removing the elastic, cut it with scissors rather than pulling it through your locs, which causes friction damage. Apply a small amount of tightening gel to the locs in the knot before tying to increase hold, reducing how tightly you need to pull the elastic. Sleep with a satin-lined cap to prevent the knot from loosening overnight. If you notice thinning at the crown, reduce the frequency of the updo and wear your locs down for 2-3 weeks to recover.
Which face shape suits the Twisted Warrior Locs best?
Heart and oval face shapes benefit most from this style. Heart faces have wider foreheads and narrower chins — the warrior knot at the crown adds volume where the face is already wider, which sounds counterintuitive but actually creates balance by drawing the eye upward, while the hanging locs add width at the jawline to balance the pointed chin. Oval faces have naturally balanced proportions, so this style adds visual interest without disrupting harmony. The shaved sides remove bulk, which helps square and round faces by reducing width, but these shapes must be cautious about how low the hanging locs fall — too much length at the jaw adds unwanted width.
What’s the difference between twisted locs and regular locs?
Twisted locs are created by twisting sections of hair consistently in one direction during the locing process and maintained by retwisting in that same direction during root maintenance, resulting in a visible spiral rope-like texture along the entire length of each loc. Regular (freeform or palm-rolled) locs have a more organic, cylindrical shape without the pronounced twist pattern. Twisted locs appear more uniform and intentional, while freeform locs look more natural and varied. Twisted locs require more maintenance — retwisting appointments every 4-5 weeks — while freeform locs can go 6-8 weeks. Twisted locs also tend to loc up faster in the initial stages because the consistent twisting pattern accelerates the matting process.
How long should I wait before doing a warrior knot with new locs?
Wait until your locs are at minimum 6 months mature before regularly styling them in a warrior knot. New locs (under 6 months) are still forming and haven’t fully locked — excessive pulling and manipulation can cause them to unravel or thin at the roots. Once your locs reach the 6-month mark and feel firm when you squeeze them, you can begin occasional updos. Even at 6 months, limit warrior knot styling to 2-3 times per week maximum for the first year, increasing frequency only after your locs are fully matured (12-18+ months). Very new locs (1-3 months) should never be tied tightly.
4 of 12 — The Midnight Fade Locs
Optimal Face Shapes For This Cut
The Midnight Fade Locs are universally flattering but work exceptionally well for oval, square, and oblong face shapes. The mid-skin fade removes bulk at ear level, which softens the strong angular jawlines of square faces while the shoulder-length locs add horizontal width to balance the facial structure. Oblong faces benefit significantly from the horizontal line created by the locs at shoulder level — this interrupts the vertical length and creates visual width where needed. The middle part adds balance and symmetry, which works well for faces with slight asymmetry. Round faces can absolutely wear this style, but should consider whether shoulder-length locs add too much horizontal emphasis; if your face is particularly round, keep locs at collarbone length instead of shoulders. Diamond faces may find the width at shoulders emphasizes already-prominent cheekbones — consider wearing locs pulled back occasionally for balance.
Complete Grooming Kit Breakdown
Invest in professional tools for home maintenance. You need Andis Master Adjustable Blade Clippers for precise fade work if you’re touching up between barber visits, Wahl Professional Peanut Trimmer for edge-ups and beard work, and professional barber scissors for trimming loc ends evenly. Product lineup: Jamaican Mango & Lime Resistant Formula Locking Gel for root maintenance and flyaway control, SheaMoisture Jamaican Black Castor Oil Strengthen & Restore Leave-In Conditioner (apply every 2-3 days, nickel-sized amount for shoulder-length locs), Murray’s Loc-Lock for extra hold when needed, tea tree oil mixed with jojoba oil (3:1 ratio) for scalp health and preventing buildup, and Dr. Bronner’s Liquid Soap (unscented) diluted 1:3 with water for residue-free washing. Get a wide-tooth wooden comb and rat-tail comb for parting precision, plus a satin or silk bonnet for sleep protection.
Realistic Maintenance Requirements
This is medium maintenance with weekly touchpoints. Barber visits every 12-14 days for fade maintenance — mid-skin fades show growth visibly after two weeks. Loctician appointments every 5-6 weeks for retwisting roots and any palm-rolling needed to keep mature locs cylindrical. Daily care is minimal: 5 minutes maximum. Spritz locs with water or rosewater mixture, apply a small amount of leave-in conditioner if locs feel dry, and separate any locs trying to merge together. The middle part should be redone every 3-4 days using your rat-tail comb. Washing schedule: every 7-10 days using diluted Dr. Bronner’s, ensuring you rinse thoroughly to avoid residue. Beard care is daily — 3 minutes using beard oil and a boar bristle brush. Edge-ups can be done at home with the Peanut trimmer every 5 days if you’re confident, otherwise wait for barber visits.
What To Say In The Barber Chair
Give these exact instructions: “I need a mid-skin fade — start with a 0 at my ear level and take it down to skin using a bald fade technique. Blend from skin to a 1, then 1 to 1.5, then 1.5 to 2 where my locs start. The fade should cover both sides from temple to behind my ears, and wrap around to my nape in the back. Make sure the transition is smooth — I don’t want any visible lines between guard levels. For my hairline, use the trimmer to shape it naturally — don’t cut it too far back, just clean up the edge. My beard needs a 3.5 guard overall, with a bald fade at the neckline starting one finger-width above my Adam’s apple. Clean up my cheek line but don’t cut it too high — natural placement. Make sure the beard fade blends into the temple fade seamlessly. Don’t touch my loc length or thickness — just work around them.”
The next style takes this classic aesthetic and adds a modern twist that works equally well for day or night settings.
FREQUENTLY ASKED QUESTIONS
How do I maintain a mid-skin fade between barber visits?
Maintain your mid-skin fade between professional visits by using a quality trimmer like the Wahl Peanut for edge-ups every 4-5 days. Focus only on your hairline and neckline — clean up any new growth creating fuzzy edges. Do NOT attempt to redo the fade itself at home unless you have professional training; fades require precise guard blending that’s difficult to replicate solo. Use a handheld mirror plus your bathroom mirror to check the back of your neck. Apply a small amount of aftershave balm post-trim to prevent irritation. Visit your barber every 12-14 days for professional fade maintenance — attempting to stretch longer than two weeks makes the next fade more difficult because there’s more growth to correct.
Which face shape suits Midnight Fade Locs best?
Oval, square, and oblong face shapes benefit most from shoulder-length locs with a mid-fade. Oval faces maintain their natural balance, square faces have their angular jawlines softened by the fade while gaining horizontal width from the locs at shoulder level, and oblong faces benefit from the horizontal line created by shoulder-length locs which interrupts excessive vertical length. The middle part adds symmetry that works well for all three shapes. Round faces should be cautious — shoulder-length locs can add horizontal width where you don’t want it; consider keeping locs at collarbone length instead to maintain more vertical emphasis.
What’s the difference between a mid-fade and a low fade with locs?
A mid-fade starts at ear level and creates moderate contrast between your skin and locs, making it versatile for both professional and casual settings. A low fade starts below your ears (around the bottom of your ear or lower) and creates subtle contrast that’s more conservative and grows out less noticeably. Mid-fades require maintenance every 12-14 days because the larger skin area shows growth quickly. Low fades can stretch to 14-18 days between visits. Mid-fades make a bolder statement and draw more attention to the loc styling, while low fades provide a cleaner look that doesn’t compete with the locs for visual attention. Choose based on your lifestyle and how often you can commit to barber visits.
How often should I wash shoulder-length locs?
Wash shoulder-length mature locs every 7-10 days using a residue-free shampoo or diluted Dr. Bronner’s soap. Washing more frequently than weekly can cause excessive moisture cycling that prevents locs from tightening properly, while washing less than every 10 days allows oil, dirt, and product buildup that creates an odor and attracts lint. Focus the soap on your scalp and roots — the length of mature locs cleans sufficiently from the water and soap runoff. Rinse extremely thoroughly, spending 2-3 minutes ensuring no soap residue remains, as buildup is the primary cause of loc-related scalp problems. After washing, squeeze excess water out gently with a microfiber towel (never rub), then air dry completely — never go to sleep with damp locs.
5 of 12 — The Minimalist Loc Taper

Face Shape Analysis For The Minimalist Taper
The Minimalist Loc Taper is extraordinarily versatile and works for nearly all face shapes, but it’s particularly effective for round and square faces. The low taper fade removes minimal bulk, maintaining fullness that actually benefits these shapes — round faces gain vertical height from the 4-5 inch locs standing naturally upward, while square faces have their angular features softened by the natural loc texture without losing masculine definition. Oval faces wear this effortlessly as the balanced proportions require no correction. Heart-shaped faces benefit from the fullness at the crown which balances a wider forehead. The only face shape that should exercise caution is oblong — the short locs don’t add enough horizontal width, and the upward styling can emphasize vertical length. If you have an oblong face, consider the next style in this guide which adds more horizontal volume.
Tools And Products For Daily Maintenance
This low-maintenance style still requires quality tools. Purchase Oster Fast Feed Clippers for taper maintenance (if you’re doing edge-ups at home), Andis T-Outliner for precise hairline and beard work, and keep a boar bristle brush specifically for locs to stimulate your scalp and distribute oils naturally. Product selection: Taliah Waajid Lock It Up for retwisting and daily moisture (use sparingly — pea-sized amount), Knatty Dread Cream Wax for any loose hairs at the roots, jojoba oil with a few drops of peppermint essential oil for scalp health applied 2-3 times weekly, and Cremo Beard Oil for your beard maintenance. Buy a wooden wide-tooth comb for gentle loc separation and a satin pillowcase or sleep cap. The minimalist aesthetic means you want to avoid product buildup, so choose lightweight options that don’t leave residue.
Maintenance Time And Frequency
This is genuinely low-maintenance — designed for busy professionals and minimalists. Barber visits every 16-20 days for taper touch-ups; the low taper grows out more gracefully than high fades, giving you flexibility with scheduling. Loctician appointments every 6-8 weeks for root retwisting — short mature locs require less frequent maintenance than longer ones because they experience less weight-related stress. Daily styling is under 5 minutes: apply a tiny amount of Lock It Up to your palms, rub together, run hands through your locs to distribute moisture, then brush gently to stimulate scalp and smooth the surface. No elaborate styling required. Washing every 8-10 days with a residue-free shampoo, focusing on scalp. Beard care is 3-4 minutes daily — apply beard oil, brush through with a boar bristle beard brush, and trim stray hairs weekly. This style prioritizes looking naturally polished with minimal effort.
Barber Chair Communication Script
Tell your barber: “I want a classic low taper — not a fade. Start with a 1.5 guard at the bottom around my neckline and ears, then blend to a 2, then 2.5, then 3 moving upward. The taper should be gradual and subtle — no dramatic contrast. Where my locs begin, I want the transition to look natural, not like a harsh line. Clean up my hairline with the trimmer — keep the corners natural, not too sharp or rounded. For my beard, use a 4 guard all over, then blend the neckline from a 3 to a 4 so there’s no hard edge. My cheek line should be natural — just clean up anything growing too high, but don’t create an artificial line. Make sure everything is symmetrical and balanced. Don’t touch the length of my locs at all — just taper the sides and back around them.”
This minimalist foundation is perfect for men who want polish without fuss, and the next style builds on these principles while adding more creative edge.
SECTION 5 — FREQUENTLY ASKED QUESTIONS
How do I maintain minimalist locs at short length?
Maintain short locs by retwisting roots every 6-8 weeks at your loctician to prevent excessive new growth buildup. At home, apply a lightweight loc moisturizer (pea-sized amount) 2-3 times weekly, focusing on roots and any areas showing frizz. Gently palm-roll each loc between your hands once weekly to maintain cylindrical shape. Wash every 8-10 days with residue-free shampoo, rinse thoroughly, and air dry completely before styling. The key to minimalist styling is avoiding heavy products — use only what’s necessary for moisture and hold, never layering multiple products that create buildup and weigh down your short locs.
Which face shape suits the Minimalist Loc Taper best?
Round, square, and oval faces all benefit from the Minimalist Loc Taper. Round faces gain vertical height from the 4-5 inch locs standing naturally upward, creating the illusion of facial length. Square faces have their angular jawlines softened by the natural loc texture while maintaining masculine definition. Oval faces have naturally balanced proportions that don’t require correction, so this style simply adds character. The low taper is subtle enough that it doesn’t dramatically alter facial proportions, making it one of the most universally flattering loc styles. Oblong faces should approach cautiously as the short length doesn’t add horizontal width.
What’s the difference between a taper and a fade?
A taper is a gradual decrease in hair length created by using progressively higher clipper guard numbers (1.5 to 2 to 2.5 to 3), resulting in a subtle, classic look with no skin showing. A fade uses lower guards or no guard at all, taking hair down to the skin and creating dramatic contrast. Tapers require less frequent maintenance (every 16-20 days) compared to fades (every 7-14 days). Tapers look more conservative and professional, while fades make a bolder statement. Both can work with locs, but tapers are better for short locs (under 6 inches) because they maintain fullness around the base without creating a harsh contrast that can make short locs look disconnected from the scalp.
How long does it take for locs to reach 4-5 inches?
The timeline to reach 4-5 inch locs depends on your starting hair length and natural hair growth rate. If you start with 2-inch hair and use the twist method to begin your loc journey, expect 8-12 months to reach 4-5 inches of mature loc length. Hair typically grows 0.5 inches per month, but locs shrink during the maturation process as the hair tightens and locks, so you’ll need more length than you think initially. If you start with longer hair (4-5 inches) and use the comb-coil or two-strand twist method, you’ll have the desired length immediately, but the locs won’t be fully mature (tight and cylindrical) for 6-12 months depending on your hair texture and maintenance routine.
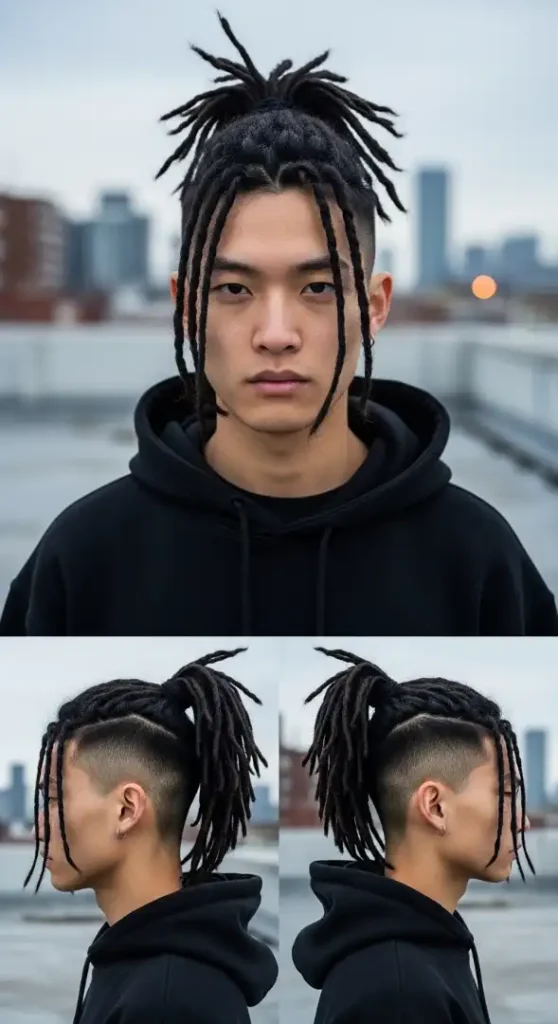
6 of 12 — The Urban Edge Mohawk Locs
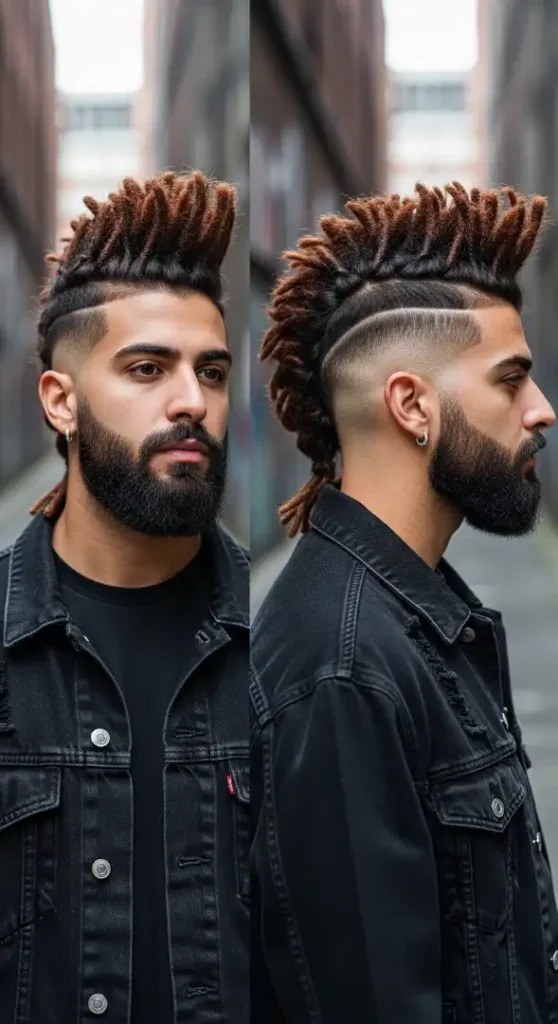
Face Shape Compatibility For Mohawk Locs
The Urban Edge Mohawk Locs work best for oval, diamond, and oblong face shapes. Oval faces maintain balance naturally — the mohawk adds character without disrupting proportions. Diamond faces benefit significantly: the upward styling at the top balances wider cheekbones while the shaved sides remove bulk at the temples, and the beard width balances a pointed chin. Oblong faces gain horizontal width from the mohawk’s forward styling direction, which interrupts excessive vertical length. Round faces should avoid this style entirely — the shaved sides remove width where you already lack it, and the vertical mohawk emphasizes roundness by drawing the eye up and down rather than creating horizontal balance. Square faces can pull this off but need to be cautious; the hard line where shaved sides meet the mohawk can emphasize already-angular features. Add a slight fade transition instead of a hard line to soften this effect.
Professional Grooming Equipment Required
The mohawk demands precise tools. You need Wahl Professional 5-Star Balding Clippers for keeping sides at skin level, Andis GTX T-Outliner for hairline and mohawk edge definition, Wahl Detailer for beard sculpting precision, and professional hairdressing gel-hold comb for styling the mohawk shape. Product lineup: Got2b Glued Spiking Glue (yellow tube) for maximum mohawk hold — use golf-ball-sized amount for 6-8 inch locs, Eco Styler Gel with Argan Oil for base hold before applying glue, Knatty Dread Dreadlock Cream for moisture on the locs themselves applied before styling, beard oil specifically for sculpted beards (lighter weight than standard), and Got2b Glued Blasting Freeze Spray as finishing hold. Keep lint-free hair ties for securing the mohawk base before styling upward, a blow dryer with concentrator nozzle for drying while styling, and satin bonnet or wrap for protecting the style overnight.
Maintenance Reality Check
This is high-maintenance — no sugarcoating it. Barber visits every 5-7 days to maintain skin-level shaved sides; anything longer and the contrast that makes this style dramatic starts disappearing. You CANNOT do this yourself unless you have a multi-angle mirror setup and significant skill. Loctician visits every 4 weeks for retwisting, with extra attention to the mohawk section locs since they’re under constant styling stress. Daily styling is 20-25 minutes and non-negotiable: wash or wet the mohawk section, apply loc cream for moisture, blow-dry while brushing upward into shape, apply gel for base hold, apply spiking glue working it through the locs, use your hands to sculpt the mohawk shape, finish with freeze spray, and allow 10 minutes to set. The style lasts one full day maximum — you must restyle daily. Beard maintenance is 10 minutes daily including oil application, brushing, and trimming any growth disrupting the sculpted lines. This style is for men committed to daily grooming.
Exact Barber Instructions
Say precisely: “I want a loc mohawk — shave both sides completely down to skin using a 0 guard or bald technique. The shaved area should start at my temple on each side and go straight back to behind my ears and down my neckline. The mohawk section should be 3-4 inches wide running down the center of my head from my hairline to my crown. I want a HARD LINE where the shaved sides meet the mohawk locs — no fade, no blending, clean separation. Use the T-Outliner to create that hard line so it’s razor-sharp. For my beard, I want geometric sculpting — sharp cheek line angled from the bottom of my sideburn toward the corner of my mouth, and a defined neckline that’s straight and low. Use the detailer for precision on the beard edges. Make everything symmetrical — the mohawk width should be centered perfectly, and both shaved sides should be identical. Don’t touch the length of my locs, just shave everything outside the mohawk section.”
If mohawk drama is your aesthetic, the next style takes loc styling even further into experimental territory.
FREQUENTLY ASKED QUESTIONS
How do I style a loc mohawk to stand up all day?
Style your loc mohawk by first wetting the mohawk section completely, applying loc cream for moisture, then blow-drying while brushing upward with a paddle brush to create the initial upward direction. Once dry, apply Eco Styler Gel liberally throughout the mohawk section as base hold. Then apply Got2b Glued Spiking Glue (use a golf-ball-sized amount for 6-8 inch locs), working it through from roots to tips. Use your hands to sculpt the mohawk into the desired shape — forward lean, straight up, or slightly back depending on preference. Finish with Got2b Freeze Spray, coating the entire mohawk. Allow 10 minutes to set without touching. The glue creates rock-hard hold that lasts all day but requires daily restyling.
Which face shape suits the Urban Edge Mohawk Locs best?
Oval, diamond, and oblong faces benefit most from mohawk locs. Oval faces maintain natural balance while adding dramatic character. Diamond faces benefit because the upward styling balances wider cheekbones, the shaved sides remove temple bulk, and added beard width balances a pointed chin. Oblong faces gain horizontal width from the forward-styled mohawk, interrupting excessive vertical length. Round faces should avoid this entirely — shaved sides remove width where you need it, and the vertical mohawk emphasizes roundness. Square faces can wear it but should add a slight fade transition instead of a hard line to soften angular features.
What’s the difference between a loc mohawk and a regular mohawk?
A loc mohawk uses your existing mature locs styled into a mohawk shape, meaning the center section is textured rope-like locs rather than loose hair. This creates a unique aesthetic that combines punk rebellion with cultural loc tradition. A regular mohawk uses loose hair that’s spiked or styled up with product, creating a smoother silhouette. Loc mohawks require mature locs at minimum 6 inches to achieve the dramatic upward styling, while regular mohawks can be created with 3-4 inches of loose hair. Loc mohawks also require heavy-duty products like spiking glue because locs are heavier than loose hair. Both styles require shaved or faded sides for contrast, but loc mohawks maintain the style’s integrity longer because locs hold shape better than loose hair.
How often do I need to shave the sides of my loc mohawk?
Shave the sides of your loc mohawk every 5-7 days maximum to maintain the dramatic contrast that defines this style. The shaved sides are what make the mohawk visually striking — once stubble grows in, the impact dulls significantly. You need consistent barber visits unless you’re skilled with clippers and have a multi-angle mirror setup at home. If you attempt home maintenance, use Wahl Balding Clippers and work in sections, always checking both sides for symmetry. The hard line where shaved sides meet the mohawk section is the most critical area — use a T-Outliner to keep this edge razor-sharp. If you can’t commit to weekly shaving maintenance, this style isn’t realistic for your lifestyle.
7 of 12 — The Freeform Philosophy Locs
Face Shapes That Work With Freeform Locs
Freeform locs are remarkably versatile because their natural, organic shape adapts to any face structure without imposing a geometric aesthetic. That said, oval and diamond faces wear freeform locs most effortlessly — the irregular volume distribution creates visual interest without requiring balance correction. Round faces benefit from freeform locs that naturally grow outward and upward, creating width that paradoxically elongates by disrupting the circular silhouette with angular texture. Square faces are softened by the organic, non-linear nature of freeform locs; where structured styles can emphasize jaw angles, freeform adds softness. Heart-shaped faces benefit from the natural volume at varying heights rather than concentrated at the crown. Oblong faces should ensure their freeform locs grow with some horizontal volume — if locs grow predominantly downward without width, they can emphasize length. The key advantage: freeform locs work WITH your natural head shape rather than against it.
Minimal Tools, Maximum Authenticity
Freeform locs require almost no tools, which is philosophically intentional. You need only: A spray bottle for water to refresh locs and assist separation, pure essential oils (jojoba, coconut, or tea tree) for scalp health, residue-free shampoo like Dr. Bronner’s for washing, and your hands for the primary maintenance technique of separating locs. That’s genuinely it. No clippers, no trimmers, no styling products. The freeform philosophy rejects the commercial grooming industry’s product dependency. If you choose to occasionally visit a loctician, they might use scissors to trim loose hairs at your request, but even this is optional. Many freeform practitioners never cut their locs at all. The only “product” worth considering: a satin or silk bonnet or pillowcase to reduce friction while sleeping and prevent lint accumulation. Otherwise, your grooming kit is your hands, water, and oil — that’s the authentic freeform approach.
Time Investment: Less Is More
Freeform locs are the lowest-maintenance loc style because you’re working with natural hair behavior instead of fighting it. Professional visits are optional and infrequent — many freeform practitioners never visit a loctician at all, while others go once every 6-12 months simply to separate any locs that are merging where they don’t want them to. Daily “maintenance” is 5 minutes maximum: finger-separate any locs that are trying to merge (a natural process), apply a small amount of oil to your scalp if it feels dry (2-3 times per week), and that’s it. No styling required. Washing is every 7-14 days — longer intervals are acceptable because you’re not using products that build up. The time investment decreases as your locs mature; once fully locked (12-24 months), daily maintenance drops to 2-3 minutes of separation as needed. This is a lifestyle choice for people who reject high-maintenance grooming routines.
What To Tell Your Loctician (If You Visit One)
If you choose to visit a loctician for your freeform journey, say: “I’m growing freeform locs, so I don’t want any styling, retwisting, or shaping. I’m here for separation only — I need you to separate any locs that are merging together where I don’t want them to merge. Use your fingers to gently pull apart any locs that are congo-ing together, especially at the roots. I don’t want you to cut any loose hairs unless they’re creating a safety issue like catching on something. No products except maybe a tiny amount of oil if needed during separation. I’m embracing the natural thickness variation, irregular loc sizes, and organic growth direction — don’t try to make them uniform. Just separate where needed and let me leave. This should take 30-45 minutes maximum depending on how much merging has happened.” Most locticians respect the freeform philosophy if you communicate clearly upfront.
The freeform approach honors cultural tradition and natural processes, but if you want that authenticity with more structural definition, the next style bridges both worlds.
FREQUENTLY ASKED QUESTIONS
How do I start freeform locs from scratch?
Start freeform locs by simply stopping all hair manipulation — no brushing, combing, or detangling. Wash your hair with residue-free shampoo every 7-10 days, then let it air dry naturally without towel-rubbing or touching. Within 2-3 weeks, your hair will begin to tangle and mat naturally, forming the foundation of locs. After 4-6 weeks, use your fingers to gently separate the forming hair into individual sections roughly 1-2 inches wide — these will become your locs. Don’t force uniform size; embrace natural variation. Continue washing and separating for 6-12 months as your hair tangles and tightens into mature locs. No products, no tools, no manipulation beyond separation. The process requires patience — freeform locs look messy during months 3-8 before they mature into defined locs.
Which face shape suits freeform locs best?
Freeform locs work for all face shapes because their organic, irregular growth adapts naturally to your head structure rather than imposing geometric rules. Oval and diamond faces wear them most effortlessly. Round faces benefit from the outward and upward growth that creates elongating texture. Square faces are softened by the non-linear, organic nature of freeform locs. Heart faces benefit from natural volume distribution at varying heights. Oblong faces should ensure locs grow with horizontal volume, not just straight down. The key: freeform works WITH your natural shape rather than correcting it.
What’s the difference between freeform locs and semi-freeform locs?
Freeform locs are started and maintained with zero manipulation beyond finger separation — no twisting, no palm-rolling, no products, no styling. They form entirely through natural matting and tangling, resulting in irregular sizes, organic shapes, and unpredictable growth patterns. Semi-freeform locs are started with an intentional method (like two-strand twists or comb coils) to create initial uniform sections, but then maintained with minimal manipulation similar to freeform — occasional root maintenance and separation but no heavy styling or product use. Freeform is completely organic; semi-freeform has an intentional foundation. Freeform locs typically have more size variation and organic texture, while semi-freeform maintains slightly more uniformity from the structured start.
How often should I separate my freeform locs?
Separate your freeform locs as needed, which typically means every 1-3 days during the first year of formation, decreasing to once weekly or less after they’re fully matured (12+ months). The goal is to prevent locs from merging together where you don’t want them to merge — this process is called “congolocks” or “congo-ing.” Use your fingers to gently pull apart any locs that are tangling together at the roots. Don’t force separation if the locs are firmly joined; use water or oil to lubricate and gently work them apart. Some freeform practitioners intentionally allow some congo-ing for even larger, more organic locs. The frequency depends on your hair texture — coily hair types may need more frequent separation than wavy types.
8 of 12 — The Platinum Rebel Locs
Face Shape Recommendations For Colored Locs
The Platinum Rebel Locs work best for oval, heart, and diamond face shapes. The high bald fade combined with forward-styled shoulder-length platinum locs creates dramatic visual weight at the forehead, which balances heart-shaped faces by adding volume where the face is naturally wider, then tapering down to match the pointed chin. Diamond faces benefit from the fade removing width at the temples while the platinum color draws attention upward and forward, balancing wider cheekbones. Oval faces maintain their natural proportions while the platinum adds rebellious character. Avoid this style if you have a round face — the shoulder-length locs add horizontal width at exactly the wrong place (mid-face level), emphasizing roundness rather than creating elongation. Square faces should approach cautiously; the dramatic platinum can emphasize angular features unless you keep some softness in your beard growth to balance the jaw.
Professional Color & Grooming Tools
Platinum locs require specialized maintenance tools. For home care: Wahl Professional Balding Clippers for maintaining the bald fade between appointments, Andis T-Outliner for hairline precision, professional tinting bowl and brush if you’re doing root touch-ups at home (not recommended for first-timers), and a silk or satin sleep cap in white or light colors to avoid color transfer. Product requirements: Purple shampoo specifically formulated for textured hair (Clairol Shimmer Lights or Matrix So Silver) to tone brassiness every 3rd wash, Olaplex No. 3 Hair Perfector applied weekly to repair bleach damage, leave-in conditioner for color-treated hair (apply daily — colored locs are dry locs), loc retwisting gel that’s clear and lightweight (avoid heavy waxes that create buildup on porous bleached hair), and scalp oil with vitamin E for the exposed scalp from the fade. Budget for professional salon visits: $150-250 for initial bleaching, $80-120 for root touch-ups every 4-6 weeks.
Maintenance Schedule For Colored Locs
High maintenance is non-negotiable with platinum locs. Barber visits every 5-7 days for bald fade touch-ups — the contrast between skin and platinum is what makes this style dramatic, so overgrowth kills the aesthetic fast. Color salon visits every 4-6 weeks for root bleaching and toning — as your natural hair grows, dark roots will show, and while some darkness creates the ombré effect shown here, more than 2-3 inches of regrowth looks unkempt rather than intentional. Loctician visits every 4-5 weeks for retwisting — bleached locs are more fragile than natural locs, so consistent maintenance prevents breakage. Daily care is 15-20 minutes: apply leave-in conditioner to the length of your locs, apply scalp oil to your fade areas, and every 3rd wash (approximately every 9-10 days) use purple shampoo instead of regular shampoo to tone any brassiness. Weekly deep conditioning with Olaplex is non-negotiable — skip this and your locs will become brittle and snap off.
Barber & Colorist Instructions
For your barber: “I need a high bald fade — start with a 0 guard at my temples and taper to skin using your balding clippers. Blend from skin to 0.5, then 0.5 to 1, then 1 to 1.5 where my locs begin. Make the fade high — starting about 2.5 inches above my ears. The transition should be clean with no visible lines. Use the T-Outliner to create a sharp hairline front and back. Don’t touch my loc length or color. Keep my beard at natural scruff length — I’m maintaining it at 2-3 days growth, so don’t shave it.”
For your colorist: “I want platinum blonde locs with about 2 inches of natural dark roots for an intentional ombré effect. Use a quality bleach with Olaplex added to minimize damage — lift to level 10 platinum. Tone with a violet-based toner to remove any brassiness. Apply bleach carefully from 2 inches away from my roots to the ends — I want those roots dark. Process time will be longer because of my loc texture, so plan 3-4 hours. After processing, apply Olaplex No. 2 as a bond-building treatment. For touch-ups, only bleach new growth — never overlap onto previously bleached sections. Give me a purple shampoo and deep conditioning protocol for at-home maintenance.”
If platinum feels too bold, our next style shows how to incorporate color with more subtlety.
FREQUENTLY ASKED QUESTIONS
How do I maintain platinum blonde locs without severe damage?
Maintain platinum locs by using Olaplex No. 3 Hair Perfector weekly to rebuild bonds broken during bleaching — apply to damp locs, leave for 45 minutes, then rinse. Use purple shampoo every third wash to prevent brassiness but don’t overuse (causes purple buildup). Apply leave-in conditioner daily because bleached locs are extremely porous and dry. Deep condition every 10-14 days with a protein-free moisturizing treatment. Minimize heat exposure — avoid blow-drying when possible. Sleep with a satin cap to reduce friction. Get professional color maintenance every 4-6 weeks rather than attempting home bleaching, which almost always causes uneven damage. If your locs feel crispy or snap easily when bent, you’ve over-processed — focus on moisture and protein balance immediately.
Which face shape suits Platinum Rebel Locs best?
Oval, heart, and diamond face shapes work best with platinum locs styled forward at shoulder length. Heart faces benefit from the volume at the forehead balancing a wider upper face and pointed chin. Diamond faces benefit from the fade removing temple width while platinum draws attention upward. Oval faces maintain balance naturally while adding rebellious character. Round faces should avoid shoulder-length locs that add horizontal width at mid-face level — keep platinum locs shorter (6-8 inches) and styled upward instead. Square faces should maintain softness in beard growth to balance angular features that platinum color can emphasize.
What’s the difference between bleaching locs and bleaching loose hair?
Bleaching locs is significantly more complex than bleaching loose hair. Locs are densely matted hair with limited porosity penetration, meaning bleach must process 2-3 times longer to achieve the same lift level as loose hair. The center core of thick locs may remain darker than the outer surface, creating dimensional color. Rinsing bleach from locs is more difficult — residual bleach trapped inside continues processing and causes damage, so thorough rinsing is critical. Bleached locs also become more fragile because the locked structure prevents internal bonds from reforming the way loose hair can. Touch-ups are trickier because you must avoid overlapping bleach on previously lightened sections. Always see a professional colorist experienced with textured hair — DIY loc bleaching almost always results in uneven color or breakage.
How often do I need to touch up platinum loc roots?
Touch up platinum loc roots every 4-6 weeks depending on your natural hair growth rate and how much dark root you want visible. If you want minimal roots (1 inch or less), visit your colorist every 4 weeks. If you’re embracing the ombré effect and want 2-3 inches of dark roots, stretch appointments to 6 weeks. The key: only bleach new growth, never overlapping onto previously bleached sections, which causes breakage. Between appointments, use root touch-up spray or powder in platinum if you have a special event and need to camouflage regrowth temporarily. Budget $80-120 per touch-up appointment plus tip. Factor this ongoing cost when deciding to go platinum — it’s a financial and time commitment, not a one-time transformation.
9 of 12 — The Business Casual Top Knot Locs
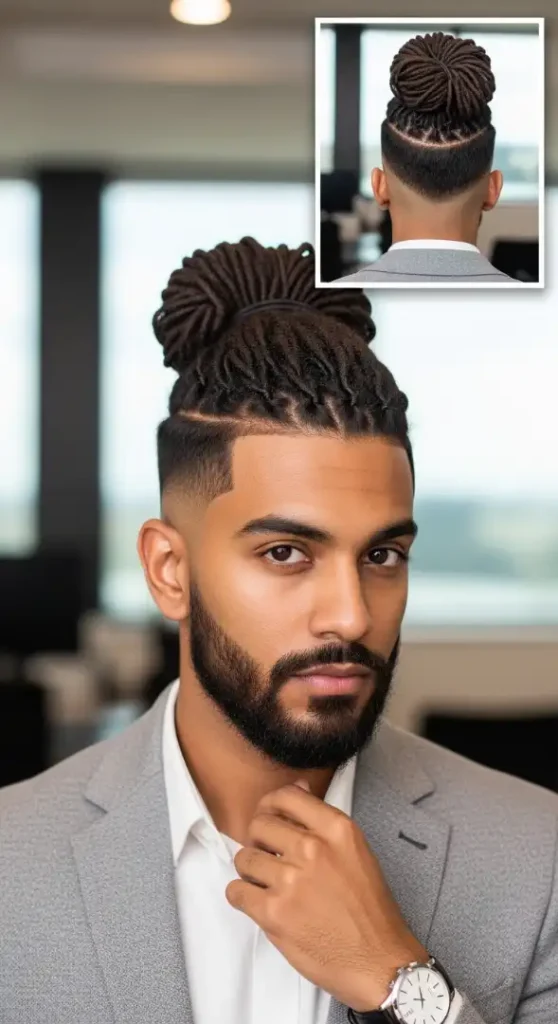
Face Shape Compatibility For Professional Top Knots
The Business Casual Top Knot Locs excel on square, oval, and oblong face shapes in professional settings. Square faces benefit significantly — the top knot adds vertical height and softness at the crown, balancing angular jawlines while the low fade maintains masculine structure. The gathered locs create upward visual movement that softens hard edges. Oval faces maintain their natural balance while the top knot adds polish and sophistication without disruption. Oblong faces benefit from the horizontal line created by the knot itself, which interrupts excessive vertical length at the crown area. Round faces should approach cautiously — while the top knot does add vertical height (which is good for round shapes), if worn too loose or too forward it can add width at the crown that emphasizes roundness. For round faces, ensure the knot is tight, positioned more toward the back of the crown rather than forward, and the low fade provides sufficient side tapering. Heart and diamond faces work well with this style naturally.
Professional Grooming Arsenal
For maintaining the Business Casual Top Knot, invest in: Andis Master Clippers for low fade maintenance, Wahl 5-Star Detailer for hairline cleanup and beard precision, professional hairdressing scissors for trimming stray loc hairs, and a wooden wide-tooth comb for gentle loc separation. Product selection: Cantu Shea Butter Moisturizing Curl Activator Cream (quarter-sized amount) for pre-styling moisture and hold, Got2b Ultra Glued Gel for securing the knot base without flaking (pea-sized amount at the ponytail point), hair elastics specifically designed for thick hair in black (never thin rubber bands), beard oil with subtle or no fragrance for professional environments, and leave-in conditioner spray for daily loc refreshing. Keep a lint roller or lint brush at your desk for removing any particles from your blazer before meetings. A satin sleep cap prevents the knot from loosening overnight, though you’ll need to retie it each morning regardless.
Maintenance Schedule & Time Reality
Medium maintenance with daily touchpoints. Barber visits every 14-18 days for low fade touch-ups — low fades are forgiving and can stretch longer between appointments than high fades, making this schedule realistic for busy professionals. Loctician appointments every 5-6 weeks for root retwisting and ensuring locs remain healthy. Daily styling is 10-12 minutes: apply moisturizing cream to locs, brush or finger-comb locs toward your crown gathering point, secure with a hair elastic (not too tight — leave slight looseness to prevent tension alopecia), twist the gathered locs around the elastic base to form the knot, secure the end with a second elastic, and use a small amount of gel at the base if needed for polish. Spray with leave-in conditioner for sheen. The knot should be retied daily for maximum neatness. Beard maintenance is 5 minutes daily — apply oil, brush, and shape with your hands. Edge-ups can be done at home every week with the detailer for maintaining the professional hairline between barber visits.
Exact Barber Instructions For This Cut
Say precisely: “I need a low fade — start with a 1.5 guard at the bottom of my hairline and blend to a 2, then 2.5, then 3 where my locs begin. The fade should start just below my ear level — not mid-ear or high, I want it low and subtle for a professional look. Make the gradation smooth with no visible lines. Use the detailer to clean up my hairline front and back — keep the corners natural and the overall shape professional, not too sharp or aggressive. For my beard, I want a 4 guard overall length, with a clean cheek line that’s not too low or too high — natural professional placement. Fade my neckline from a 3 to a 4 with a bald fade at the very bottom starting about one finger-width above my Adam’s apple. Make sure the beard fade connects smoothly to my hairline fade at the sideburns — no visible separation. Don’t touch my loc length, just work the fade around them.”
The top knot balances professionalism with cultural authenticity perfectly, and our next style takes loc versatility even further.
FREQUENTLY ASKED QUESTIONS
How do I tie a professional top knot with locs that stays secure all day?
Tie a secure professional top knot by first applying a small amount of moisturizing cream to your locs for hold and smoothness. Brush or gather all locs toward your desired knot position (crown-forward area for this style), then secure tightly with a thick hair elastic designed for locs. Twist the gathered locs around the elastic base 1.5-2 full rotations to form the knot shape, then secure the twisted end with a second elastic. Apply a pea-sized amount of Got2b gel at the base of the ponytail (where it meets your head) for extra security, smoothing any flyaways. The key: use TWO elastics (one for the base gather, one for the twisted knot end) and don’t pull so tight that you create scalp tension. Retie daily for maximum neatness — overnight loosening is natural.
Which face shape suits Business Casual Top Knot Locs best?
Square, oval, and oblong faces benefit most from professional top knot locs. Square faces gain vertical height and softness that balances angular jawlines while the low fade maintains masculine structure. Oval faces add sophistication without disrupting natural balance. Oblong faces benefit from the horizontal line created by the knot itself, interrupting excessive vertical length. Round faces should ensure the knot is tight, positioned toward the back of the crown rather than forward, with a well-defined low fade providing side tapering — otherwise the knot can add unwanted width. Heart and diamond faces naturally work well with this style.
What’s the difference between a top knot and a man bun with locs?
A top knot is positioned at the crown or crown-forward area of your head, creating a higher, more prominent updo that sits visibly above your head’s silhouette when viewed from the side — it’s intentionally noticeable and makes a style statement. A man bun is positioned at the back of your head near the occipital bone (where your skull curves), creating a lower, more subtle updo that sits closer to your head — it’s functional and understated. Top knots are typically tighter and more structured, while man buns can be looser and messier. Top knots work better for professional settings because they appear more deliberate and polished, while man buns read as casual. Both require minimum 6-8 inches of loc length.
How often should I get my low fade touched up for a professional look?
Touch up your low fade every 14-18 days to maintain professional polish. Low fades are more forgiving than mid or high fades because the smaller skin area grows out less noticeably, allowing you to stretch appointments longer without looking unkempt. However, beyond 18 days, the tapering loses its definition and the contrast between the fade and your locs dulls, defeating the purpose of the style. If you have a particularly important presentation or client meeting, consider scheduling your barber visit 1-2 days before for optimal sharpness. Between appointments, maintain your hairline at home every week using a detailer trimmer to keep edges clean — this extends the professional appearance of your fade significantly.
10 of 12 — The Braided Foundation Locs
Face Shapes For Starting Your Loc Journey
The Braided Foundation Locs work universally for all face shapes during the starter phase because the full coverage and natural volume don’t impose geometric structure — you’re simply beginning the journey. However, understanding how your face shape will interact with mature locs helps planning. Oval faces will wear mature locs effortlessly regardless of final length or styling. Round faces should consider eventual loc length carefully — plan for styling that creates vertical emphasis (top knots, high buns) rather than letting locs hang at cheek level, which adds horizontal width. Square faces will benefit from the softness that mature locs provide, naturally balancing angular jawlines. Heart and diamond faces should embrace the volume at the crown that locs naturally create, which balances wider foreheads or cheekbones. Oblong faces should plan for eventual loc styling that includes horizontal elements (man buns, side-swept styles) rather than purely vertical hanging locs that emphasize length. The braided start method shown here creates uniform section sizes, giving you control over final loc thickness regardless of face shape.
Starter Tools & Early-Stage Products
Beginning your loc journey requires minimal but specific tools. You need: Rat-tail comb for precise sectioning and parting if you’re doing box braids yourself or having a friend help, hair clips or bands for holding sectioned hair while braiding, professional hair scissors for trimming loose hairs (not cutting loc length), and spray bottle with water for keeping hair moisturized during the braiding process. If visiting a professional, they’ll provide these. Product selection for starter locs (0-6 months): Residue-free shampoo like Dr. Bronner’s diluted 1:3 with water, aloe vera gel (pure, not with alcohol) for retwisting roots as braids begin to bud into locs, lightweight oil like jojoba or grapeseed (3-4 drops max per application) for moisture without buildup, and satin or silk bonnet for sleep protection. AVOID heavy waxes, thick creams, and petroleum-based products during the starter phase — they prevent proper loc formation and cause buildup that takes months to remove.
Time Investment During Early Stages
Low daily maintenance with periodic professional touchpoints. Initial box braid installation takes 4-6 hours depending on head size and desired loc count (typically 60-100 locs for medium-sized sections). Once braided, daily maintenance for the first 3 months is under 5 minutes: lightly spray with water to keep moisturized, apply 3-4 drops of oil to palms and run through locs, and separate any that are trying to merge. Professional retwist appointments begin at 6-8 weeks post-installation as the braids start to bud and frizz — your loctician will retwist the new growth at roots. Between months 3-6, visits every 6-7 weeks as your locs begin to tighten and lock. Washing during the first 2 months is minimal — once every 10-14 days with extreme care using diluted residue-free shampoo, focusing only on the scalp, gently squeezing soap through the braids without excessive manipulation. After month 2, increase to every 7-10 days. The starter phase is patient work — hands-off except for moisture and separation.
What To Tell Your Loctician
If getting professional starter locs with box braids, say: “I want to start my loc journey using the box braid method. I want medium-sized sections — approximately 60-80 locs total depending on my head size. Make the sections squared, not circular, using the box braid parting technique. Braid each section down to the ends — I want the full length braided, not just the roots, because I want the foundation to be structured as my locs form. Make the braids tight but not so tight that they create tension on my scalp — I should feel secure but not painful. Keep the sectioning uniform so my locs are relatively consistent in size as they mature. Don’t use any wax or heavy products — just lightweight gel or aloe vera if you need something to help the braiding. After braiding, show me how to care for them during the first few months, including when I should come back for my first retwist as they begin to bud.”
Starter locs require patience and trust in the process, and the next style shows what happens when you fully commit to the mature loc transformation.
FREQUENTLY ASKED QUESTIONS
How do I start locs using the box braid method?
Start locs with box braids by sectioning your clean, dry hair into uniform squares approximately 1-1.5 inches each using a rat-tail comb — create a grid pattern across your entire scalp. Each section should contain roughly the same amount of hair for uniform loc thickness. Secure each section with a clip while working on others. Begin braiding each section from the root to the ends using standard three-strand box braid technique, braiding tightly at the roots but allowing slight looseness toward the ends to prevent excessive tension. The braids will remain for 2-3 months as your hair begins to mat and tangle naturally at the roots beneath the braids, creating the foundation of your locs. After 6-8 weeks, visit a loctician for your first retwist as the braids begin to frizz and bud into early locs.
Which face shape suits Braided Foundation starter locs best?
All face shapes can start locs with the braided foundation method because the starter phase doesn’t impose geometric styling — it’s simply full natural coverage as your hair begins its loc journey. The method creates uniform section sizes, giving you control over final loc thickness regardless of face shape. Plan your eventual loc styling based on your face shape: oval faces work with any mature styling, round faces should plan for vertical emphasis styles (top knots), square faces benefit from loc softness naturally, heart and diamond faces embrace crown volume, and oblong faces should plan for horizontal styling elements (side sweeps, buns) rather than purely vertical hanging locs.
What’s the difference between starting locs with box braids versus two-strand twists?
Starting locs with box braids creates a more structured, uniform foundation because the braiding technique locks the hair tightly from roots to ends, resulting in locs that are cylindrical and consistent in thickness from base to tip. Box braid starters take longer to install (4-6 hours) but last longer before requiring retwist (6-8 weeks). Two-strand twists create a softer, more organic start — the twisting is less rigid than braiding, resulting in locs with slight variations in thickness and a more natural appearance. Twist starters install faster (2-4 hours) but unravel more easily, requiring retwist sooner (4-6 weeks). Box braids are better for people wanting very uniform, structured locs, while two-strand twists are better for those wanting more natural, varied loc formation. Both methods result in mature locs eventually — the difference is primarily aesthetic during the first 6-12 months.
How long does it take for box braid starter locs to fully mature?
Box braid starter locs take 12-18 months to reach full maturation, meaning the entire length is locked, cylindrical, and firm when squeezed. The timeline breaks down as: Months 0-3 (starter phase) — braids begin to frizz and bud at roots, Months 3-6 (budding phase) — roots are clearly forming locs while ends are still somewhat loose, Months 6-12 (teenage phase) — locs are forming along the entire length but may still have some loose sections and significant frizz, Months 12-18 (mature phase) — locs are tight, firm, cylindrical throughout. Timeline varies by hair texture: coily hair (4A-4C) locs faster (12-15 months), wavy hair (2A-2C) takes longer (18-24 months). Consistent retwisting every 6-8 weeks and avoiding heavy products accelerates maturation.
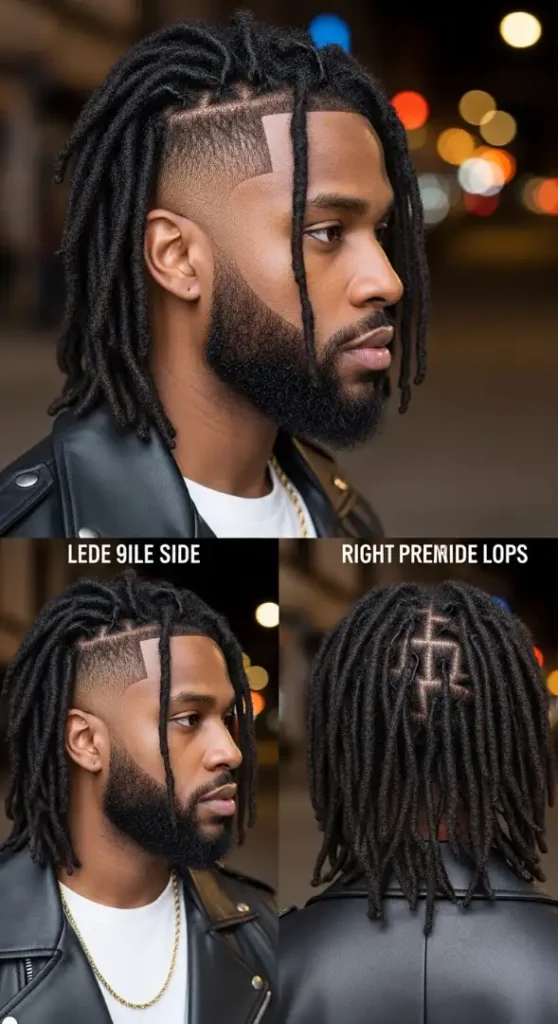
11 of 12 — The Sculptural Undercut Locs
Face Shape Strategy For Asymmetric Locs
The Sculptural Undercut Locs work best for oval, diamond, and square face shapes willing to embrace asymmetry. Oval faces maintain balance naturally — the asymmetric styling adds dramatic interest without disrupting proportions. Diamond faces benefit significantly: the undercut on one side removes width at the temple where cheekbones are widest, while the swept loc volume on the opposite side creates diagonal lines that draw the eye across rather than focusing on cheekbone width. Square faces have their angular jawlines both emphasized and softened simultaneously — the hard part and undercut showcase masculine structure while the flowing locs add softness. Avoid this style if you have a round face — the asymmetric volume adds width on one side without creating vertical balance, which can make roundness more pronounced rather than elongated. Heart-shaped faces should be cautious; the single-side loc volume can overemphasize an already-wider forehead unless the undercut is on the forehead side to balance it. This is a high-fashion editorial style that prioritizes drama over conventional balance.
High-Fashion Grooming Tools
The Sculptural Undercut demands precision tools and bold styling products. You need: Wahl Professional 5-Star Magic Clip for undercut maintenance, straight razor or safety razor for creating the hard part line (most barbers use this — difficult for home maintenance), Andis T-Outliner for beard geometric sculpting and edge cleanup, professional styling brush for directing loc flow, and salon-quality scissors for trimming stray loc hairs. Product selection: Got2b Ultra Glued Gel (golf-ball-sized amount) for holding locs in the swept position all day, Shine ‘n Jam Conditioning Gel Extra Hold as a lighter alternative for less dramatic days, argan oil for adding glossy sheen to the loc section before styling, matte paste for beards to maintain sculpted beard shape, and edge control specifically for hard parts to keep the shaved line visible and sharp. Budget for professional styling sessions if wearing this for events — achieving the perfect asymmetric sweep takes practice. A satin pillowcase and loc cap prevent the style from flattening overnight, though expect to restyle partially each morning.
Maintenance Reality For Editorial Styling
Very high maintenance — this is not a daily-wear style for most lifestyles. Barber visits every 4-5 days to maintain the undercut at 0.5 guard and especially to maintain the razor-sharp hard part line, which grows out visibly within a week. You CANNOT maintain the hard part yourself — it requires professional barbering skill with a straight razor. Loctician appointments every 4-5 weeks for retwisting the roots on the loc section and ensuring length remains healthy. Daily styling is 25-30 minutes and requires skill: apply argan oil to locs for shine and manageability, brush locs dramatically to the right side using Got2b gel worked through from roots to mid-length (not the ends — keep those natural), secure the base of the swept section with a hidden elastic if needed for extra hold, use edge control along the hard part line to maintain visibility, and sculpt beard using matte paste and a fine-toothed comb. The style lasts one day maximum — overnight flattening is inevitable. This is a high-fashion editorial style best suited for special events, photoshoots, or men whose careers involve appearance-based work (modeling, entertainment, high-fashion retail).
Precise Barber Instructions
Tell your barber: “I want a sculptural undercut on my left side only with a dramatic hard part. Clipper the entire left side down to a 0.5 guard starting at my temple, going back behind my ear, and down my neckline on that side. Keep the right side completely untouched — all my locs stay there at full length. At the transition point between the undercut and my locs — approximately 2 inches above my left ear — use a straight razor to create a razor-sharp hard part line running from my temple back toward my crown. The hard part should be a clean channel about 2-3mm wide that’s completely visible and defined. Make sure the line is perfectly straight and follows the natural curve of my head. For my beard, I want geometric sculpting — sharp angular cheek line, straight defined jawline, and a fade at the neckline. Use your detailer for precision beard edges. The overall look should be high-contrast and sculptural — clean lines, dramatic asymmetry. Don’t touch my loc length on the right side at all.”
If this editorial approach is your aesthetic, remember that high-fashion styling requires equal commitment to maintenance — our final style brings everything full circle.
FREQUENTLY ASKED QUESTIONS
How do I maintain a hard part line between barber visits?
You cannot effectively maintain a razor-sharp hard part line at home between professional barber visits — it requires straight razor skill and the ability to see the angle clearly, which is nearly impossible solo. However, you can maintain cleanliness by using an Andis T-Outliner trimmer to carefully clean up any hair growing within the hard part channel. Hold your trimmer at the exact angle of the part and gently go over the line every 2-3 days to prevent visible stubble inside the channel. Use a handheld mirror plus your bathroom mirror to see the line from multiple angles. Do NOT attempt to recut or deepen the hard part yourself with a razor — leave that to professionals. Visit your barber every 4-5 days to maintain the razor-sharp definition this style requires.
Which face shape suits Sculptural Undercut Locs best?
Oval, diamond, and square faces work best with asymmetric undercut locs. Oval faces maintain natural balance while adding dramatic interest. Diamond faces benefit because the undercut removes width at the temple where cheekbones are widest, while swept locs create diagonal lines that redirect attention. Square faces have angular features both showcased and softened — the hard part emphasizes masculine structure while flowing locs add softness. Round faces should avoid this entirely as asymmetric volume adds width on one side without vertical balance. Heart faces should be cautious unless the undercut is on the forehead side to balance width.
What’s the difference between an undercut and a fade with locs?
An undercut with locs means one section of your head (usually one side or the back) is clipped to a uniform guard length (typically 0.5 to 2) with a hard defined line where the undercut meets your locs — there’s no gradual blending. The undercut creates dramatic high-contrast between the clipped section and full loc length. A fade with locs means a gradual blending from skin or very short length up to where your locs begin, with multiple guard levels creating smooth transition — there’s no hard line. Undercuts are more avant-garde and editorial, requiring frequent maintenance (every 4-7 days) to keep the hard line visible. Fades are more classic and versatile, requiring maintenance every 7-14 days depending on fade height. Undercuts make a bold fashion statement; fades provide polished versatility.
How long do my locs need to be for a dramatic side-swept undercut style?
Your locs need to be minimum 10-12 inches for a truly dramatic side-swept undercut as shown here, where the locs create significant volume cascading over one side of your head and past your shoulder. Shorter locs (6-8 inches) can create a subtle side-swept undercut, but without the sculptural drama that defines this editorial style. The weight and length of 14-16 inch locs allows for the swept section to hold position better with product, creating the intentional asymmetric silhouette. If your locs are currently shorter and you want this look, be patient — locs grow approximately 6 inches per year depending on hair texture and health, so plan accordingly. Don’t cut your locs on the non-undercut side thinking it will make them look fuller — embrace the length for maximum impact.
12 of 12 — The Natural Coil Locs

Face Shape Analysis For Coily Natural Locs
The Natural Coil Locs are universally flattering because the organic coily texture and medium length create balanced proportions that adapt to any face structure. However, certain shapes benefit most. Oval faces wear this effortlessly — the natural volume and texture add character without disruption. Round faces benefit significantly from the upward spring of coily locs, which creates vertical emphasis and elongates facial proportions naturally. The taper fade removes bulk at the sides, further enhancing the elongation effect. Square faces are beautifully softened by the organic spiral texture, which contrasts angular jawlines with natural curves. Heart and diamond faces benefit from the even volume distribution — coily locs don’t concentrate volume at any single point, instead creating balanced fullness. Oblong faces should ensure the coily locs maintain some width rather than hanging straight down — palm-rolling creates the springy texture that achieves this naturally. This is one of the most versatile loc styles because the natural coil formation works with your head shape rather than imposing structure.
Essential Tools For Palm-Rolled Locs
Palm-rolled coily locs require minimal tools with maximum technique. You need: Your hands (the primary tool — clean hands with short nails), spray bottle with water or rosewater, pure aloe vera gel for hold during palm-rolling without buildup, residue-free shampoo like Dr. Bronner’s for washing, wooden wide-tooth comb for gentle separation, and pure oils (jojoba, argan, or grapeseed — 3-4 drops per session). For professional maintenance if you visit a loctician: they’ll use professional loc rollers or interlocking tool occasionally for root tightening. For the taper fade: maintain at home with Wahl Peanut Trimmer for edge-ups or visit a barber with Andis Master Clippers for clean taper work. Product requirements are intentionally minimal: Knotty Boy Dreadlock Wax in light formula if you need extra hold (use sparingly — pea-sized amount maximum), leave-in conditioner spray for daily moisture, and satin bonnet or pillowcase for sleep. The philosophy here is natural texture with minimal product interference.
Maintenance Schedule & Daily Care
Medium maintenance with emphasis on natural technique. Barber visits every 14-18 days for taper fade touch-ups — the mid-height taper is forgiving and grows out gracefully. Loctician appointments every 6-7 weeks for professional palm-rolling and root maintenance, though many practitioners do this at home between visits. Daily palm-rolling maintenance is 10-15 minutes: spray locs lightly with water or rosewater to dampen them, apply a tiny amount of aloe vera gel to your palms if needed, then palm-roll each loc individually — place the loc between your palms and roll it back and forth with firm pressure, working from roots to tips. This maintains the cylindrical shape and tightens the coil structure. Do this every 2-3 days for consistent coil definition. Washing is every 7-10 days with residue-free shampoo, focusing on scalp. After washing, immediately palm-roll all locs while damp to restore coil definition. Beard care is minimal — apply beard oil daily and brush with a boar bristle brush to distribute oils naturally. This style embraces natural texture, so avoid over-manipulation or heavy products that weigh down the springy coils.
Barber Communication Script
Tell your barber: “I need a classic taper fade — start with a 1 guard at the bottom around my ears and neckline, then blend to 1.5, then 2, then 2.5 moving upward where my locs begin. I want the taper to start at mid-height — around ear level — not too high, not too low. Make the blending smooth and gradual so there are no visible lines between guard levels. The transition into my locs should be natural — don’t create a shelf or hard line. Use the trimmer to clean up my hairline front and back naturally — keep the corners soft and organic, not too sharp. For my beard, I want natural shaping — just clean up any growth on my neck below my natural beard line and on my cheeks above my natural cheek line, but don’t create artificial lines. Keep it full and organic. Don’t touch my loc length, texture, or thickness at all — just taper the sides and back around them.”
The coily natural loc style honors texture and tradition simultaneously, completing our journey through 12 distinct dreadlock aesthetics that prove locs are endlessly versatile.
FREQUENTLY ASKED QUESTIONS
How do I palm-roll my locs to maintain coily texture?
Palm-roll your locs by first lightly spraying them with water or rosewater to dampen (not soaking wet — just moist). Apply a tiny amount of aloe vera gel to your palms if needed for grip and slight hold. Take one loc, place it between your palms, and roll it back and forth with firm, consistent pressure — imagine rolling dough between your hands into a rope. Work from the root down to the tip, ensuring you roll the entire length. The motion should be continuous and smooth, not jerky. Roll each loc for 15-20 seconds. Repeat every 2-3 days to maintain tight coil definition and cylindrical shape. After washing, immediately palm-roll all locs while still damp to restore coil structure. This technique tightens the loc and creates the characteristic spiral texture. Do NOT use excessive product — aloe vera or water is sufficient.
Which face shape suits Natural Coil Locs best?
All face shapes work well with natural coil locs because the organic spiral texture and balanced volume adapt naturally to any structure. Round faces benefit especially from the upward spring of coily texture creating vertical elongation, while the taper fade removes side bulk. Square faces are softened by the organic curves of coil texture contrasting angular jawlines. Oval faces maintain balance while adding textured character. Heart and diamond faces benefit from even volume distribution without concentrated fullness at any point. Oblong faces should ensure coils maintain width through consistent palm-rolling rather than hanging straight down. This is one of the most universally flattering loc styles.
What’s the difference between palm-rolled locs and freeform locs?
Palm-rolled locs are maintained through regular palm-rolling technique (every 2-3 days) where you physically roll each loc between your palms to maintain cylindrical shape and tight coil definition, resulting in uniform, springy locs with consistent thickness and visible spiral texture. Freeform locs receive no palm-rolling or manipulation beyond separation — they mat and tangle naturally, resulting in organic, irregular shapes with varied thickness and less defined texture. Palm-rolled locs look more intentional and uniform; freeform locs look more natural and organic. Palm-rolled requires regular maintenance commitment (10-15 minutes every 2-3 days); freeform requires only occasional separation (2-3 minutes as needed). Both are valid approaches — palm-rolling creates the aesthetic shown here, while freeform honors completely natural formation.
How often should I wash palm-rolled coily locs?
Wash palm-rolled locs every 7-10 days using residue-free shampoo. More frequent washing (every 3-5 days) can prevent locs from tightening properly because constant moisture cycling loosens the coil structure you’re building through palm-rolling. Less frequent washing (every 14+ days) allows oil, dirt, and product buildup that creates odor and prevents locs from breathing. Focus shampoo on your scalp where oil accumulates, letting soap runoff clean the length of your locs. Rinse extremely thoroughly — residual shampoo causes buildup and itching. After washing, immediately palm-roll every loc while still damp to restore coil definition and maintain cylindrical shape. Let locs air dry completely (4-6 hours minimum) before sleeping or putting on a cap. Never wash locs at night — they must dry fully.