
11 Fresh Haircuts for Men to Try This Summer
1 of 11 — The Mediterranean Wave Taper

Which Face Shape Works Best with The Mediterranean Wave Taper?
The Mediterranean Wave Taper is engineered specifically for square and oval face shapes, where the natural wave texture on top creates vertical movement that softens the angular jawline characteristic of square faces while maintaining masculine definition. The tapered sides remove visual bulk, drawing the eye upward toward the textured crown and creating a balanced silhouette that doesn’t overwhelm facial proportions. For oval faces, this cut enhances the already-balanced bone structure by adding dimensional interest through wave patterns without disrupting natural harmony.
Round and diamond face shapes should approach this style with caution. Round faces risk additional width from the wavy volume on top, which can make the face appear fuller rather than elongated. Diamond faces with narrow foreheads may find the side-swept wave creates too much top-heaviness, throwing off the face’s natural proportions. If you have either shape, request your barber keep the top length to 2.5-3 inches maximum and increase the taper graduation for more dramatic side slimming.
The Exact Grooming Kit You Need
To maintain The Mediterranean Wave Taper at home, you’ll need precision tools and texture-enhancing products. For clippers, the Wahl Magic Clip (Model 5049-400) or Oster Fast Feed (Model 76023-510) provides the blade sharpness needed for clean taper work. Your barber will use these during your visit, but for home edge maintenance between cuts, invest in the Andis T-Outliner (Model 04710) for crisp lineup touch-ups around the temples and sideburns every 4-5 days.
For styling, the wave texture demands a sea salt spray applied to damp hair—Bumble and bumble Surf Spray or Oribe Après Beach Wave and Shine Spray (3-4 pumps distributed through mid-lengths to ends) creates that lived-in Mediterranean texture. Follow with a pea-sized amount of Baxter of California Clay Pomade or Uppercut Deluxe Matt Clay for separation and hold without destroying the natural wave pattern. For the beard, Honest Amish Beard Oil (4-6 drops daily) keeps the facial hair conditioned and prevents the coarse texture that competes with your refined haircut.
Daily maintenance requires a Denman D3 Original Styler 7-Row Brush for distributing product and a Kent 81T fine-tooth comb for precision parting. Budget $85-120 for your complete starter kit, then $25-30 monthly for product replenishment.
Maintenance Level: MEDIUM
Expect barber visits every 3 weeks to maintain taper precision—the graduated fade from a #2 guard at the baseline to blended length at the parietal ridge loses its sharp definition quickly as hair grows. The top length can stretch to 5-6 weeks between full cuts, but the taper is the star of this show and demands professional attention. Daily styling time clocks in at 6-8 minutes: dampen hair in shower, apply sea salt spray while wet, rough-dry with fingers to 80% dry, apply clay pomade with scrunching motion to enhance waves, then air-dry the final 20% for natural texture.
The growth pattern is forgiving—as the taper grows out, it transitions into a more relaxed, casual version of itself rather than looking unkempt. By week 4, you’ll notice the fade line creeping higher on your head, which signals time for a refresh. The wavy top actually improves slightly as it grows from weeks 2-4, gaining additional movement and texture before it crosses into “too long” territory at week 5.
Monthly maintenance cost averages $45-65 depending on your barber’s rate ($30-40 per cut) plus product replacement ($15-25). Difficulty rating: Intermediate—you’ll need to master the scrunching technique for wave definition, but once you’ve got the motion down, it becomes second nature.
Barber Talk: The Exact Script
Say this to your barber:
“I want The Mediterranean Wave Taper with a mid taper fade starting at the top of my ear. Take the sides from a #2 guard at the baseline and blend up to the natural length at the parietal ridge—I want smooth graduation with no visible lines. Keep the top at 3.5 inches, maintaining the natural wave texture with point cutting for movement—don’t thin it out too much or I’ll lose the wave pattern. Create a left side part about 1.5 inches from my hairline. For the neckline, give me a rounded taper that follows my natural hairline, blended clean with no hard edge. Blend my beard into the fade at the jawline, keeping the beard length at 6-8mm for proportion. Finish with a crisp lineup at the temples and a natural hairline shape—I don’t want a harsh boxed edge, just definition.”
If your barber has worked with wavy or curly textures before, you can also mention: “I’m going for that natural Mediterranean coastal vibe—think textured waves, not tight curls or slicked-back formality.”
The next style strips away the wave texture entirely for a sharp, architectural cut that thrives on precision rather than natural movement—perfect if you prefer control over casual.
FAQs
Q: How often should I get The Mediterranean Wave Taper touched up?
A: You’ll need a professional touch-up every 3 weeks to maintain the crisp taper fade that defines this cut. The wavy top can go 5-6 weeks between full cuts, but the graduated fade loses precision rapidly as hair grows, especially around the ear outline and temple connection where the blend is tightest. After 3 weeks, the fade blur becomes noticeable and the style loses its sharp, intentional edge.
Q: What products work best for enhancing natural wave texture in this cut?
A: Sea salt spray is essential—apply 3-4 pumps of Bumble and bumble Surf Spray or Oribe Après Beach to damp hair, then scrunch upward to activate waves. Follow with a pea-sized amount of matte clay pomade like Baxter of California Clay Pomade for separation and hold. Avoid heavy creams or gels that weigh down waves and create an artificial, crunchy finish instead of natural Mediterranean texture.
Q: Can I get The Mediterranean Wave Taper with straight hair instead of wavy?
A: While this cut is optimized for natural wave texture, straight-haired men can achieve a similar look using a sea salt spray and blow-drying technique with a diffuser attachment. You’ll create wave-like texture through styling rather than relying on your natural hair pattern, but expect to add 3-4 minutes to your morning routine and the waves won’t hold quite as long—typically 6-8 hours versus all-day hold for naturally wavy hair.
Q: Does The Mediterranean Wave Taper work for professional office environments?
A: Absolutely—the mid taper keeps sides conservative enough for corporate dress codes while the textured top adds personality without crossing into edgy territory. Request slightly less volume on top (3 inches instead of 3.5) and ask your barber for a more structured wave pattern if you work in finance, law, or other traditional industries. The natural wave reads as confident and put-together rather than casual or rebellious.
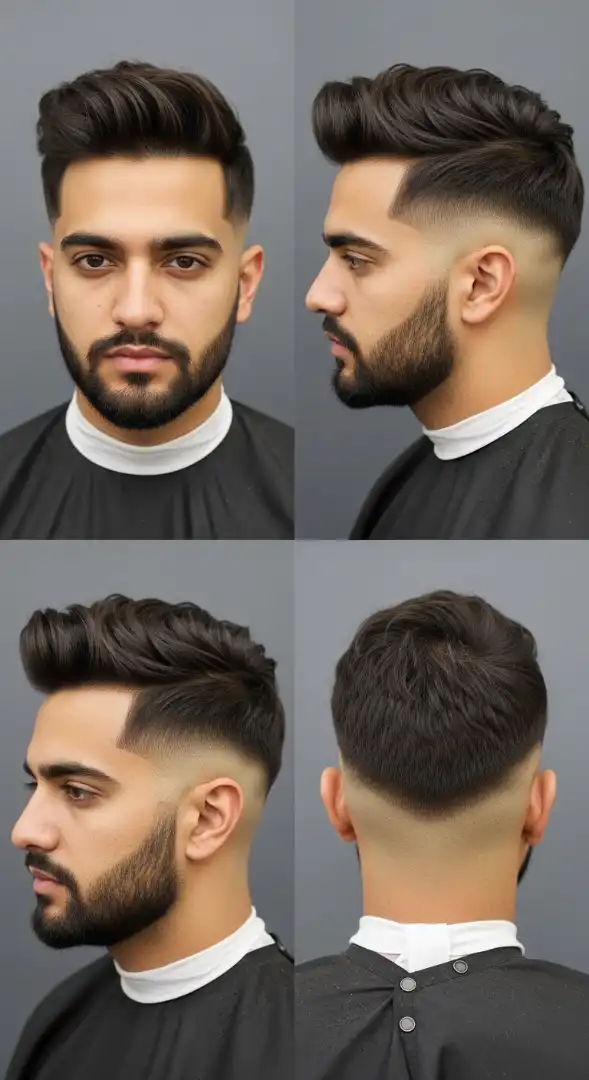
2 of 11 — The Shadow Fade Executive
The Perfect Face Shape Match for The Shadow Fade Executive
The Shadow Fade Executive performs exceptionally well on oval and diamond face shapes, where the sleek side-swept styling and ultra-subtle fade create clean horizontal lines that enhance natural bone structure without adding unnecessary volume. Oval faces benefit from the architectural precision—the blunt-cut top and geometric part add interest without disrupting the face’s inherent balance, while the shadow fade’s minimal contrast keeps attention on facial features rather than the haircut itself. Diamond faces with wider cheekbones gain significant advantage from the side-swept direction, which draws the eye laterally across the face and visually balances a narrow forehead and chin.
Heart-shaped faces should request slightly more length retention on the sides (start the fade lower, perhaps mid-ear rather than upper-ear) to avoid over-emphasizing forehead width. Round faces can absolutely wear this cut, but the styling direction becomes critical—sweep the hair more dramatically to one side to create diagonal lines that elongate rather than emphasize roundness. Oblong faces should avoid this style entirely or request significantly more volume on top (3-3.5 inches instead of 2.5) to prevent over-elongation, as the sleek sides and tight fade will make an already long face appear even more stretched.
Professional-Grade Grooming Arsenal
The Shadow Fade Executive demands precision tools and premium products—this isn’t a drugstore-pomade situation. Your barber will use Andis Master Clippers (Model 01557) or Wahl Senior (Model 8500) for the ultra-tight shadow fade work, blending from bare skin to full density within half an inch using guards #0.5, #1, and #1.5 in sequence. For home maintenance, you won’t touch the fade yourself—this requires professional skill every 2 weeks without exception.
Your investment goes into styling products. Layrite Superhold Pomade (water-based, dime-sized amount) or Suavecito Firme Hold Pomade provides the sleek, all-day control this cut demands—apply to damp hair, comb through with a Baxter of California Pocket Comb for precision parting, then blow-dry on medium heat while directing hair to the side with a Denman Classic Styling Brush. Finish with 2-3 spritzes of medium-hold hairspray like Redken Triple Take 32 for humidity resistance and polish.
For daily maintenance between washes (you’ll shampoo only every 2-3 days to preserve natural oils), keep a Kent 20T styling comb in your desk drawer for midday touch-ups. Monthly product budget: $40-55 including pomade ($18), hairspray ($22), and professional-grade comb replacement annually ($15 amortized). The tools are a one-time investment of $65-80, but they’ll last 3-5 years with proper care.
Maintenance Level: HIGH
This is unequivocally a high-maintenance cut. Barber visits every 2 weeks are non-negotiable—the shadow fade’s entire appeal rests on that barely-there gradient that becomes visible stubble by day 10-12. Missing an appointment transforms this from “executive precision” to “forgot to get a haircut” faster than any other style on this list. The top length can stretch to 4-5 weeks, but you’ll be in the chair for fade maintenance long before then.
Daily styling demands 12-15 minutes every single morning: shower, towel-dry to damp (not wet), apply pomade with even distribution focusing on roots, create side part with precision comb, blow-dry while directing hair flow with brush using tension for smoothness, finish with hairspray, final comb-through for perfection. There’s zero room for “I’m running late” shortcuts—this cut looks intentional or it looks wrong, with no middle ground.
The growth pattern is unforgiving. By week 3 without a fade touch-up, the shadow line becomes a visible dark band rather than a subtle gradient, and the geometric precision dissolves into “guy who needs a haircut.” The slicked styling also means any cowlick or wave pattern that emerges as hair grows will disrupt the sleek finish. Monthly cost: $75-110 ($40-60 for bi-weekly cuts plus $35-50 for products). Difficulty rating: Advanced—you need blow-dry skills, product application precision, and the discipline to maintain the schedule religiously.
Barber Talk: The Exact Script
Say this to your barber:
“I want The Shadow Fade Executive with an ultra-tight shadow fade starting just above my ear line. Use a #0.5 guard at the baseline, blend to #1 within half an inch, then graduate to #1.5 at ear-top level, finishing with scissors-over-comb blending to the 2.5-inch top length. I want the fade so subtle it’s almost invisible—just a gentle gradient from skin tone to full hair. Create a sharp left-side part positioned 2 inches from my left temple, cut with clipper precision for a clean line. The top should be 2.5 inches exactly, blunt-cut with scissors for weight and sleekness—no point cutting or texturizing. I want geometric precision, not movement. Give me a razor lineup at my hairline, temples, and sideburns—I want those edges sharp enough to cut paper. Keep the sideburns straight and level at mid-ear. For the neckline, give me a tapered rounded finish with the fade blending seamlessly—no hard line.”
Add if your barber asks about styling: “I’m blow-drying this with tension and using water-based pomade for a sleek, corporate finish. I need it to look polished under office fluorescent lighting, not textured or casual.”
The next cut abandons corporate polish entirely, embracing natural texture and deliberately imperfect styling that works for creative professionals who value authenticity over architectural precision.
FAQs
Q: How do I maintain The Shadow Fade Executive between barber visits?
A: You cannot maintain the shadow fade yourself—it requires professional skill and precision clippers every 2 weeks without exception. At home, your maintenance focuses entirely on daily styling: apply water-based pomade to damp hair, create your side part with a fine-tooth comb, blow-dry with tension using a round brush, and finish with medium-hold hairspray. Between washes, use a styling comb for midday touch-ups to maintain the sleek side-swept direction.
Q: What’s the difference between a shadow fade and a regular fade?
A: A shadow fade uses the tightest possible gradient—blending from skin or near-skin (#0.5 guard) to full hair density within 0.5-1 inch, creating a barely-visible “shadow” effect rather than a dramatic line. Regular fades typically span 2-3 inches of blending space and create obvious contrast between lengths. Shadow fades appear subtle and sophisticated under office lighting, while regular fades make a bolder, more noticeable statement. Shadow fades require more frequent maintenance (every 2 weeks) versus regular fades (every 3-4 weeks).
Q: Can I get The Shadow Fade Executive if I have curly or wavy hair?
A: Technically yes, but you’ll need to chemically straighten or use a flat iron daily to achieve the sleek, controlled finish that defines this cut. Natural wave or curl texture fundamentally conflicts with the geometric precision and smooth side-swept styling this cut requires. If you have textured hair and want a similar professional aesthetic, consider The Mediterranean Wave Taper instead, which embraces natural texture rather than fighting it. Forcing straight styling on curly hair adds 8-10 minutes to your daily routine and causes significant heat damage over time.
Q: Is The Shadow Fade Executive appropriate for casual Friday or weekend wear?
A: While technically “appropriate” anywhere, this cut is optimized for professional environments and formal occasions—it looks somewhat overdressed in ultra-casual settings like beach days, hiking, or backyard BBQs. The high-polish finish and geometric precision read as “intentional corporate grooming” rather than “relaxed weekend vibe.” If you want versatility, request slightly more texture on top (ask for point cutting instead of blunt cutting) so you can style it casually with matte clay on weekends while keeping the sleek pomade look for the office.
3 of 11 — The Textured Fringe Forward

Which Face Shapes Thrive with The Textured Fringe Forward?
The Textured Fringe Forward is specifically engineered for round and heart-shaped faces, where the forward-swept fringe creates horizontal width across the forehead that balances facial proportions beautifully. Round faces benefit from the vertical texture and piece-y separation that adds visual height, counteracting the circular shape with deliberate angular lines created by choppy fringe edges. The mid fade removes bulk from the sides, slimming the face’s widest point while the textured top draws attention upward. Heart-shaped faces with wider foreheads gain coverage and balance—the fringe visually narrows the forehead while the fade’s mid-placement adds subtle width at the temples, creating more balanced proportions from top to bottom.
Square and diamond face shapes should approach cautiously. Square faces risk over-emphasizing width if the fringe falls too heavy across the forehead—request your barber thin the fringe significantly with point cutting to create gaps and airiness rather than a solid horizontal line. Diamond faces with naturally narrow foreheads may find the fringe adds unwanted width at the widest point of their face. Oval faces can wear this style successfully but don’t gain the same transformative benefit since their proportions are already balanced. Oblong faces should avoid this cut entirely—the horizontal fringe line shortens an already-long face, and the mid fade’s vertical emphasis over-elongates.
Your Complete Texturing Toolkit
The Textured Fringe Forward requires specific tools for both the cut and daily styling. Your barber will use Wahl Magic Clip (Model 5049-400) for the mid fade work, starting with a #1.5 guard at the temple line and blending up to scissor-over-comb at the parietal ridge. The fringe itself demands professional texturizing shears—specifically Kasho KXP-30T thinning scissors (30-tooth) for creating that piece-y, lived-in separation without removing too much density. Standard cutting shears would leave the fringe too blunt and heavy.
For home styling, your product arsenal needs sea salt spray as the foundation—Hanz de Fuko Hybrid Sea Salt Spray (4-5 pumps on damp hair) creates initial texture and grit. Follow with a matte styling clay like Hanz de Fuko Claymation or Baxter of California Clay Effect (pea-sized amount, maybe slightly larger for thick hair) worked through from roots to ends with your fingers. The key technique: scrunch and separate individual pieces rather than combing through, which destroys the textured effect.
You’ll also need a blow dryer with concentrator nozzle—Dyson Supersonic if budget allows ($430), or BaBylissPRO Nano Titanium (Model BABNT5548T) at $60 as the budget alternative. Use medium heat while scrunching hair forward with your fingers, directing the nozzle downward to enhance texture. Total toolkit investment: $75-95 for products and tools (excluding the high-end dryer option), with monthly product replenishment at $28-35.
Maintenance Level: MEDIUM
Barber visits fall into a comfortable every 3-4 weeks rhythm—the mid fade tolerates growth better than high or shadow fades, maintaining its shape for nearly a month before losing definition. The textured top actually improves between weeks 2-3 as it gains length for better piece-y separation, then starts looking overgrown around week 5. Daily styling requires 5-7 minutes: apply sea salt spray to damp hair, scrunch with fingers while blow-drying on medium heat, work in clay with separating motions, final piece-out individual sections in the fringe, done.
The growth pattern is forgiving and actually enhances the “lived-in” aesthetic this cut embraces. Unlike precise geometric cuts that look wrong when they grow, The Textured Fringe Forward transitions gracefully into a slightly longer, more relaxed version of itself. By week 4, the fringe may fall slightly lower on your forehead (trimming it yourself with small scissors is an option if you’re confident), and the fade softens into a more subtle gradient rather than looking neglected.
Monthly maintenance cost: $55-75 including one barber visit ($35-50) plus product replacement ($20-25). The stubble beard requires daily maintenance with a Philips Norelco OneBlade (Model QP2520/70) set to 2mm guard, adding 2 minutes to your morning routine. Difficulty rating: Beginner to Intermediate—the styling technique is intuitive (scrunch and separate) rather than requiring precision combing or blow-dry tension skills, making this accessible for guys who’ve never used styling products before.
Barber Talk: The Exact Script
Say this to your barber:
“I want The Textured Fringe Forward with a mid fade starting at my temple line. Blend from a #1.5 guard at the fade start point up to scissor length at the parietal ridge—I want smooth graduation with no harsh lines. Keep the top at 3 inches, but this is critical: use texturizing shears heavily on the fringe and throughout the top to create piece-y separation. I want choppy, irregular edges, not a blunt cut. Cut the fringe to fall just above my eyebrows when dry, and make sure you account for shrinkage when hair dries—cut it slightly longer than you think. Point cut the entire top to remove weight and create movement. For the sides, fade into a #1 at the hairline and temples. Keep my stubble beard at 2-3mm with the trimmer and blend it into the fade at the jawline—no hard line between beard and fade. Give me a natural, slightly messy hairline—I don’t want a sharp lineup, just definition and cleanup of stray hairs.”
If your barber asks about styling direction: “I’m going to style this forward with fingers and clay, so cut it to fall naturally in that direction with lots of texture.”
The next style moves in the opposite direction—abandoning forward movement for a slicked-back power aesthetic that commands attention in any room you enter.
FAQs
Q: How do I style The Textured Fringe Forward without making it look messy?
A: The key is controlled messiness through intentional separation rather than random chaos. Apply sea salt spray to damp hair, blow-dry while scrunching forward with your fingers (not a brush), then work pea-sized matte clay through hair using pinching motions to separate individual pieces. The difference between “textured” and “messy” is deliberate piece-out work in the final step—spend 30-45 seconds pulling apart small sections of the fringe to create gaps and definition rather than leaving it as one clumped mass.
Q: Can The Textured Fringe Forward work for professional office environments?
A: Yes, but with important qualifications—it works in creative industries (marketing, design, tech startups, architecture) but may be too casual for conservative corporate environments like law, finance, or traditional corporate offices. The textured, piece-y aesthetic reads as “intentionally styled casual” rather than “polished professional.” If your office allows jeans and button-downs, this cut is appropriate; if it requires suits and ties daily, consider The Shadow Fade Executive instead. You can dial down the texture by using less product and combing it slightly smoother for more conservative days.
Q: What’s the difference between The Textured Fringe Forward and a regular fringe haircut?
A: The Textured Fringe Forward uses aggressive texturizing (30-40% hair removal with thinning shears) to create piece-y, separated strands with visible gaps, while regular fringe cuts maintain density with blunt edges for a solid horizontal line. Traditional fringes sit heavier on the forehead and require precise styling to avoid looking dated or juvenile, while The Textured Fringe Forward embraces controlled imperfection and looks better slightly messy. The mid fade integration also distinguishes it from classic fringe cuts that often feature uniform length on the sides.
Q: How long does it take for The Textured Fringe Forward to grow out if I want to change styles?
A: The fringe itself reaches side-part length in 6-8 weeks and can be styled differently almost immediately by changing product and direction. The mid fade grows out gracefully over 4-5 weeks into a more uniform short length on the sides. If transitioning to a completely different style, you’re looking at 10-12 weeks to gain enough length throughout for a barber to work with a new shape, but you won’t experience an awkward in-between phase since the textured nature of this cut tolerates growth well.
4 of 11 — The Precision Undercut

The Face Shape Science Behind The Precision Undercut
The Precision Undercut is a powerhouse for oval, oblong, and heart-shaped faces, where the dramatic top volume and bare-skin sides create vertical emphasis that plays beautifully with naturally elongated or top-heavy proportions. Oval faces gain visual interest from the stark contrast without disrupting their balanced structure—the disconnected sides frame the face cleanly while the substantial top length adds personality. Oblong faces benefit significantly because the horizontal hard part line breaks up vertical length, creating a visual stopping point that prevents over-elongation, while the volume on top balances a long chin. Heart-shaped faces with wider foreheads find the weight and volume on top creates proportion with a narrower chin, and the clean shaved sides slim the temple area.
Square and round face shapes need caution approaching this cut. Square faces with prominent jawlines may find the severe side contrast over-emphasizes facial width—the bare #0 sides remove any softening effect, leaving the jaw as the dominant feature. If you have a square face and want this cut, request your barber keep some length on the sides (#1 or #2 guard instead of bare skin) to maintain slight coverage. Round faces experience the opposite problem: the top volume can add unwanted height while the shaved sides don’t provide enough narrowing effect because there’s no gradient fade to create slimming lines.
Diamond faces need to assess forehead width carefully. If your forehead is already narrow relative to your cheekbones, the top-heavy volume may look disproportionate and amplify the diamond shape rather than balance it.
Essential Tools for the Disconnected Aesthetic
The Precision Undercut demands specific equipment for both creation and maintenance, with more emphasis on professional barber skills than most cuts on this list. Your barber will use Andis Master Clippers (Model 01557) with a #0000 blade (0.5mm) or detachable #00000 blade (for complete skin-level shave) to create that bare-skin disconnected effect on the sides and back. The hard part line requires a straight razor or Andis T-Outliner trimmer (Model 04710) with a zero-gap blade modification for surgical precision—this isn’t something you’ll recreate at home.
For daily top styling, you’ll need high-hold products because 5 inches of hair swept dramatically to one side demands structural support. Layrite Superhold Pomade (water-based, nickel-sized amount) or Suavecito Firme Hold provides all-day control without the crispy helmet effect of gel. Apply to damp hair, blow-dry with a paddle brush while directing hair to your chosen side, then finish with strong-hold hairspray like Kenra Volume Spray 25 (5-6 spritzes) for humidity resistance.
Between barber visits, you’ll need home maintenance tools for the shaved sections. A Philips Norelco OneBlade (Model QP2520/70) or Wahl Peanut (Model 8685) allows you to buzz the sides every 5-7 days to maintain that clean disconnected look—hair growth becomes visible stubble by day 4-5, so weekly home buzzing is essential. The hard part line cannot be maintained at home; it requires professional touch-ups every 2-3 weeks.
Total toolkit investment: $95-130 for styling products, home clippers, and brushes. Monthly product cost: $30-40. The high maintenance demands also mean higher barbershop costs—budget $45-60 per visit for barbers experienced with precision undercut work.
Maintenance Level: HIGH
This is unambiguously a high-maintenance cut. Professional barber visits every 2-3 weeks are mandatory for hard part maintenance and ensuring the disconnect line remains perfectly horizontal around your entire head—any growth variation destroys the geometric precision. Between professional visits, you’ll buzz the shaved sections at home every 5-7 days with your trimmer to prevent stubble from compromising the clean aesthetic. Miss a week of home maintenance and you’ll look like someone who’s growing out an undercut rather than someone actively maintaining one.
Daily styling demands 10-14 minutes every morning: shower, towel-dry hair to damp, apply pomade with emphasis on roots for lift, blow-dry while pulling hair to the side with a paddle brush (this step cannot be skipped—air-drying will leave the top flat and shapeless), apply hairspray for hold, final comb-through for polish. The top length requires washing every other day to prevent oil buildup that weighs down volume, adding shampoo/conditioner routine to your schedule.
The growth pattern is unforgiving on multiple fronts. The shaved sides show stubble within 3-4 days. The hard part line blurs by week 2. The top length needs trimming every 4-5 weeks to prevent it from becoming too heavy and losing its swept shape. Unlike textured cuts that tolerate growth gracefully, The Precision Undercut looks intentional and sharp or it looks neglected—there’s no middle ground.
Monthly cost: $95-140 including two barber visits ($90-120) plus home product replenishment ($30-40) plus home clipper blade oil and maintenance ($5-10 annually amortized). Difficulty rating: Advanced—you need blow-dry skills with a brush, precision home buzzing around your entire head without creating uneven patches, and the discipline to maintain the schedule religiously without shortcuts.
Barber Talk: The Exact Script
Say this to your barber:
“I want The Precision Undercut with a hard disconnect line. Shave the sides and back with a #0 guard or #00000 detachable blade for the cleanest possible finish—I want skin-level, not stubble. Create the disconnect line perfectly horizontal, starting at my temple level and continuing around my entire head at the exact same height. I want zero taper, zero fade, zero blending—just a sharp line separating the top from the shaved sections. Keep the top at 5 inches with minimal layering—I want weight and volume, not texture. Add a hard part line on my left side, 2 inches from my left temple, using a straight razor or zero-gap trimmer for precision. Cut it deep enough to last 2 weeks. For the nape, continue the #0 guard shave in a rounded shape following my natural hairline—keep it clean and geometric. I’m blow-drying this to the right side with strong-hold pomade, so cut the top to accommodate side-swept styling with enough length to create drama.”
Add if your barber asks about styling: “I want maximum contrast between the bare sides and the top volume—don’t soften the disconnect line with any blending. I’m going for sharp, architectural, statement-making.”
The next cut abandons geometric precision for natural, effortless styling that works with your hair’s movement rather than controlling it into rigid shapes.
FAQs
Q: How do I maintain the shaved sides of The Precision Undercut at home?
A: Buzz the shaved sections yourself every 5-7 days using a #0 or #00000 clipper guard, working carefully around your entire head to maintain consistent length. Use a handheld mirror to check the back and ensure even coverage. The hard part line cannot be maintained at home—it requires professional touch-ups with a straight razor or zero-gap trimmer every 2-3 weeks at the barbershop. Missing home maintenance by even a week makes stubble visible and compromises the clean disconnected aesthetic this cut depends on.
Q: Can I grow out The Precision Undercut gracefully or will it look awkward?
A: Growing out an undercut creates one of the most awkward in-between phases in men’s hair, typically lasting 4-6 months. The shaved sides grow into short stubble (months 1-2), then awkward medium length that sticks out from your head (months 3-4), before finally reaching a length you can style differently (months 5-6). Most men abandon the grow-out by month 3 and get it buzzed into a different style. If you’re committed to growing it out, ask your barber to gradually blend the disconnect line over multiple visits, transitioning it into a high fade first, then a mid fade, then longer uniform sides—stretching the process over 4-5 months makes it less jarring.
Q: What’s the difference between The Precision Undercut and a fade?
A: The Precision Undercut features a hard disconnect with zero blending—the top length and shaved sides meet at a sharp horizontal line with no gradient or fade work. Fades use gradual length transitions blending from short to long over 1-3 inches of vertical space, creating smooth graduation. Undercuts are more dramatic and higher-contrast but require more frequent maintenance. The disconnected line also enables features like hard parts that fades cannot achieve. Visually, undercuts read as more editorial and fashion-forward while fades appear more classic and versatile.
Q: Does The Precision Undercut work for casual everyday wear or is it too bold?
A: The Precision Undercut sits at the bold end of the men’s haircut spectrum—it makes an intentional statement rather than blending into background professionalism. It works well in creative industries (fashion, design, entertainment, tech), nightlife settings, and lifestyle contexts where personal style is celebrated. It’s too avant-garde for conservative corporate environments (finance, law, traditional business) where subtlety is valued. Consider your daily environment: if you work somewhere people comment positively on unique style choices, this cut fits; if your workplace values conformity and conservatism, it will draw attention you may not want.
5 of 11 — The Desert Storm Buzz

Universal Face Shape Compatibility of The Desert Storm Buzz
The Desert Storm Buzz is one of the rare truly universal cuts that works across all face shapes because its uniform length removes hair as a variable in facial proportions entirely—the focus shifts entirely to your natural bone structure, facial hair, and personal style. This democratizing effect makes it exceptionally valuable for men uncertain about their face shape or those who’ve struggled with previous cuts that emphasized unflattering features.
That said, certain face shapes gain specific advantages. Oval and diamond faces benefit most because the buzz cut’s clean simplicity showcases naturally balanced proportions without distraction—you’re working with ideal ratios already, and the buzz doesn’t interfere. Square faces with strong jawlines find the buzz cut emphasizes masculine angularity beautifully, especially when paired with a well-groomed beard that adds length below the jaw for balance. Round faces experience perhaps the most dramatic transformation: removing hair volume from the sides creates an instant slimming effect, and pairing the buzz with a fuller beard adds vertical length that elongates the face significantly.
Heart-shaped faces should ensure their beard is proportional—since the face is naturally wider at the forehead and narrower at the chin, a full beard balances this by adding width at the bottom. Oblong faces can wear a buzz cut successfully but should consider keeping a shorter beard (under 10mm) to avoid over-elongating an already-long face. The key insight: face shape compatibility for buzz cuts depends heavily on facial hair choices, making the beard your primary styling variable rather than the haircut itself.
The Minimalist Grooming Kit
The Desert Storm Buzz demands the simplest toolkit of any style in this article—one high-quality clipper covers 90% of your needs. Invest in Wahl Elite Pro (Model 79602) ($50-65) or step up to Andis Master (Model 01557) ($130-150) if you want professional-grade performance that lasts a decade. Use the #3 guard (10mm) for the initial cut and all maintenance—consistency is the entire game here, so guard precision matters more than blade sharpness.
For home maintenance, you’ll buzz yourself every 7-10 days to maintain that fresh-cut look before regrowth becomes visibly uneven. This requires a handheld mirror for checking the back and crown ($15-20 for a quality model), and good bathroom lighting to catch any missed patches. The beard demands more attention than the hair: Philips Norelco Beard Trimmer Series 7000 (Model BT7215/49) ($50-70) with its built-in vacuum system keeps cleanup minimal. Set it to 12mm for beard length, 2mm for cheek line and neck edge definition.
Product needs are minimal: beard oil (4-6 drops daily)—Honest Amish Classic Beard Oil ($13 for 2oz bottle that lasts 3 months)—and occasionally beard balm for shaping if your beard grows particularly wild (Viking Revolution Beard Balm, $15, lasts 4-5 months). Skip hair products entirely—the buzz cut needs zero styling products, ever. This is wash-and-go in its purest form.
Total toolkit investment: $80-130 one-time for clippers and mirror, then $6-8 monthly for beard oil replacement. This is the lowest maintenance cost of any style in this article, and the time savings compound significantly over months and years.
Maintenance Level: LOW
The Desert Storm Buzz earns its low-maintenance rating legitimately. Zero barbershop visits required—you can maintain this entirely at home with your clippers, though professional edge work every 6-8 weeks ($15-25) keeps the hairline and temple corners looking crisp if you want that extra polish. Home buzzing takes 4-6 minutes every 7-10 days: run the #3 guard over your entire head in multiple directions (front to back, back to front, side to side) to ensure even coverage, use the handheld mirror to check the back and crown, clean up the neckline and around the ears with the trimmer’s detail blade, done.
Daily “styling” is literally 30 seconds: run your hand over your head in the shower to remove any loose hairs, towel dry, walk out the door. No products, no blow-drying, no combing, no decision-making about how to wear it today. The uniformity means it looks the same every single day—which is either incredibly liberating (no thought required) or potentially boring (no variation), depending on your personality and lifestyle needs.
The beard requires 3-5 minutes daily: apply beard oil after showering while hair is damp, brush through with a boar bristle brush to distribute oil and train growth direction, trim the cheek line and neck edge every 3-4 days to maintain definition (1-2 minutes with your trimmer). Full beard trim to 12mm happens during your home head buzz every 7-10 days, keeping them synchronized.
Monthly cost: $6-10 for beard oil and occasional professional edge work if desired. Even if you visit a barber monthly for professional detailing (entirely optional), you’re looking at $20-30 monthly versus the $75-140 of high-maintenance cuts. Difficulty rating: Beginner—if you can hold clippers and move them across your head in straight lines, you can maintain this cut successfully. The beard requires slightly more skill for clean cheek and neck lines, but tutorial videos and practice make this accessible within 2-3 attempts.
Barber Talk: The Exact Script
If you’re getting this cut done professionally for the first time before transitioning to home maintenance, say this to your barber:
“I want The Desert Storm Buzz with a #3 guard across my entire head—completely uniform length from front hairline to crown to nape, no fade, no taper, no variation. Keep my hairline natural but clean it up with edge work at the temples and corners. For the neckline, I want it rounded and natural, not blocked—just clean up stray hairs below my natural hairline. Leave my beard at 12-15mm and clean up the cheek line and neck edge for definition. Show me exactly where the cheek line and neck edge are so I can maintain them at home. I’m planning to buzz this myself every week or two, so I need to see the technique.”
Most barbers will appreciate your interest in learning and may demonstrate the buzzing motion, show you how to use mirrors effectively, and explain common mistakes (like missing the crown or creating uneven patches by going too fast). Consider this first visit a paid tutorial session as much as a haircut.
For ongoing home maintenance, you need no script—you’re your own barber now, following the same motion every 7-10 days with machine-like consistency.
The next style moves in the opposite direction entirely: trading the buzz cut’s uniform simplicity for dramatic pompadour volume that demands daily styling commitment and substantial product usage.
FAQs
Q: Can I really maintain The Desert Storm Buzz entirely at home without ever visiting a barber?
A: Yes—the uniform #3 guard length across your entire head requires only clippers and basic technique. Buzz in multiple directions (front to back, back to front, left to right) every 7-10 days to maintain freshness. The only consideration is edge work: hairline and temple corners stay sharper with professional touch-ups every 6-8 weeks ($15-25), but this is optional, not required. Many men maintain buzz cuts entirely at home for years without professional help.
Q: How do I prevent uneven patches when buzzing my own head at home?
A: Use consistent pressure and overlap your passes—don’t move too quickly or you’ll create stripes. Buzz in multiple directions rather than just one, which catches hairs growing at different angles. Use a handheld mirror to check the back and crown from multiple angles, and work in good lighting that shows shadows clearly. Go slower on your first 3-4 attempts until you develop muscle memory for the motion. Most importantly, use the same #3 guard every single time—switching guards creates length variation that looks like a mistake.
Q: What beard length works best with The Desert Storm Buzz?
A: Medium-length beards at 10-15mm create the ideal balance—short enough to look groomed and intentional, long enough to add personality and contrast with the minimal hair length. Shorter stubble (under 5mm) can make the overall look feel too severe or military unless that’s your specific aesthetic goal. Longer beards (over 20mm) risk looking unbalanced since the head has minimal hair. The sweet spot is 12mm: substantial enough to define your face shape but proportional to the buzz cut’s simplicity.
Q: Does The Desert Storm Buzz work in professional business environments?
6 of 11 — The Classic Ivy League

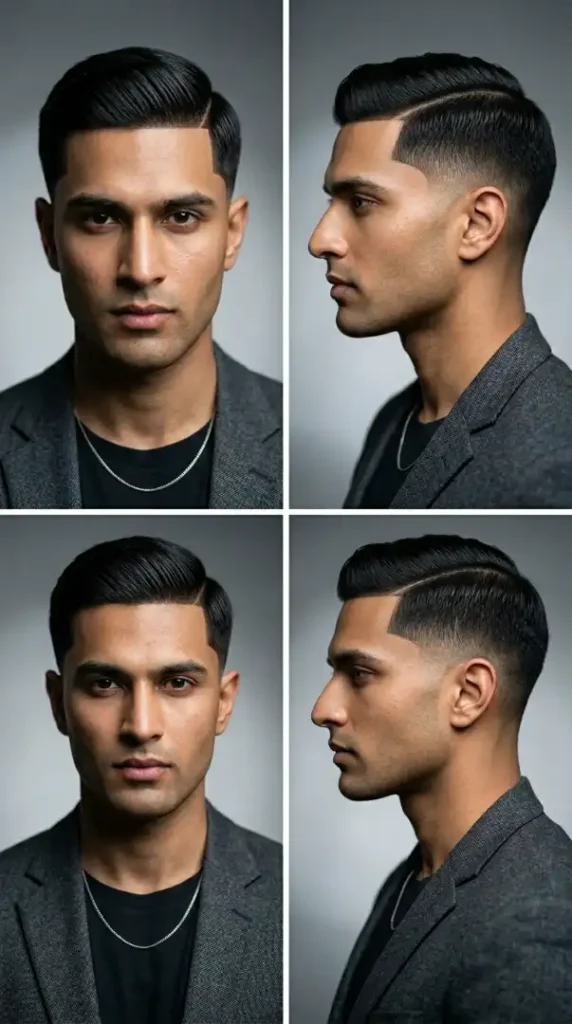
The Universal Appeal of The Classic Ivy League Across Face Shapes
The Classic Ivy League is one of the most universally flattering cuts in men’s grooming because its conservative proportions and clean lines work harmoniously with natural facial structure rather than fighting against it. Oval faces are the natural sweet spot—the graduated taper and moderate top length maintain the face’s inherent balance without adding or removing visual weight anywhere. Square faces benefit significantly from the soft side-swept styling that curves around angular jawlines, creating gentle contrast rather than emphasizing geometric hardness. The graduated taper (rather than a harsh fade) provides enough coverage on the sides to soften rather than sharpen square proportions.
Round faces gain subtle elongation from the 2-inch top length when styled with slight lift at the roots, while the tapered sides slim the face’s widest point without the dramatic contrast of skin fades that can look too severe. Diamond faces find the clean side part and conservative length balances wider cheekbones beautifully—the styling doesn’t add volume at the temples (which would widen the forehead) or create bulk at the jawline (which would emphasize narrowness). Heart-shaped faces appreciate how the tapered sides add gentle width at the temple area while the styled top provides balance without overwhelming a narrower chin.
The only face shape requiring adjustment is oblong. Men with particularly long faces should request their barber keep the top closer to 1.5 inches rather than 2 inches to avoid adding vertical length, and consider asking for slightly less taper graduation on the sides (perhaps stopping at #3 instead of #2 at the hairline) to retain coverage that prevents over-elongation.
Professional-Grade Tools for the Timeless Look
The Classic Ivy League requires precision tools that deliver clean, graduated results without the aggressive contrast of modern fades. Your barber will use Oster Classic 76 Clippers (Model 076076-010) or Wahl Senior (Model 8500) for the taper work, starting with a #4 guard (12mm) at the top of the taper zone and blending down through #3 (10mm) and #2 (6mm) to the hairline. The blend must be smooth and gradual—this isn’t a high-contrast fade but a gentleman’s taper that creates subtle graduation. Scissors-over-comb technique handles the top, cut to exactly 2 inches with minimal layering to maintain weight and classic shape.
For home styling, you need traditional products that create shine and hold without modern matte finishes. Layrite Original Pomade (water-based, dime-sized amount) or Murray’s Superior Hair Dressing Pomade (petroleum-based for higher shine, requires warm-up between palms) gives you that classic combed look. Apply to damp hair, create your side part with a fine-tooth comb—the Kent 20T pocket comb ($8-12) is perfect for precision part lines—then comb through smoothly from roots to ends.
You’ll also need a quality hair brush for daily grooming—Mason Pearson Popular Mixture Bristle & Nylon brush ($125-150) is the gold standard and lasts decades, but Uppercut Deluxe CT6 Tortoiseshell comb ($15-20) works excellently as a budget alternative. For finishing, a light-hold hairspray—L’Oréal Paris Elnett Satin (3-4 spritzes)—sets the style without stiffness.
Monthly product investment: $18-30 for pomade replacement (water-based lasts 4-6 weeks, petroleum-based lasts 2-3 months). One-time tool cost: $30-50 for comb and brush if you skip the luxury options, or up to $180 if you invest in Mason Pearson.
Maintenance Level: MEDIUM
The Classic Ivy League sits comfortably in medium-maintenance territory with a predictable rhythm that becomes routine quickly. Barber visits every 3-4 weeks maintain the taper’s graduation and keep the top at optimal 2-inch length. Unlike fades that lose definition within 10 days, the graduated taper tolerates growth gracefully, looking intentionally grown-in rather than neglected even at week 4. You can stretch to 5 weeks if necessary, though the style loses its crisp definition after week 4.
Daily styling requires 7-9 minutes: shower and towel-dry hair to damp (not soaking wet), apply pomade with even distribution focusing on mid-lengths and ends (avoid over-applying at roots which creates greasy appearance), create your side part with the fine-tooth comb using firm pressure for a clean line, comb hair from part line toward the opposite side with smooth strokes, finish with light hairspray if needed for all-day hold, final comb-through for polish. The technique is straightforward—unlike textured cuts requiring scrunching or piece-out work, this is pure precision combing.
The growth pattern is forgiving. The taper softens gradually rather than developing harsh lines, and the top length gains slight additional movement as it grows from 2 to 2.5 inches over 3-4 weeks. Many men actually prefer the look at weeks 2-3 when the cut has relaxed slightly from its initial precision. The style looks appropriate in any setting throughout its growth cycle—you won’t experience that “I need a haircut urgently” phase until week 5+.
Monthly maintenance cost: $50-75 including one barber visit ($35-50 depending on location and barber skill level) plus product replenishment ($18-30). This is mid-range compared to other styles—less expensive than high-maintenance precision cuts, more than buzz cuts, comparable to textured styles. Difficulty rating: Beginner to Intermediate—the combing technique is simple and intuitive, but achieving a perfectly straight side part and smooth finish requires 4-5 practice attempts before it becomes second nature.
Barber Talk: The Exact Script
Say this to your barber:
“I want The Classic Ivy League with a graduated taper on the sides and back. Start the taper with a #4 guard at the top of my ears and blend smoothly down through #3 and #2 to my hairline—I want gradual graduation, not a fade with visible lines. Use scissors-over-comb to blend from the #4 guard into the top length. Keep the top at exactly 2 inches, cut with scissors using minimal layering—I want weight and classic shape, not texture. Create a left side part positioned about 2 inches from my left temple, following my natural part line if visible. Cut the hair to be styled to the right with a clean sweep. For the neckline, give me a rounded taper that follows my natural hairline, blended smoothly with the same graduated technique as the sides. Clean up my hairline at the temples and forehead with edge work, but keep it natural—I don’t want a harsh blocked lineup, just definition.”
If your barber asks about finish: “I’m using traditional pomade and combing it smooth—classic Ivy League polish, not modern textured styling.”
The next style abandons tradition entirely for an edgy, asymmetrical approach that makes deliberate rule-breaking the entire point.
FAQs
Q: What’s the difference between The Classic Ivy League and a crew cut?
A: The Ivy League maintains 2 inches on top (versus a crew cut’s 0.5-1 inch) and uses a graduated taper on the sides (versus a crew cut’s uniform short length). Ivy League hair is long enough to comb and part with visible styling direction, while crew cuts are too short for directional styling. The Ivy League works in professional business settings and formal occasions, while crew cuts read as more casual or athletic. Ivy League requires daily styling with pomade; crew cuts need zero products or styling.
Q: Can I style The Classic Ivy League with a modern matte finish instead of traditional shine?
A: Yes—substitute water-based pomade for matte clay like Hanz de Fuko Claymation or Baxter of California Clay Effect. Apply the same way (to damp hair, comb through with part), but the finish will be contemporary matte rather than classic shine. This works well in creative industries or casual environments where traditional polish feels too formal. Keep in mind that matte products provide less hold than pomades, so you may need to reapply or touch up throughout the day for the same control.
Q: How do I create a perfectly straight side part at home?
A: Start with damp (not wet) hair. Place your fine-tooth comb at the desired part position (typically 2 inches from your temple), press firmly against your scalp, and draw the comb straight back toward your crown in one smooth motion. The pressure creates a clean line by separating hair to opposite sides. If the part isn’t straight, wet your hair again and retry—multiple attempts are normal. Once the part is established, comb each side away from the part line. With practice (4-5 attempts), muscle memory makes this automatic.
Q: Does The Classic Ivy League work for thinning hair or receding hairlines?
A: Yes, and it’s actually advantageous—the conservative 2-inch length provides coverage without requiring significant density, and the side-swept styling creates diagonal lines that draw attention away from hairline recession. The graduated taper keeps sides short enough that contrast with thinning top hair is minimal. Avoid this cut only if your hair has thinned to the point where 2-inch length shows visible scalp—in that case, The Desert Storm Buzz is the better choice. The Ivy League works well with diffuse thinning or mild recession; it cannot hide advanced hair loss.
PINTEREST PIN PACK
📌 PIN TITLE: “11 Timeless Haircuts That Never Go Out of Style (Barbers Love These)”
📝 PIN DESCRIPTION: “Looking for a cut that works in any decade, any setting, any occasion? The Classic Ivy League has been the gentleman’s choice since the 1950s for good reason: graduated taper, 2-inch styled top, clean side part. Works for literally every face shape. Appropriate from boardroom to wedding to weekend brunch. Get the exact guard progression, pomade application technique, and perfect-part tutorial inside. This is the ultimate versatile cut. Tap to see front and back angles. #MensHaircut #IvyLeague #MENXSTYLE”
#️⃣ HASHTAGS: #MensHaircut #IvyLeague #MensHairstyles #MensGrooming #ClassicHaircut #TaperCut #TraditionalStyle #MensStyle #BarberLife #HairGoals #FreshCut #BarberShop #TimelessStyle #GentlemansHaircut #ProfessionalStyle #MensFashion #GroomingTips #MensLook #HairInspiration #ClassicCut #MENXSTYLE #ClassicIvyLeague
⚡ CTA LINE: “Show your barber these angles—precision taper work makes all the difference.”
7 of 11 — The Asymmetric Edge

Face Shape Compatibility for The Asymmetric Edge
The Asymmetric Edge is a high-risk, high-reward cut that either transforms your look dramatically or emphasizes facial imbalances—there’s no middle ground. Square faces are the ideal canvas because the asymmetrical diagonal line breaks up the geometric parallel lines of a square jaw and forehead, creating visual interest that softens angular features without diminishing masculine structure. The buzzed left side draws attention to strong jawline definition, while the textured right side adds personality without bulk.
Oval faces can absolutely pull this off because their balanced proportions provide a neutral foundation that tolerates asymmetric styling without creating unwanted emphasis anywhere. The cut adds edge and personality to faces that might otherwise look too conventionally proportioned. Diamond faces benefit from the diagonal transition line that crosses the widest part of the head (cheekbone level), creating horizontal movement that balances narrow forehead and chin areas.
Round, heart, and oblong faces should approach with extreme caution or avoid entirely. Round faces risk having the asymmetry emphasize facial roundness—the textured volume on one side can make that side of the face appear wider, while the buzzed opposite side looks disproportionately narrow, creating an unbalanced effect. Heart-shaped faces with already-asymmetric proportions (wider forehead, narrower chin) may find the haircut’s intentional asymmetry compounds rather than balances their natural shape. Oblong faces experience vertical emphasis from the diagonal line that can over-elongate.
Critical insight: asymmetric cuts require near-perfect facial symmetry to work well. If you have naturally asymmetric features (one eye slightly higher, uneven jaw, off-center nose), deliberate asymmetry in your haircut will amplify these rather than disguise them. Symmetric cuts hide facial asymmetry; asymmetric cuts reveal it.
Specialized Tools for Asymmetric Precision
The Asymmetric Edge requires barbers with advanced cutting skills—this isn’t a standard fade or taper, but architectural hair design that demands precision and vision. Your barber will use Andis Master Clippers (Model 01557) or Wahl Magic Clip (Model 5049-400) for the buzzed left section, maintaining uniform #1 guard (3mm) length from temple down to above the ear. The transition line demands free-hand scissor work with professional texturizing shears—specifically Mizutani Acro Type shears (6.0-inch) for precision diagonal cutting and Kasho KXP-30T thinning scissors for blending where the buzzed section meets longer textured hair.
For home styling of the longer right section, you need texturizing products that enhance waves without creating heavy, slicked-down weight. Bumble and bumble Surf Spray (4-5 pumps on damp hair) creates foundation texture, followed by Uppercut Deluxe Matt Clay or Hanz de Fuko Claymation (pea-sized amount, work through with scrunching motion) for separation and matte finish. The asymmetry means you’re styling only half your head, which actually simplifies the routine—focus all product and technique on the right side, ignore the left entirely.
You’ll need a quality blow dryer to enhance wave texture—use a diffuser attachment while scrunching hair forward to amplify natural movement. Between barber visits, the buzzed left section requires home maintenance with Wahl Peanut (Model 8685) or Philips Norelco OneBlade every 5-7 days to prevent stubble from blurring the sharp transition line.
Total toolkit investment: $85-120 for styling products and home trimmer. Monthly product cost: $25-35. This cut also demands higher barber fees—expect $60-90 per visit for stylists skilled in asymmetric design work, not standard barbershop pricing.
Maintenance Level: HIGH
The Asymmetric Edge is unambiguously high-maintenance on multiple fronts. Professional barber visits every 2-3 weeks are essential to maintain the sharp diagonal transition line—any growth blurs the dramatic contrast that defines this cut. The buzzed left section shows stubble within 4-5 days, requiring home buzzing every 5-7 days with your trimmer to keep it consistently short. The textured right section needs trimming every 4 weeks to prevent it from growing too long and losing the 4-inch target length that balances with the short left side.
Daily styling focuses exclusively on the right side and takes 8-11 minutes: apply sea salt spray to damp hair (right side only), scrunch while blow-drying with diffuser attachment to enhance waves, work matte clay through with separating motions, piece out individual sections for texture definition. The buzzed left side requires zero styling—literally just wake up and go on that side. This creates an interesting hybrid maintenance profile: half your head demands intensive styling, half requires nothing.
The growth pattern creates visible imbalance quickly. By week 2 without professional maintenance, the transition line softens and the buzzed section develops visible stubble that compromises the clean aesthetic. By week 3, it looks like an asymmetric cut that’s growing out rather than a deliberately maintained style. Unlike symmetric cuts that grow out evenly, asymmetric styles show aging on a accelerated timeline because balance deteriorates faster than simple length increase.
Social considerations: this is a statement cut that draws attention and comments everywhere you go. Be prepared for strangers to mention your hair, colleagues to have opinions, and family members to ask “what happened?” The asymmetry is so bold it becomes a conversation topic. If you prefer subtle grooming that blends into professional environments, this isn’t your cut. This works in creative industries, artistic communities, nightlife settings, and anywhere personal expression is celebrated over conformity.
Monthly cost: $130-200 including two professional cuts ($120-180) plus product replenishment and home buzzing supplies ($25-35). Difficulty rating: Advanced—requires precision home buzzing without creating uneven patches on the short side, texturizing and wave-enhancement skills on the long side, and the confidence to maintain a bold look that attracts attention.
Barber Talk: The Exact Script
Say this to your barber:
“I want The Asymmetric Edge with a dramatic diagonal asymmetric design. Buzz my entire left side with a #1 guard from my left temple down to just above my left ear—keep this section uniformly short with zero graduation. On my right side, maintain 4 inches of length with natural wave texture—don’t straighten or remove the wave pattern. Create a sharp diagonal transition line starting at my left temple and angling upward across my crown to my right occipital bone. This line should be clean and visible, not blended or soft. Use texturizing shears heavily on the longer right section to create piece-y, separated texture—I want individual wave strands visible, not a solid mass of hair. Style the right side forward and to the right with natural movement. Keep my stubble beard at 3mm and blend it into the buzzed left side seamlessly. For the nape, continue the asymmetry—keep it short on the left, longer on the right, following the diagonal line around the back of my head.”
Add if your barber asks about long-term maintenance: “I’ll buzz the left side at home every week and come back every 2-3 weeks for you to refresh the transition line. I’m committed to maintaining this—I know it needs frequent touch-ups.”
The next style moves back toward symmetry and classic proportions, offering a fade-based approach that’s bold yet balanced for men seeking impact without asymmetric extremes.
FAQs
Q: How do I know if The Asymmetric Edge will work with my face shape?
A: Stand in front of a mirror and place your hand over the left half of your face, then the right half. If your facial features look balanced and symmetric when viewed individually, asymmetric haircuts work well—you have the foundation to support intentional imbalance. If your features already show noticeable asymmetry (one eye higher, jawline uneven, crooked nose), asymmetric haircuts amplify these differences rather than hiding them. Square and oval faces are safest bets; round, heart, and oblong faces should consult with an experienced stylist before committing.
Q: Can I transition from The Asymmetric Edge to a different style, or am I locked in?
A: You can transition to other styles, but it requires growing out the buzzed left section which takes 3-4 months to reach styling length. During this period, you’ll experience an awkward phase where the left side is shorter than the right. Most people either buzz the entire head short to reset (1-2 weeks of very short hair), or transition to a high fade on the left while maintaining length on top, gradually blending the asymmetry into a more conventional style over 2-3 cuts spanning 6-8 weeks. Plan your timing if you have important events where you need to look polished.
Q: How do I style The Asymmetric Edge without making it look messy or unintentional?
A: The key is maintaining crisp contrast between the buzzed and textured sections—this signals “deliberately asymmetric” rather than “forgot to style half my head.” Buzz the short section every 5-7 days so it stays uniformly short without visible stubble growth. On the textured side, use matte clay with intentional piece-out work to create defined separation rather than random clumps. The clean contrast between a sharp short side and deliberately textured long side makes the asymmetry read as intentional design, not accident.
Q: Does The Asymmetric Edge work for professional corporate environments?
A: Generally no—this cut is too avant-garde for conservative industries like finance, law, accounting, or traditional corporate settings where conformity and subtle professionalism are valued. It thrives in creative industries (advertising, design, fashion, entertainment, tech startups), artistic communities, and entrepreneurial environments where personal expression is encouraged. If your workplace has a strict dress code or conservative culture, this cut will be perceived as unprofessional or attention-seeking. Reserve it for industries and companies where unique personal style is an asset, not a liability.
8 of 11 — The Crown Volume Fade

Face Shape Optimization for The Crown Volume Fade
The Crown Volume Fade is engineered specifically for round and heart-shaped faces where vertical height is the primary transformational goal. Round faces experience dramatic elongation from the 2-3 inches of quiff lift at the crown, which pulls the eye upward and creates visual length that counteracts circular proportions. The high skin fade removes bulk from the sides at precisely the widest part of a round face (temple to ear level), creating an immediate slimming effect while the crown volume adds height where round faces need it most. The combination reshapes facial perception from circular to oval.
Heart-shaped faces benefit from different mechanics: the substantial crown volume adds visual weight at the top of the head, balancing a naturally wider forehead with a narrower chin. The high fade maintains clean lines at the temples without adding width, while the backward-swept quiff styling creates horizontal movement that doesn’t overemphasize forehead width. The result is balanced proportions where the top and bottom of the face feel more equally weighted.
Oblong and oval faces should approach cautiously. Oblong faces risk over-elongation from the added vertical height—if you have an already-long face, adding 2-3 inches of upward-styled hair can make you look stretched. If you have an oblong face and want this cut, request your barber keep the quiff height to 1.5 inches maximum and consider a mid fade instead of high fade to retain some side coverage. Oval faces can wear this cut but don’t gain transformational benefit since their proportions are already balanced—it becomes purely a style choice rather than a corrective measure.
Square and diamond faces work moderately well. Square faces appreciate the vertical emphasis that softens angular proportions, though the skin fade can over-emphasize jawline width. Diamond faces find the crown volume balances wider cheekbones, but need to ensure the fade doesn’t make a narrow forehead appear even narrower—request slightly more length retention at the temple if this is a concern.
Professional Volume-Building Arsenal
The Crown Volume Fade demands specialized products and tools that create structural lift rather than just surface styling. Your barber will use Andis Master Clippers (Model 01557) with #0000 detachable blade for the skin fade base, creating bare-skin starting point at the temples. The fade progression uses #0.5, #1, and #1.5 guards in tight sequence, blending within 1.5 inches of vertical space to create that dramatic high-contrast gradient. The crown cut requires point-cutting technique with Mizutani Acro Type shears (6.0-inch) to create texture that supports volume rather than weight that collapses it.
For home styling, volume demands pre-styler products that build structure from the roots. Schwarzkopf Osis+ Dust It Mattifying Powder (sprinkle at roots while hair is damp, massage in with fingers) creates immediate lift and grip. Follow with high-hold styling cream—American Crew Forming Cream (dime-sized amount, focus on roots and mid-lengths) provides moldable hold without heaviness. The critical tool: a blow dryer with concentrator nozzle—Dyson Supersonic ($430) or BaBylissPRO Nano Titanium ($60)—used while pulling hair upward and backward with a round brush (2-inch barrel diameter).
The blow-dry technique makes or breaks this style: apply products to damp hair, section the top into three parts (front, crown, back), blow-dry each section while pulling upward with the round brush under tension, direct heat from roots toward ends to set the lift, finish with strong-hold hairspray—Kenra Volume Spray 25 (8-10 spritzes from 12 inches distance) to lock the volume in place. The entire process is heat-and-tension based—you cannot air-dry this style and achieve the signature height.
Monthly product investment: $40-55 including mattifying powder ($18), forming cream ($16), hairspray ($22). One-time tool cost: $80-450 depending on blow dryer choice, plus $25-35 for a quality round brush (Ibiza Hair G Series 2-inch round brush at $30 is excellent mid-range).
Maintenance Level: HIGH
This is definitively high-maintenance territory. Professional barber visits every 2 weeks are mandatory—the high skin fade loses its dramatic contrast within 10-12 days as stubble growth blurs the gradient. The quiff top length can stretch to 4-5 weeks between trims, but you’ll be visiting for fade maintenance long before the top needs cutting. Daily styling is non-negotiable and time-intensive: 15-18 minutes every single morning executing the full blow-dry routine described above.
The morning routine breaks down: shower and towel-dry to damp (2 minutes), apply mattifying powder at roots (1 minute), apply forming cream (1 minute), section hair (30 seconds), blow-dry with round brush tension technique (8-10 minutes working through all sections systematically), apply hairspray while hair is still warm from dryer (1 minute), final hand-styling to perfect shape (2 minutes). There are zero shortcuts—skipping the blow-dry step means the quiff collapses within an hour. Skipping the mattifying powder means you won’t achieve the 2-3 inch lift. This style demands the full process daily.
The growth pattern is harsh. By day 3-4 after a fade touch-up, the skin-level sections show visible stubble. By week 2, the fade has softened into a less dramatic gradient. The crown volume styling actually tolerates some length growth (weeks 2-4 often look better than week 1 as hair gains slight additional weight that paradoxically holds the styled shape longer), but the fade degradation forces you back to the barber regardless.
Humidity and weather are significant enemies. High humidity environments (over 60%) cause styled volume to collapse within 2-4 hours despite hairspray. Rain or heavy perspiration require complete re-styling. If you live in humid climates or play sports during the day, this cut becomes even more challenging to maintain through afternoon and evening activities.
Monthly cost: $145-220 including two barber visits ($90-140 depending on metro area and barber skill level) plus product replenishment ($40-55) plus potential emergency product restocks and additional hairspray ($15-25). Difficulty rating: Expert—requires mastery of blow-dry technique with tension, round brush skills, understanding of how to direct heat for maximum lift, product layering knowledge, and the discipline to execute a 15-minute routine every single day without fail.
Barber Talk: The Exact Script
Say this to your barber:
“I want The Crown Volume Fade with maximum height at the crown for dramatic vertical presence. Give me a high skin fade starting with a #0000 blade at my temples, blending up through #0.5, #1, and #1.5 guards to full density at the parietal ridge—I want tight progression within 1.5 inches of blend space for high contrast. The top should be 3.5 inches at the crown, cut with heavy point-cutting and texturizing to remove weight and support volume—don’t leave it heavy or it’ll collapse when I style it. I’m blow-drying this upward and back with a round brush and strong-hold products, so cut it to accommodate that styling direction. Create clean geometric edges at the temples and hairline. Taper my beard into the fade at the jawline—5mm beard length blending into the skin fade seamlessly. For the back, continue the high fade around my entire head at consistent height with a rounded nape shape.”
Add if your barber asks about texture: “I need maximum texture on top with point-cutting and thinning shears—weight is the enemy of volume, so thin it aggressively while keeping 3.5-inch length.”
The next cut strips away all the high-maintenance complexity for a return to minimalist simplicity that works for men who value ease over height-building drama.
FAQs
Q: How do I maintain crown volume throughout the day without it collapsing?
A: Layer your products strategically: mattifying powder at roots (creates grip and texture), forming cream through mid-lengths (provides moldable hold), strong-hold hairspray as final step while hair is still warm from blow-drying (locks the shape). Avoid touching your hair throughout the day—oils from your hands break down product and cause collapse. In high-humidity environments, carry travel-size hairspray for midday touch-ups. If volume drops significantly, you need stronger products or better blow-dry technique with more tension on the round brush.
Q: Can I achieve The Crown Volume Fade look with naturally curly or wavy hair?
A: Yes, but it requires additional heat-styling steps. You’ll need to blow-dry with a round brush while pulling hair straight to remove curl pattern, then style upward for volume. This adds 5-7 minutes to your routine and causes heat damage over time. Alternatively, embrace a textured-volume version using curl cream instead of forming cream and enhancing your natural pattern while blow-drying upward—this creates a different aesthetic (textured volume vs. sleek volume) but reduces heat damage. Tightly coiled hair types may need chemical straightening to achieve the sleek quiff look.
Q: How often do I need to wash my hair with The Crown Volume Fade?
A: Daily washing is recommended because the heavy product load (mattifying powder, forming cream, hairspray) builds up on your scalp and hair, making subsequent styling difficult. Use a clarifying shampoo 2-3 times per week (try Neutrogena Anti-Residue Shampoo) to remove product buildup, and regular shampoo on other days. Condition only the ends, never the roots—conditioner at the crown will weigh down hair and prevent volume. Some men successfully style every other day by using dry shampoo on day 2, but daily washing yields the most consistent results.
Q: Is The Crown Volume Fade appropriate for men over 40?
A: Absolutely—in fact, it’s particularly advantageous for men experiencing early crown thinning because the styling direction (upward and back) creates coverage and volume that disguises thinning density. The high skin fade draws attention to sharp facial features and strong jawlines that often become more prominent with age. The only consideration: ensure your styling stays modern and age-appropriate by avoiding excessive height (2-2.5 inches is sophisticated; 3+ inches can read as trying too hard past age 45). Request your barber keep it refined rather than extreme.
9 of 11 — The Slick Back Power

Face Shape Dominance with The Slick Back Power
The Slick Back Power is a commanding style that works exceptionally well for square, diamond, and oval faces, where strong bone structure becomes the focal point once hair is pulled away from the face. Square faces absolutely dominate this look—the slicked-back direction exposes and emphasizes angular jawlines and prominent cheekbones, creating a masculine, authoritative presence. The low fade maintains coverage on the sides that prevents over-emphasis of facial width, while the backward flow draws the eye from forehead to crown, creating visual movement that softens geometric hardness.
Diamond faces benefit from the substantial backward volume that balances wider cheekbones with visual weight at the crown. The slicked styling doesn’t add width at the temples (where diamond faces are naturally narrow), and the low fade placement adds subtle fullness at the mid-face level where it’s needed most. Oval faces are naturally suited to virtually any style, and the slick back showcases their balanced proportions while adding sophistication and polish.
Round faces should approach with significant modifications or avoid entirely. The slicked-back direction that pulls hair away from the face removes any softening or framing effect, leaving roundness fully exposed. If you have a round face and want this aesthetic, you must pair it with a substantial full beard (12mm+ length) that adds vertical length below the jawline to elongate overall facial proportions. Without the beard, round faces look even rounder with slicked-back styling.
Heart-shaped faces need to ensure their forehead width doesn’t become over-emphasized. The backward direction can make a wide forehead appear even more dominant. Request your barber leave slightly more length and texture at the hairline (rather than slicking it completely back from the forehead edge) to maintain some softening coverage. Oblong faces can wear this successfully but should avoid adding too much vertical volume at the crown—keep the slicked hair relatively flat rather than built up, which prevents over-elongation.
Premium Products for High-Shine Control
The Slick Back Power demands premium pomades that deliver high shine and all-day hold without flaking or losing control in humidity. Your barber will use Oster Classic 76 Clippers (Model 076076-010) or Andis Master (Model 01557) for the low fade, starting with a #2 guard (6mm) at mid-ear level and blending smoothly up to scissor-cut length at the parietal ridge. The top is cut to 4 inches with minimal layering—you want weight and density, not texture that disrupts the sleek backward flow.
For styling, traditional oil-based pomades deliver the signature high-shine finish this cut demands. Murray’s Superior Hair Dressing Pomade (petroleum-based, requires warming between palms before application, nickel-sized amount) creates legendary shine and rock-solid hold that lasts 12-16 hours. For easier washout, Suavecito Firme Hold Pomade (water-based, dime-to-nickel-sized amount depending on hair thickness) provides strong hold with high shine that rinses clean with just water.
Application technique is critical: apply pomade to completely dry hair (unlike most modern products that work on damp hair)—oil-based pomades need dry hair to grip properly. Start at the front hairline, work product backward through hair with your palms, use a wide-tooth comb (Kent 20T or Mason Pearson C1) to distribute evenly, then finish with a fine-tooth comb to create those signature sleek comb lines showing directional flow. The final step: run your palms over the hair one more time to enhance shine.
You’ll also need beard oil for the full beard—Honest Amish Classic Beard Oil (6-8 drops daily) and beard balm for shaping—Grave Before Shave Beard Balm (dime-sized amount, work through beard to shape and control flyaways). A boar bristle beard brush (Kent BRD2 or Beardbrand Boar’s Hair) distributes product and trains growth direction.
Monthly product investment: $28-45 for pomade replacement (oil-based lasts 2-3 months at $15-18 per tin; water-based lasts 4-6 weeks at $18-22 per jar) plus beard products ($10-15 monthly). One-time comb investment: $15-35 for quality wide-tooth and fine-tooth combs.
Maintenance Level: MEDIUM-HIGH
The Slick Back Power sits at medium-high maintenance requiring consistent effort without reaching the extreme demands of the highest-maintenance cuts. Professional barber visits every 3-4 weeks maintain the low fade’s clean gradient and keep top length at the optimal 4 inches. The low fade tolerates growth better than high or skin fades, maintaining its shape for nearly a month before losing definition. You can stretch to 5 weeks if necessary, though the slicked styling looks best with fresh fade work.
Daily styling requires 9-12 minutes: shower and completely dry hair (critical—towel dry thoroughly, then air-dry or blow-dry to 100% dryness before applying pomade), warm pomade between palms for 30-45 seconds until it softens (oil-based only; water-based is ready immediately), apply to dry hair starting at front hairline and working backward, distribute with wide-tooth comb using firm strokes from front to crown, create sleek finish with fine-tooth comb showing visible comb lines, run palms over hair to enhance shine and smooth any disrupted areas, apply beard oil and balm while hair dries, brush beard to shape.
The oil-based pomade consideration: it doesn’t wash out with water alone, requiring shampoo every 2-3 days to remove buildup. Many men adopt a routine of applying fresh pomade over yesterday’s pomade for 2-3 days, then washing completely and starting fresh. This reduces daily styling time to 5-7 minutes on days 2-3 (just comb and add slight fresh product) while day 1 requires the full 12-minute routine.
The growth pattern is very forgiving. The slicked-back direction actually looks better with slight length increase from weeks 2-4 as hair gains weight that helps it stay in place. The low fade softens gradually without developing harsh lines. This style maintains its power aesthetic throughout the full 4-week growth cycle, never entering an awkward “I need a cut” phase until week 5+.
Monthly maintenance cost: $60-90 including one barber visit ($40-60) plus pomade and beard product replenishment ($28-45). Difficulty rating: Intermediate to Advanced—the technique is straightforward (comb backward repeatedly), but achieving sleek, controlled results requires practice with pomade application amount (too little = weak hold, too much = greasy appearance) and comb technique (firm, smooth strokes without disrupting product distribution). Expect 5-7 practice attempts before mastering the look.
Barber Talk: The Exact Script
Say this to your barber:
“I want The Slick Back Power with a low fade and substantial length on top for classic slicked-back styling. Start the fade at mid-ear level with a #2 guard and blend smoothly up to full length at the parietal ridge—I want gradual graduation, not high-contrast fade work. Keep the top at 4 inches with minimal layering—I need weight and density for slicking backward, not texture. Cut it to fall naturally backward from the hairline to the crown. Clean up my hairline with edge work at the temples and forehead, but keep it natural—no harsh lineup. For the neckline, give me a rounded taper blended with the low fade. My beard is 10-12mm—shape it with clean cheek line and neck edge, and make sure it’s proportional to the slicked hair. I’m using traditional high-shine pomade, so the cut needs to support smooth backward combing with visible directional flow.”
If your barber asks about texture: “I want zero texture on top—this is classic slick-back styling with weight and shine, not modern textured or messy looks.”
The final two styles offer dramatically different approaches: one embracing military-inspired precision, the other celebrating natural texture and effortless movement.
FAQs
Q: How do I prevent slicked-back hair from looking greasy or overdone?
A: The key is pomade amount and application technique. Start with less than you think you need (dime-sized for thin hair, nickel-sized for thick hair), warm it thoroughly between palms, and apply to completely dry hair. Use a comb to distribute evenly rather than finger-applying, which creates uneven clumps. If hair looks greasy, you’ve used too much—wash it out and restart with 30% less product. The shine should look intentional and controlled, not wet or dripping. Matte your palms on a towel after applying to remove excess before final smoothing.
Q: Can I achieve The Slick Back Power with thin or fine hair?
A: Yes, but you’ll need to modify the approach. Thin hair actually slicks back more easily than thick hair and requires less product. Use a pre-styler like Schwarzkopf Osis+ Dust It Powder at the roots for grip and slight volume before applying pomade. Request your barber keep the top closer to 3-3.5 inches rather than 4 inches—less length means less weight pulling on thin hair. Avoid heavy oil-based pomades that can make thin hair look flat; stick with water-based for better volume retention.
Q: How do I wash out oil-based pomade completely?
A: Apply a generous amount of conditioner (not shampoo) to dry hair before your shower, work it through thoroughly to break down the pomade’s oils, let it sit for 2-3 minutes, then rinse with warm water. Follow with regular shampoo. For stubborn buildup, use a clarifying shampoo like Suave Daily Clarifying Shampoo or Neutrogena Anti-Residue. Some men find that applying coconut oil or olive oil to dry hair before shampooing helps dissolve petroleum-based pomades more effectively.
Q: Does The Slick Back Power work for receding hairlines?
A: It depends on the recession pattern. Mild to moderate temple recession (M-shaped hairline) actually works well—the slicked-back direction doesn’t emphasize the temples and draws attention backward to the crown where you have density. Deep recession that’s progressed past the mid-scalp creates problems because you need sufficient hairline coverage to start the slicked flow. If your hairline has receded significantly, consider The Desert Storm Buzz or The Classic Ivy League instead, which work better with advanced recession.
10 of 11 — The Military Regulation

Universal Discipline: The Military Regulation Across Face Shapes
The Military Regulation is remarkably universal because its ultra-short length and flat-top geometry remove hair as a facial proportion variable entirely—you’re working with pure bone structure, skin, and the sharp geometric lines of the cut itself. This creates success across all face shapes for different reasons. Square faces find the horizontal flat-top deck emphasizes angular proportions beautifully, creating a masculine, disciplined aesthetic that aligns with strong jawlines. The high fade removes side bulk at exactly the right point, maintaining clean lines without softening.
Round faces experience dramatic transformation—the flat-top plateau creates horizontal visual interest at the crown while the high skin fade aggressively removes side volume, delivering maximum slimming effect. The geometric precision of the cut adds angular lines that round faces naturally lack. Oval faces maintain their balanced proportions while gaining a bold, no-nonsense edge. The style doesn’t disrupt natural harmony but adds personality through precision rather than styling.
Diamond faces benefit from the flat-top deck that adds visual weight at the crown (where diamond faces are narrow), balancing wider cheekbones. Heart-shaped faces appreciate how the high fade adds clean lines at the temples without bulk, while the flat top provides weight that balances a narrower chin. Oblong faces should request slightly more length on top (#3 guard instead of #2) to avoid over-emphasizing vertical proportions, but can absolutely wear this cut successfully with that minor modification.
The critical success factor isn’t face shape—it’s personality and lifestyle compatibility. This is a bold, uncompromising cut that signals discipline, precision, and no-nonsense approach to grooming. It works in military/law enforcement contexts, athletic environments, and for men who value function over fashion. It’s incompatible with corporate environments requiring softer professionalism or creative industries celebrating individual expression.
Specialized Tools for Military Precision
The Military Regulation requires specific clipper expertise and geometric precision that not all barbers possess—seek out barbers with military or high-and-tight experience rather than general stylists. Your barber will use Andis Master Clippers (Model 01557) or Oster Fast Feed (Model 76023-510) with #0000 detachable blade for the skin fade base. The top is cut with a #2 guard (6mm) using clipper-over-comb technique to create that signature flat horizontal deck across the crown—this requires skill to maintain perfectly level plateau.
The fade itself is architectural precision work: starting from bare skin (#0000) at the fade line, blending through #0.5 and #1 guards in the narrow 0.75-inch transition zone to reach the #2 flat top. This tight gradient demands expert clipper control and blending technique. The geometric line where fade meets flat top should form a crisp 90-degree angle visible from profile—this isn’t soft or blended but deliberately sharp.
For home maintenance between barber visits, you’ll need high-quality clippers with guards—Wahl Elite Pro (Model 79602) ($60) or Andis Master ($140) if you’re committed to long-term home maintenance. You can maintain the #2 flat top yourself every 7-10 days to keep it regulation-length, but the high skin fade requires professional touch-ups every 2 weeks without exception—attempting to blend your own fade typically creates uneven patches that look unprofessional.
Product needs: absolute zero. This cut requires no styling products, no pomades, no creams, nothing. Hair is cut short enough to lay flat naturally. Your daily routine is: wake up, possibly run damp hands over head to flatten any sleep disruption, done. The only grooming product you might consider is light scalp moisturizer if the frequent buzzing causes dryness—Kiehl’s Facial Fuel (2-3 drops, massage into scalp after shower) prevents irritation.
Monthly product investment: $0-8 (only if using scalp moisturizer). One-time clipper investment: $60-140 if maintaining top length at home; $0 if relying entirely on professional cuts.
Maintenance Level: MEDIUM (but polarizing)
The Military Regulation creates an interesting maintenance paradox: it’s low-effort daily but high-frequency professional. Daily time commitment is essentially zero—30 seconds maximum to run damp hands over your head if needed. No styling, no products, no decisions about how to wear it. You wake up, and your hair is already in regulation form. This is the ultimate simplicity for daily routine.
However, professional barber visits every 2 weeks are non-negotiable for maintaining the high skin fade precision. By day 10-12, stubble growth blurs the geometric fade line and the cut starts looking grown-out rather than regulation. Home buzzing the #2 top yourself every 7-10 days extends the fresh look slightly but doesn’t replace professional fade work. If you miss the 2-week appointment, by week 3 you’ve lost the military precision entirely and it looks like any generic short haircut growing out.
The growth pattern is unforgiving specifically at the fade line. The flat #2 top actually tolerates slight growth well (you can buzz it yourself at home), but the skin fade shows stubble within 4-5 days and visible length by 10 days. The geometric sharpness that defines this cut depends entirely on that clean fade-to-flat-top transition staying crisp. Once that softens, the entire aesthetic collapses.
This maintenance profile suits men who value consistency and routine over flexibility. If you thrive on regimented schedules and appreciate that your haircut never requires daily decisions, this is ideal. If you prefer variety, travel frequently (hard to maintain 2-week barber schedules), or want styling options, this cut will frustrate you.
Monthly maintenance cost: $80-120 including two professional cuts ($40-60 each). If you invest in home clippers and maintain the top yourself between professional fade work, you might reduce to $60-90 monthly (one professional fade + one home top buzz + clipper investment amortized). Difficulty rating: Intermediate for home top maintenance (straightforward buzzing with #2 guard), Advanced if attempting your own fades (not recommended—geometric precision is difficult to achieve on yourself).
Barber Talk: The Exact Script
Say this to your barber:
“I want The Military Regulation high-and-tight with geometric precision. Buzz the entire top with a #2 guard using clipper-over-comb technique to create a perfectly flat, horizontal deck across my crown—no rounding, no natural shape following, pure flat plateau. Start a high skin fade at mid-head level, above my temples, using a #0000 blade at the baseline. Blend from bare skin through #0.5 and #1 guards to reach the #2 flat top within a tight 0.75-inch gradient—I want high-contrast precision, not soft gradual blending. The line where the fade meets the flat top should be geometrically sharp, forming a crisp 90-degree angle visible from profile. Clean up all edges with sharp lineup work at temples, hairline, and sideburns. For the neckline, continue the skin fade with a squared or slightly rounded shape—keep it military-regulation clean. I want zero styling ability—this should lay flat naturally with no products needed.”
Add if your barber asks about length: “Military regulation #2 on top, skin fade on sides—nothing longer, nothing shorter. This is functional discipline, not fashion styling.”
The final style offers the complete opposite philosophy: celebrating natural texture, movement, and effortless casual styling that embraces imperfection rather than eliminating it.
FAQs
Q: Can I maintain The Military Regulation entirely at home without barber visits?
A: You can maintain the #2 flat top at home every 7-10 days with quality clippers, but the high skin fade requires professional skill every 2 weeks. Attempting to blend your own fade typically creates uneven patches, visible lines, and unprofessional appearance. Most men find the best balance is: buzz the top at home weekly ($0 cost), visit barber bi-weekly for fade precision ($40-60 per visit). This keeps it regulation-sharp while reducing costs versus weekly professional cuts.
Q: Does The Military Regulation work for thinning hair or bald spots?
A: Yes—this is actually one of the best cuts for concealing early-stage hair loss. The uniform #2 length across the entire top makes thinning density less visible because there’s no dramatic length contrast showing sparse areas. The high fade draws attention to the geometric precision rather than hair quality. This works well for diffuse thinning or crown balding; it cannot hide advanced hair loss where large bald areas exist, but by that point you’d transition to The Desert Storm Buzz or a complete shave.
Q: What’s the difference between The Military Regulation and a crew cut?
A: The Military Regulation uses a perfectly flat horizontal deck on top created with clipper-over-comb technique, while crew cuts have natural head-shape rounding. Military Regulation features a high skin fade with tight gradient (0.75 inches of blending), while crew cuts typically use uniform guards on sides or more gradual tapers. Military Regulation is geometric and architectural; crew cuts are softer and more traditional. Military Regulation requires zero styling; crew cuts may use light product for polish.
Q: Is The Military Regulation appropriate for non-military professional environments?
A: It depends heavily on industry culture. This cut works well in law enforcement, security, athletics, construction, skilled trades, and other fields valuing discipline and practicality. It’s too severe for most corporate office environments (finance, consulting, traditional business), where The Classic Ivy League or The Shadow Fade Executive would be more appropriate. Creative industries generally prefer less regimented styles. Assess your workplace culture: if conformity and discipline are valued over individual expression, it works; if personal style is celebrated, it’s too rigid.
11 of 11 — The Natural Flow Crop

Celebrating Natural Texture Across All Face Shapes
The Natural Flow Crop is designed specifically to work with your hair’s natural texture rather than against it, making it ideal for men with coily, curly, or wavy hair who want to embrace their authentic hair pattern instead of fighting it with heat tools or chemical treatments. This philosophy creates universal appeal across face shapes because the natural volume and movement can be adjusted through length and styling direction rather than being locked into rigid geometric shapes.
Oval and round faces see exceptional results. Oval faces maintain their balanced proportions while the natural texture adds personality and dimension—the forward movement creates casual sophistication without disrupting harmony. Round faces benefit from the natural vertical volume coily texture provides, which adds height at the crown and elongates facial proportions. The low taper removes side bulk without the harsh contrast of skin fades, creating gentle slimming rather than dramatic reshaping.
Square and diamond faces work beautifully with this cut. Square faces appreciate how the soft, natural texture contrasts with angular jawlines, creating visual balance between geometric bone structure and organic hair movement. Diamond faces find the natural volume at the crown balances wider cheekbones while the low taper adds subtle width at the temple area where diamond faces are naturally narrow.
Heart-shaped faces should ensure the natural volume doesn’t overemphasize an already-wide forehead—request slightly less length on top (2 inches instead of 2.5) to maintain proportion. Oblong faces can wear this successfully but should avoid too much vertical volume—ask your barber to shape the top with slightly more horizontal spread rather than pure upward volume.
The transformative element: this cut celebrates texture instead of taming it. For men who’ve spent years straightening, relaxing, or fighting their natural curl pattern, The Natural Flow Crop offers liberation—your hair becomes an asset rather than something to control.
Natural Hair Care Arsenal for Coily Textures
The Natural Flow Crop for coily hair requires specialized products that enhance and define natural texture while maintaining moisture—the opposite of most styling products designed for straight hair. Your barber needs expertise in textured hair cutting—not all barbers have this skill. Seek barbers who specifically mention natural hair, coily textures, or Black barbershops in their marketing.
Your barber will use Wahl Magic Clip (Model 5049-400) or Andis Master (Model 01557) for the low taper work, starting with a #1.5 guard (4.5mm) just above ear level and blending smoothly up to natural length. The top requires twist-cutting or coil-cutting technique rather than standard scissor work—the barber works with individual coil clusters rather than cutting through them, maintaining natural curl pattern integrity.
For home care and styling, moisture is the foundation. Leave-in conditioner applied to damp hair after every wash—SheaMoisture Jamaican Black Castor Oil Leave-In Conditioner (quarter-sized amount, work through from roots to ends) provides essential hydration. Follow with curl-defining cream—Cantu Coconut Curling Cream (nickel-sized amount, apply with prayer hands method then scrunch) enhances coil definition without crunchy hold.
The critical tool: a wide-tooth comb or afro pick for detangling—Diane Ionic Anti-Static Detangling Comb ($6-8) prevents breakage. Never use fine-tooth combs on coily hair—they create breakage and frizz. Apply products to soaking-wet hair (not just damp) for maximum definition, scrunch to encourage coil formation, then air-dry or use diffuser attachment on low heat. High heat damages coily hair’s structure.
For the low taper fade maintenance, you can touch up edges yourself every 7-10 days with an edge control product—ORS Edge Control Gel (small amount on fingertips or soft brush) keeps hairline and temple edges clean between barber visits. The fade itself requires professional touch-ups every 3-4 weeks.
Monthly product investment: $25-40 for leave-in conditioner ($12), curl cream ($14), edge control ($8), occasional deep conditioning treatment ($10-15). One-time tool cost: $15-30 for wide-tooth comb, satin pillowcase (prevents friction damage during sleep), and satin/silk bonnet or durag for overnight protection.
Maintenance Level: LOW-MEDIUM
The Natural Flow Crop offers a refreshing low-to-medium maintenance profile that honors natural hair health rather than imposing high-effort styling demands. Daily routine takes 3-5 minutes: refresh coils with water spray bottle (mist lightly), apply small amount of curl cream to redefine any flattened sections, scrunch gently, done. Many men find their coils hold definition for 2-3 days without daily restyling—just protect hair overnight with satin bonnet or durag to prevent friction flattening.
Wash routine occurs every 5-7 days (coily hair shouldn’t be washed daily—natural oils are essential for health). Wash day takes 15-20 minutes: co-wash with sulfate-free cleanser, apply leave-in conditioner to soaking-wet hair, apply curl cream, scrunch and air-dry or diffuse. This is your weekly reset that provides fresh definition for the coming days.
Professional barber visits every 3-4 weeks maintain the low taper fade and shape the natural top length. Between visits, the low fade tolerates growth gracefully—by week 4 it’s softened but not obviously neglected. The coily top actually improves between weeks 2-3 as hair gains slight length for better coil formation, then starts needing a trim around week 5 when length becomes too variable.
The growth pattern works in your favor. Natural coily hair doesn’t show “grown out” the way straight hair does—it simply gains volume and length while maintaining its curl pattern. This means you’re never in that awkward in-between phase where the cut looks clearly neglected. The low taper’s gradual gradient (versus high-contrast fades) also ages gracefully.
Monthly maintenance cost: $55-80 including one barber visit ($35-50 depending on location and natural hair expertise) plus product replenishment ($25-40). Difficulty rating: Beginner—the styling technique is intuitive (apply product to wet hair, scrunch, let air-dry) and doesn’t require precision combing, blow-dry tension skills, or complex product layering. The hardest part is finding a skilled barber who understands coily hair cutting techniques.
Barber Talk: The Exact Script
Say this to your barber:
“I want The Natural Flow Crop that works with my natural coily texture instead of fighting it. Give me a low taper fade starting just above my ears with a #1.5 guard, blending smoothly up to my natural length—I want gradual graduation, not high-contrast fade. Keep the top at 2.5 inches, but this is critical: use coil-cutting or twist-cutting technique to maintain my natural curl pattern. Don’t cut through my coils with standard scissor technique—work with individual curl clusters to preserve texture and definition. Shape the top to fall forward naturally with slight volume at the crown. Clean up my edges at the hairline and temples, but follow my natural hairline shape—I want definition, not a harsh artificial lineup. My beard is 4mm—shape it with clean edges and blend it naturally into the taper at my jawline. For the nape, continue the low taper with a rounded natural shape.”
Add if your barber asks about styling: “I’m using curl cream and letting it air-dry—I want to embrace my natural texture, not straighten or control it into unnatural shapes.”
This final style completes our journey from high-maintenance precision to natural, texture-embracing simplicity—offering something for every man, every face shape, and every lifestyle in this comprehensive summer haircut collection.
FAQs
Q: How do I find a barber who knows how to cut coily or textured hair properly?
A: Look for barbers who specifically mention “natural hair,” “textured hair,” “coily cuts,” or show diverse portfolios including Black clients with natural styles. Ask directly: “Do you have experience with coil-cutting technique?” Barbers trained in traditional straight-hair cutting may not understand how to work with curl patterns without disrupting texture. Check reviews mentioning “respects natural texture” or “understands curly/coily hair.” Many cities have barbershops specializing in textured hair—these are your best bet for expertise.
Q: Can I get The Natural Flow Crop if I have relaxed or chemically-treated hair?
A: Yes, but the styling will differ. Relaxed hair won’t form defined coils, so you’ll use different products (lightweight mousse or styling cream instead of curl cream) and the aesthetic will be smoother rather than textured. The low taper fade works identically regardless of hair treatment. If you’re currently relaxed and want to transition to natural texture, you’ll need to grow out the relaxed sections (6-12 months for full transition) or do a “big chop” to remove all chemically-treated hair at once.
Q: How do I prevent my natural hair from looking dry or frizzy?
A: Moisture is everything for coily hair health. Use sulfate-free cleansers (sulfates strip natural oils), apply leave-in conditioner after every wash, seal moisture with curl cream while hair is soaking wet, sleep on satin pillowcase or use satin bonnet (cotton pillowcases cause friction and moisture loss), deep condition weekly with a treatment mask. Frizz often signals dehydration—increase your leave-in conditioner amount and ensure you’re applying products to wet (not damp) hair.
Q: Does The Natural Flow Crop work for mixed textures or loose curls?
A: Absolutely—the technique adapts to any texture from loose waves to tight coils. For looser curl patterns, you’ll use lighter products (curl-enhancing mousse instead of heavy cream) and may prefer slightly more length (3 inches instead of 2.5) for definition. The low taper fade works identically across all textures. The key is finding products matched to your specific curl type: looser curls need lightweight definition, tighter coils need moisture-rich creams. Your barber should adjust cutting technique to your curl pattern’s unique needs.