12 Trending High Fade Haircuts You’ll Love
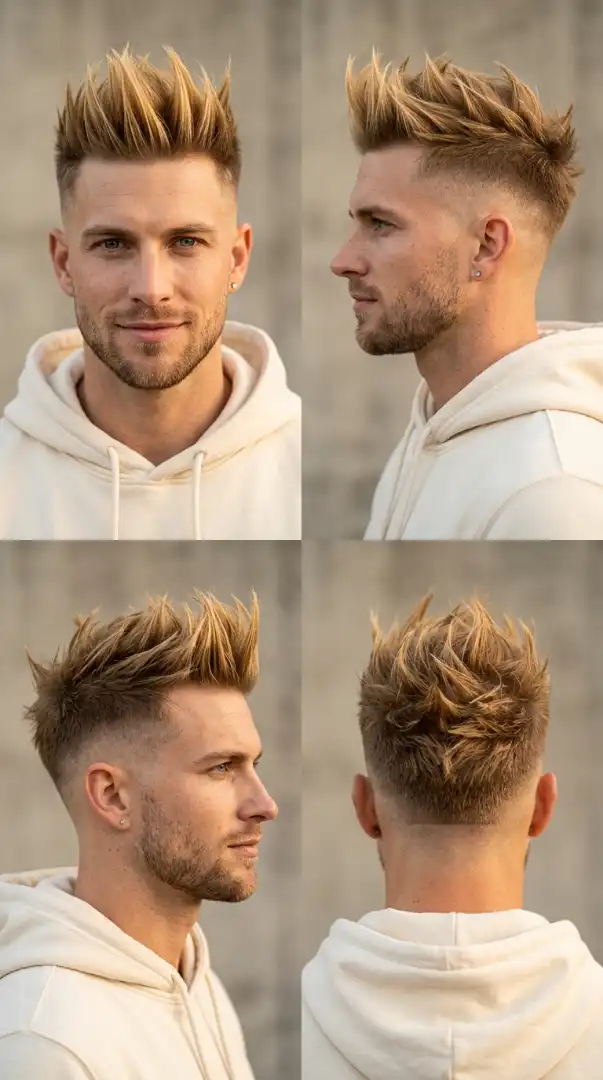
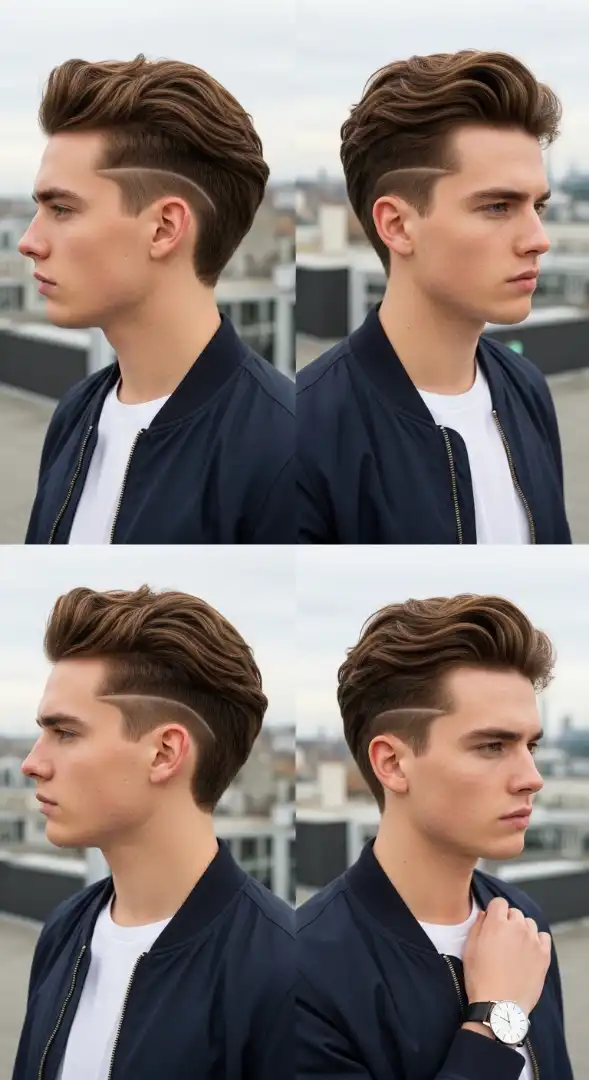
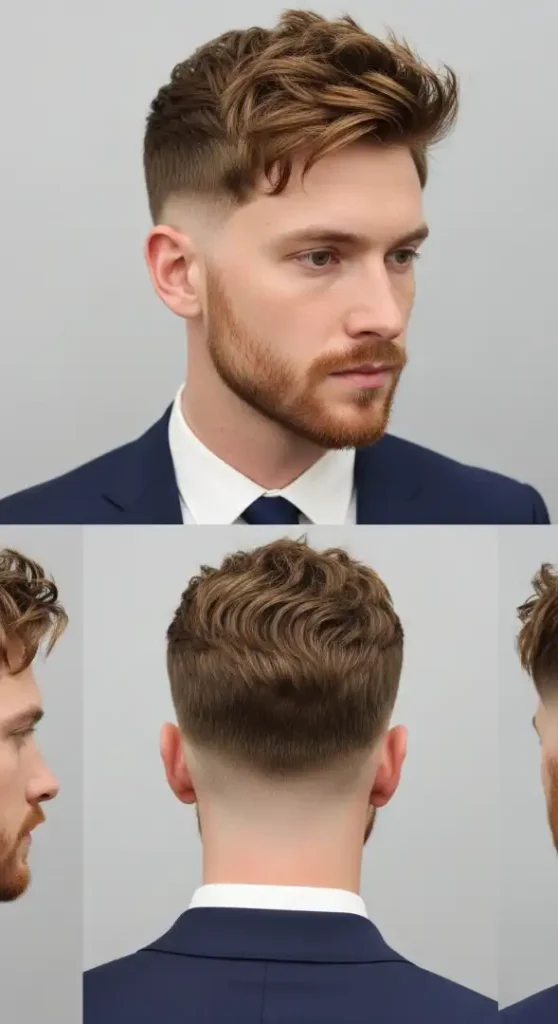
1 of 12 — The Mediterranean Sharp
Expert Analysis: Face Shape & Styling Authority
Best Face Shapes For This Cut
The Mediterranean Sharp excels on square and oval face shapes through strategic volume distribution. The high skin fade removes bulk from the sides, creating vertical emphasis that prevents square faces from appearing boxy. The fade starts at temple height, drawing attention upward toward the textured, swept fringe — this elongates the face while maintaining masculine angulation. For oval faces, this cut preserves natural proportion; the 2-inch top length adds structure without overwhelming balanced features. The sharp temple fade creates clean lines that enhance strong jawlines, making this particularly flattering for men with defined bone structure.
Round faces benefit moderately but require precise execution. The barber must keep the fade razor-sharp at the temples to maximize vertical lines. Diamond face shapes should approach cautiously — the width at the textured top can emphasize narrow jawlines. Request slightly less volume on top and consider extending the fade lower to balance proportions.
Professional Grooming Kit
Clippers: Wahl Magic Clip (primary fade work), Andis Master (bulk removal and initial blending)
Trimmer/Outliner: Andis T-Outliner (razor-sharp temple lines, beard edge-up, hairline definition)
Finishing Tools: Boar bristle Diane brush (distributes natural oils, adds shine to top texture), Kent 81T wide-tooth comb (detangling without breaking texture)
Styling Products: Layrite Supershine Cream (medium hold, high shine for the swept finish — use dime-sized amount on damp hair), Suavecito Firme Hold Pomade (strong hold for fringe structure on humid days), Honest Amish Beard Oil (conditions beard, prevents flaking at the fade line — 3-4 drops daily)
Maintenance Reality Check
Maintenance Level: HIGH
Salon visits required every 10-12 days. The high skin fade loses definition rapidly as hair grows — by day 14, the crisp temple lines blur into uneven shadow. This cut demands commitment.
Daily routine: 8-12 minutes. Morning starts with damp hair (shower or spray bottle). Work Layrite cream through top section from roots to ends using fingers, then brush backward and sweep to the right with the Kent comb. The swept direction must stay consistent or the part loses memory. Finish with light mist of medium-hold hairspray on the fringe to prevent mid-day droop. Evening touch-up takes 2 minutes — reshape with water and fingers if needed.
Product routine: 4 steps. Towel-dry to 70% damp. Apply pomade or cream. Brush and shape. Lock with hairspray. Budget 15-20 seconds per step.
This is not a wash-and-go style. Travel requires bringing your full kit. Skip styling two days in a row and the texture flattens into formless length on top with visible grow-out at the sides.
What To Tell Your Barber
“I want a high skin fade that starts just above my temples — bring it down to bare skin with the razor, not just guards. The blend should transition from skin to about a #2 guard at the round of my head, then scissor-cut the top to 2 inches with texture. Leave length concentrated on top-center and sweep everything toward my right side with a hard part on the left.
For the top, use point-cutting technique so it’s not blunt — I need movement and texture, not a helmet. The fringe should fall naturally across my forehead when unstyled but hold a sweep when I add product.
Fade the beard into the sideburns with a #1 guard — I want the beard and fade to look connected, not separate. Clean up my neckline with the trimmer, straight edge across the back.
Finish by shaping my hairline at the temples with the T-Outliner — I want sharp corners, not rounded. Don’t take the hairline back too far; keep it natural.
Show me the back and both sides in the mirror before I leave.”
This isn’t a budget haircut. Expect to pay $40-65 depending on your market. Tipping 20% is standard for this level of detail work. If you’re seeing someone new, bring a reference photo of this exact style — verbal descriptions alone create room for interpretation errors.
Common Questions Answered
How do I maintain a high skin fade at home between barber visits?
You can’t fully maintain it, but you can extend it 3-4 days. Invest in a Wahl Peanut trimmer ($45) and carefully trim the lowest guard line where skin meets hair every 5 days using a #0 guard. Never go below that line or you’ll create patches. Use a handheld mirror to check the back. Apply light beard oil to the fade area after trimming to reduce irritation. This buys you time but doesn’t replace professional blending — book your next appointment before leaving the barbershop.
Which face shape suits The Mediterranean Sharp best?
Square and oval faces achieve optimal results because the high fade emphasizes vertical lines while the textured top adds controlled volume. Square faces benefit from the softening effect of the swept fringe, which prevents harsh angularity. Oval faces maintain natural balance. Round faces can wear this cut successfully if the barber keeps fade lines ultra-sharp and reduces top volume by 20%. Diamond and heart-shaped faces should request modifications — ask for less height on top and a mid fade instead of high.
What is the difference between a high skin fade and a high bald fade?
These terms are used interchangeably in most barbershops — both mean taking the sides down to bare skin. The distinction, when it exists, is execution: a “skin fade” uses clippers with progressively smaller guards blending into a #0, then finishing with a razor for the lowest section. A “bald fade” implies starting with the razor immediately at the fade line for maximum skin exposure. Functionally, the visual result is identical. When booking, say “high skin fade down to the scalp” and your barber will understand regardless of their preferred terminology.
How often should I get The Mediterranean Sharp touched up?
Every 10-12 days for optimal appearance. The fade loses crispness by day 8, becoming visibly grown-out by day 14. If you’re maintaining professional standards or work in client-facing roles, hold to the 10-day schedule. Casual wearers can stretch to 14 days but will sacrifice the sharp aesthetic that makes this cut distinctive. Budget $160-240 monthly for maintenance ($40 per cut × 4-6 visits). Some high-end barbershops offer membership plans that reduce per-visit cost.
The next style takes this foundation and adds old-school sophistication with a side part that executives and creatives both respect.
Expert Analysis: Face Shape & Styling Authority
Best Face Shapes For This Cut
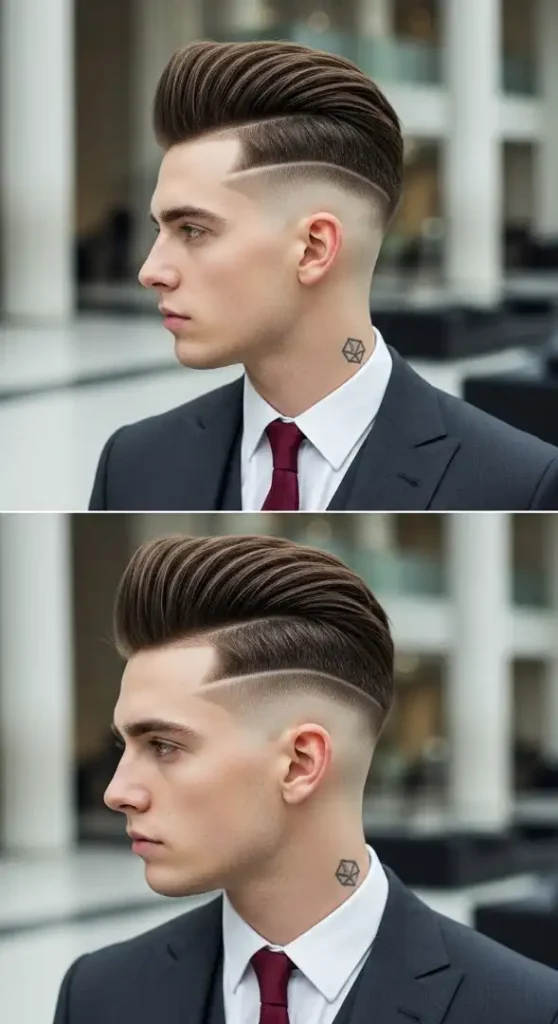
The Executive Authority transforms oval and oblong faces through horizontal volume compensation. The side-swept pompadour adds width at the crown, preventing oblong faces from appearing overly elongated. The high taper fade — less aggressive than a skin fade — removes just enough side volume to create clean lines without extreme narrowing. For oval faces, this cut enhances natural symmetry; the architectural side part adds masculine structure while the swept style prevents the “too perfect” look that can read as bland.
Square faces gain refinement. The pompadour height (1.5 inches) draws the eye upward, softening the angular jaw without eliminating its strength. The razor-etched part creates a sophisticated focal point that distracts from jaw width. This cut is particularly effective for men with strong, squared features who want to project authority without aggression.
Round faces should proceed carefully. The side sweep adds horizontal movement that can emphasize width. Request 30% more height on the pompadour and ask the barber to keep the part closer to the center (not extreme left) to create vertical emphasis. Diamond faces with narrow chins benefit significantly — the volume at top balances the face’s proportions perfectly.
Professional Grooming Kit
Clippers: Andis Master (primary tool for taper work — the magnetic motor handles fine hair without pulling), Wahl Senior (guards for initial length removal on the sides)
Trimmer/Outliner: BaByliss Pro FX787 Gold Outliner (razor-sharp for the side part line — this tool makes or breaks the look), Wahl Detailer (cleaning up the hairline and sideburns)
Finishing Tools: Mason Pearson Pocket Bristle Brush (boar bristle, creates the high-shine parallel lines in the pompadour), Kent 20T fine-tooth comb (essential for the slicked side-sweep — wide teeth won’t create smooth lines)
Styling Products: Uppercut Deluxe Pomade (water-based, high shine, strong hold — this is the gold standard for this look, nickel-sized amount), Layrite Superhold (backup for high-humidity days when you need extra grip), American Crew Forming Cream (for a less formal variation with semi-matte finish), Kiehl’s Nourishing Beard Grooming Oil if growing out stubble between clean shaves
Maintenance Reality Check
Maintenance Level: MEDIUM-HIGH
Salon visits every 14-16 days. The taper fade is more forgiving than a skin fade, allowing 4-6 extra days between appointments. However, the side part requires precision maintenance — by day 18, hair growing across the part line destroys the clean division. This is a cut for disciplined men.
Daily routine: 12-15 minutes. Cannot be rushed. Hair must be washed in the morning — this cut doesn’t work on second-day hair. After towel-drying to 60% damp, apply pomade to palms, distribute evenly through top section. Use the fine-tooth comb to create the side part, pulling firmly from front hairline to crown. Comb the right section backward and slightly to the right in parallel strokes — 8-10 passes minimum. Use the boar bristle brush to smooth and add shine. Finish by using the comb to lift and shape the pompadour at the front, creating 1.5 inches of height. Lock with medium-hold hairspray (2-second spray from 10 inches away).
Product routine: 5 steps. This isn’t minimalist. Wash, towel-dry, pomade application, combing technique, hairspray finish. Each step requires focus.
This style survives a full workday but needs touch-ups before evening events. Keep a comb and travel-size pomade in your desk or car. Expect to restyle completely if you hit the gym mid-day.
What To Tell Your Barber
“I need a high taper fade, not a skin fade — start the taper at temple level and blend from a #0.5 guard up to a #2 over about an inch and a half. Keep the transition smooth, nothing choppy. The top should be scissor-cut to 3.5 inches long, with the longest length at the front for pompadour volume.
Create a hard part on my left side using your trimmer or razor — not a natural part, a clean line. The part should run from my front hairline straight back to my crown, maybe a quarter-inch wide so it’s visible when styled.
I’m styling this with a side-swept pompadour, so cut the right side of the top slightly shorter than the left to help it stay swept when I apply product. Don’t thin out the top too much — I need density for the slicked look.
Keep my hairline natural, don’t push it back. Clean up the edges with the outliner so it looks sharp, but don’t reshape my natural line.
I’m clean-shaven, so no beard work — just make sure the sideburns taper down to a fine point at mid-ear height and fade cleanly into the skin. They shouldn’t look like separate entities.
Show me how you styled it and confirm the part is exactly where I want it before I leave the chair.”
This cut typically runs $35-55 in major cities. Book with a barber who specializes in men’s classic cuts, not someone who primarily does modern skin fades — the techniques are different.
Common Questions Answered
How do I maintain a high taper fade at home between barber visits?
The taper fade is the most home-maintenance-friendly fade variation, but it still requires care. Every 7 days, use a quality trimmer with a #1 guard to carefully blend the lowest section of the fade where it meets skin. Work in upward strokes, very light pressure — you’re maintaining the gradient, not cutting new lines. Apply aftershave balm immediately after trimming to prevent irritation. The side part line will blur as hair grows; use your trimmer without a guard to re-trace it every 6-7 days, following the original line your barber created. Don’t attempt to cut the top section at home — scissor work on your own head creates uneven results.
Which face shape suits The Executive Authority best?
Oval and oblong faces achieve the most natural, balanced look because the pompadour volume compensates for facial length without overcorrecting. Square faces benefit from the refined aesthetic — the height and structure soften angular features while preserving masculine strength. Round faces can wear this cut with modifications: request 40% more pompadour height and ask the barber to position the side part closer to center rather than far left. This creates vertical emphasis that elongates round proportions. Diamond and heart shapes also succeed — the volume at top balances narrow chins effectively.
What is the difference between a taper fade and a skin fade in terms of styling?
The visual difference is contrast severity. A skin fade takes the hair down to bare scalp, creating maximum contrast between bald sides and full top — it’s bold and modern. A taper fade blends from very short (usually #0.5 or #1) to longer hair, creating a softer, more gradual transition — it’s refined and professional. For styling purposes, taper fades maintain slightly more side hair, which means they grow out slower and look acceptable 3-4 days longer between cuts. Skin fades require more frequent maintenance but deliver higher visual impact. Choose based on lifestyle: if you’re in a boardroom daily, taper fade. If you’re building a personal brand on Instagram, skin fade.
How often should I get The Executive Authority touched up?
Every 14-16 days for crisp results. The taper fade tolerates growth better than skin fades, but the hard part requires regular maintenance. By day 18, hair growth across the part line becomes noticeable, and the fade loses its architectural precision. If you’re maintaining this for professional appearances, book standing appointments every two weeks. Casual wearers can stretch to 18 days but will sacrifice the sharp distinction that defines this cut. Budget approximately $105-165 monthly based on 2-3 visits at $35-55 per session.
The next variation brings street energy to this refined foundation — think less boardroom, more Brooklyn rooftop.
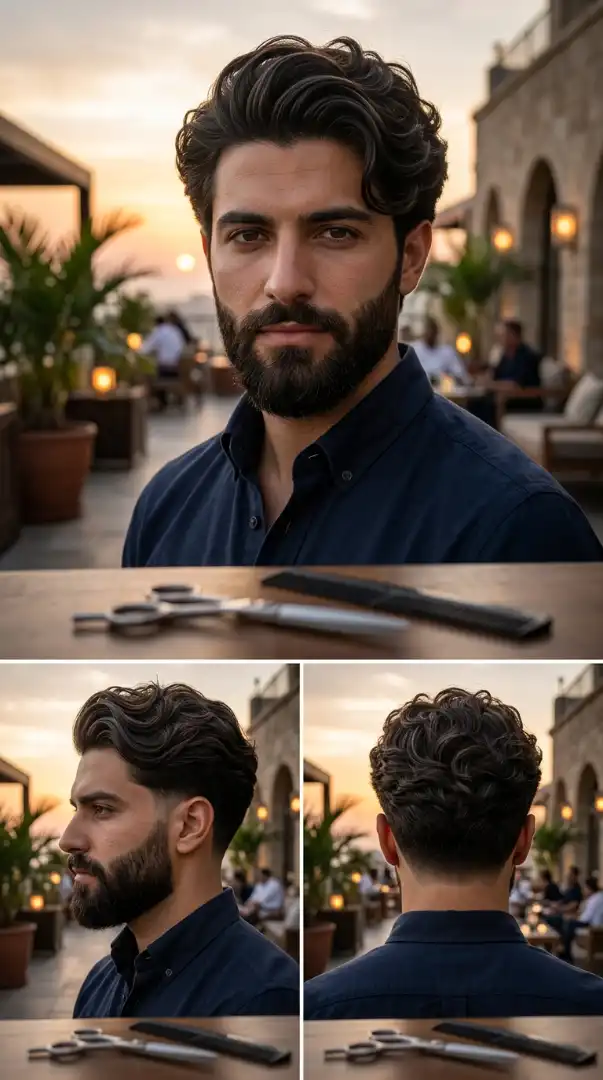
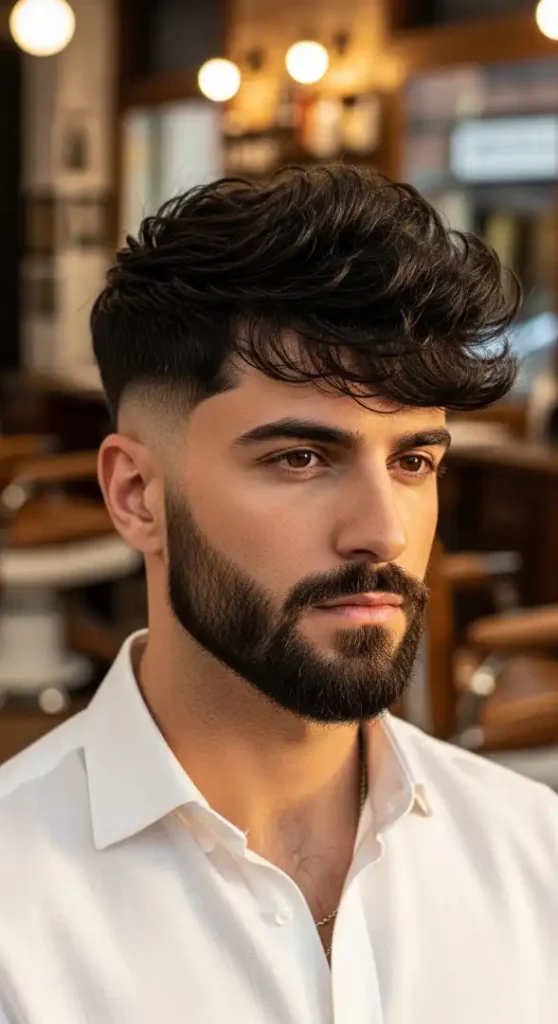
3 of 12 — The Shadow King
Expert Analysis: Face Shape & Styling Authority
Best Face Shapes For This Cut
The Shadow King dominates on diamond and oval face shapes through its curved fade architecture. The drop fade’s signature arc — descending behind the ears before rising at the back — creates a visual slimming effect that narrows wide cheekbones on diamond faces. The curve draws the eye in a downward motion, counteracting the horizontal width at mid-face. For oval faces, this cut adds edge and dimension; the slicked-back top eliminates forehead coverage, showcasing the face’s natural balance while the drop fade provides architectural interest that prevents “safe” styling.
Square faces gain unexpected softness. The drop fade’s curve introduces organic lines that contrast with angular jawlines, creating visual harmony without diminishing masculine strength. The beard connection is crucial here — it must blend seamlessly into the fade to avoid creating a horizontal line that would emphasize jaw width.
Round faces should avoid this cut or request heavy modifications. The curved fade can emphasize facial roundness by echoing circular contours. If you have a round face and love this aesthetic, ask your barber for a high skin fade (straight drop, no curve) instead, and style the top with maximum height to create vertical emphasis. Oblong faces can wear this successfully but should keep the top section to 2.5 inches maximum to avoid over-elongating the face.
Professional Grooming Kit
Clippers: Wahl Magic Clip (primary tool — zero-gap adjusted for the razor-line work on the drop curve), Andis Master (bulk removal and initial fade work before the Magic Clip detailing)
Trimmer/Outliner: Andis Slimline Pro Li (lightweight, perfect for the curved drop fade line behind the ears — heavier trimmers create hand fatigue during precision work), BaByliss Pro FX787 (beard sculpting along the jawline and connecting to the fade)
Finishing Tools: Wide-tooth carbon fiber comb (detangles thick coarse hair without static), Diane 8.5″ thermal vent brush (blow-drying the slick-back into position before product)
Styling Products: Hanz de Fuko Claymation (ultra-matte finish, strong hold — this is essential for the slicked-back look without shine, dime-sized amount on damp hair), Baxter of California Clay Pomade (alternative with slightly more pliability for restyling during the day), Jack Black Sleek Finish Texture Cream (for a semi-matte variation with less rigidity), Honest Amish Beard Balm (maintains beard shape and softness, connects beard texture to the fade visually — pea-sized amount worked through beard after shower)
Maintenance Reality Check
Maintenance Level: HIGH
Salon visits every 9-11 days. The drop fade’s curved architecture is unforgiving — by day 12, uneven growth destroys the arc’s symmetry, and the cut looks amateur instead of intentional. This fade variation demands more precision than straight-line fades, which means it grows out less gracefully.
Daily routine: 10-14 minutes. Hair must be blow-dried into position before product application — this cut doesn’t work with air-dry styling. After washing, towel-dry to 50% damp. Use the vent brush and blow dryer on medium heat, directing all hair straight back from the hairline to the crown. This sets the slick-back direction into the hair’s memory. Once 90% dry, work Claymation between palms until it breaks down (15 seconds of palm friction), then rake through the top section from front to back with fingers spread wide. Use the wide-tooth comb to smooth and align all hair in a single backward direction — no side part, no off-center flow, perfectly centered backward sweep. Finish by using your palms to compress the sides and back, ensuring a smooth surface. The matte finish will intensify as the product dries over the next 15 minutes.
Beard routine adds 3 minutes. After showering, apply beard balm to damp beard, use a boar bristle brush to distribute and shape, then let air-dry. Every 3 days, use beard trimmer with a #2 guard to maintain 5mm uniform length — uneven beard growth breaks the clean aesthetic.
Product routine: 6 steps. Wash, towel-dry, blow-dry with brush, product breakdown in palms, rake-through application, comb smoothing. This is not a quick style.
Plan to restyle if you shower mid-day at the gym. The matte product doesn’t reactivate with water — you’ll need to wash out and start over. Keep a backup supply at work or in your gym bag.
What To Tell Your Barber
“I want a high drop fade, not a standard high fade. The fade line should start at my temples, drop down behind my ears to about ear-lobe height, then curve back up toward the back of my head. The lowest point of the curve should hit around my ear lobe — if it drops lower than that, it’ll look disconnected from my beard.
Use the Wahl Magic Clip or your tightest-gap clipper for the razor line at the bottom of the curve. I want to see skin there. Blend up from the razor line to a #1.5 guard by mid-head, then scissor the top to 3 inches long with minimal layering — I’m slicking this straight back, so I need weight and density.
My beard stays at 5mm — use a #2 guard to maintain that length, and blend the beard into the drop fade with a 1-inch transition zone. I don’t want to see where the beard ends and the fade begins; it should look like one connected cut.
Preserve my widow’s peak — don’t try to round it out or create a straight hairline. The point is part of my natural look.
Check both sides of the drop fade curve in the mirror before you finish. They need to be symmetrical. If one side drops lower than the other, the whole cut looks off.
Show me the back, both sides, and the beard connection before I leave.”
Expect to pay $45-70 for this cut in metro areas. The drop fade requires more technical skill than standard high fades, so don’t look for bargain pricing — you get what you pay for. Tipping 20-25% is appropriate for this level of detail work.
Common Questions Answered
How do I maintain a high drop fade at home between barber visits?
Home maintenance is difficult because the curved fade line requires precision you can’t achieve with handheld mirrors. However, you can extend the cut’s life by 2-3 days with careful trimming. Every 5 days, use a trimmer with a #0.5 guard to carefully blend the very bottom section of the curve where it meets skin. Work in small upward strokes following the curve — never cut horizontally or you’ll create lines. Use a three-mirror setup (bathroom mirror plus two handheld mirrors) to see the back and sides simultaneously. Apply light beard oil after trimming to reduce irritation. This buys time but doesn’t replace professional work — the curve requires a trained eye to maintain symmetry.
Which face shape suits The Shadow King best?
Diamond and oval faces achieve optimal results. Diamond faces benefit from the curved fade’s slimming effect on wide cheekbones — the arc creates downward visual movement that narrows the mid-face. Oval faces gain edge and dimension without losing natural balance. Square faces can wear this cut successfully if the beard connection is executed perfectly to soften jaw angularity. Round faces should avoid this cut entirely or request a straight high skin fade instead — the drop fade’s curve echoes round facial contours and emphasizes circular features. Oblong faces need modifications: keep top length to 2.5 inches maximum to avoid over-elongation.
What is the difference between a drop fade and a regular high fade?
A regular high fade follows a horizontal line around the head at temple level, then blends straight up from there — it’s a simple architectural line. A drop fade starts at the same temple position but then curves downward behind the ears before rising again at the back of the head, creating an arc rather than a horizontal line. The drop fade follows the natural contour of the skull more closely, which creates a more organic, less rigid look. In practical terms, the drop fade requires more skill to execute symmetrically and grows out less gracefully than a straight high fade. Choose based on aesthetic preference: straight high fade for bold, architectural looks; drop fade for organic, curved sophistication.
How often should I get The Shadow King touched up?
Every 9-11 days for crisp results. The drop fade’s curved architecture is the least forgiving fade variation — asymmetrical growth becomes visible faster than on straight-line fades. By day 12, the curve loses definition and the cut begins to look unintentional rather than deliberate. If you’re maintaining this for social media presence or creative professional environments, hold to the 9-day schedule. Casual wearers can stretch to 11 days but will sacrifice the sharp curve that makes this cut distinctive. Budget $180-280 monthly for maintenance ($45 per cut × 4-5 visits or $70 per cut × 3-4 visits depending on your barber’s pricing).
The next style abandons this dark moodiness for bright, clean corporate energy — think finance district, not artist quarter.
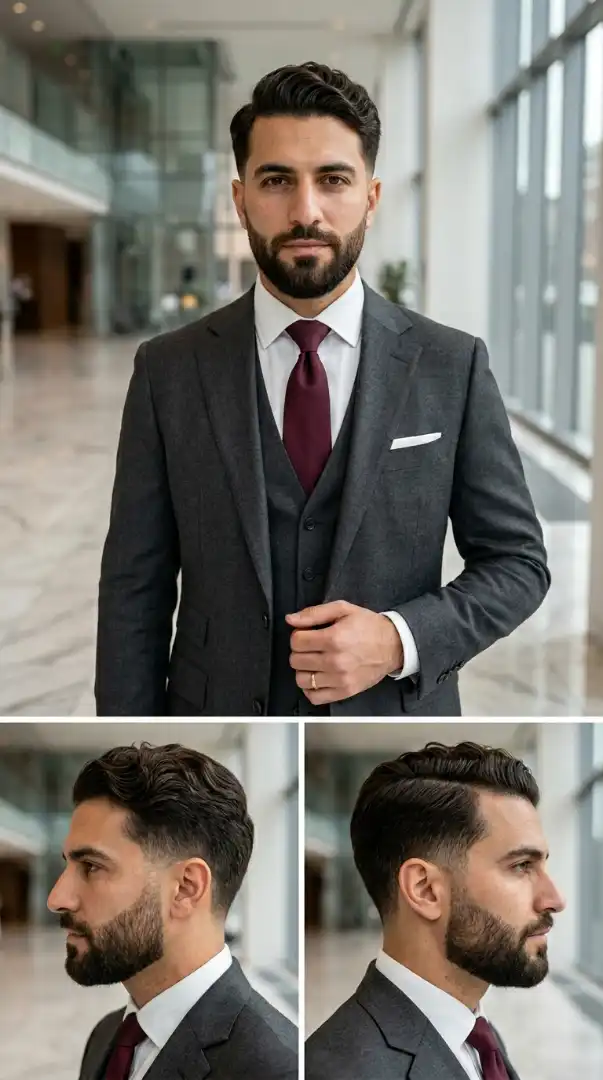
4 of 12 — The Corporate Rebel
Expert Analysis: Face Shape & Styling Authority
Best Face Shapes For This Cut
The Corporate Rebel transforms round and oval faces through strategic texture distribution. The messy, forward-falling fringe creates horizontal width at the forehead, which prevents round faces from appearing bottom-heavy. The skin fade removes side volume aggressively, creating vertical lines that elongate round proportions. For oval faces, this cut adds textured dimension while maintaining natural balance — the disheveled top prevents the “too polished” aesthetic that can make oval faces appear generic.
Square faces achieve unexpected harmony. The soft, piecey fringe contrasts with angular jawlines, introducing organic movement that softens strong bone structure without diminishing masculinity. The key is the texturing technique — heavy point-cutting creates separation that prevents the fringe from sitting as a blunt weight, which would emphasize horizontal jaw width.
Diamond faces with narrow chins benefit moderately. The forward fringe adds visual weight to the forehead, balancing the face’s proportions. However, avoid styling the fringe too far forward — keep it breaking at mid-forehead rather than covering the entire forehead, which would make the face appear top-heavy.
Oblong faces should request modifications. The default 2.5-inch top length can over-elongate already long faces. Ask your barber for 2 inches maximum and style the fringe with more horizontal movement (swept to the side slightly) rather than straight forward.
Professional Grooming Kit
Clippers: Wahl Magic Clip (primary fade tool — the zero-gap blade adjustment is essential for skin-level precision), Andis Master (initial bulk removal and mid-level fade work)
Trimmer/Outliner: Andis T-Outliner (the sharpest blade for hairline cleanup and sideburn definition), Wahl Detailer (stubble maintenance at 2-3 day length without going clean-shaven)
Finishing Tools: Wide-tooth acetate comb (prevents static in wavy hair, essential for the messy texture), Denman Classic Styling Brush 7-row (creates separation during blow-drying for natural piecey texture)
Styling Products: American Crew Fiber (the industry standard for messy texture — provides matte finish with strong hold and reworkability, dime-sized amount on dry hair), Hanz de Fuko Quicksand (ultra-dry texture with extreme hold for high-humidity days), Baxter of California Clay Effect Style Spray (matte finishing spray that adds grit and hold without weight — 3-second spray at 8 inches distance), Jack Black Beard Oil (maintains stubble softness and reduces itch during the 2-3 day growth phase — 2-3 drops worked into stubble after shower)
Maintenance Reality Check
Maintenance Level: MEDIUM
Salon visits every 12-14 days. The skin fade demands regular upkeep, but the textured top is forgiving — slight growth actually enhances the messy aesthetic rather than destroying it. This cut occupies the sweet spot: high-impact visual without extreme maintenance demands.
Daily routine: 6-9 minutes. This is the rare fade that works on second-day hair. After showering (or if styling day-two hair, lightly dampen the top section with water), towel-dry to 70%. Apply Fiber to completely dry hair — this product doesn’t work on damp hair, it needs friction with dry strands to activate. Work it between palms for 10 seconds until it breaks down slightly, then rake through the top section with fingers spread wide, working from back to front. Use your fingers to create separation — twist small sections randomly to create the piecey texture. The fringe should fall forward naturally; use your fingers to direct it across the forehead at an angle (slightly off-center, not perfectly straight across). Don’t comb or brush once product is applied — that destroys the texture. Finish with Clay Effect spray if you need extra hold or if humidity is high.
Stubble routine adds 2 minutes every 3 days. Use the Wahl Detailer without a guard to maintain the 2-3 day stubble length. Trim against the grain on the neck below the jawline to keep the neckline clean — corporate environments don’t tolerate full neck beards. Apply beard oil after trimming.
Product routine: 4 steps. Dry hair completely, finger-apply Fiber, create separation and texture, optional finishing spray. No blow-drying required unless you have extremely straight hair that needs pre-texturing.
This style survives the gym, office air conditioning, and light rain. It’s built for real life, not just the Instagram grid.
What To Tell Your Barber
“I want a high skin fade that starts at temple level and goes down to bare skin. Use your sharpest clipper or the T-Outliner for the razor line — I want to see scalp at the sides and temples. Blend from skin up to a #1 guard over about an inch of transition, then scissor-cut the top.
The top should be 2.5 inches long with heavy texturing. I need point-cutting and slide-cutting techniques to create separation and movement — don’t leave it blunt. I’m styling this as a messy textured fringe, so cut it to fall forward naturally across my forehead when unstyled. No hard part, no clean lines in the top section — I want it to look deliberately disheveled.
I’m keeping stubble at 2-3 days growth, so just clean up my neckline below the jaw and make sure my sideburns fade cleanly into the skin fade. Don’t try to shape or sculpt my stubble — I’m maintaining it at home with my trimmer.
For the fade, make sure both sides are symmetrical and the back blends seamlessly into the crown. I don’t want to see a line where the fade stops and the top starts — it should be a gradual transition.
Show me all four angles before you’re done — front, both sides, and back.”
This cut runs $35-60 in most cities. The skin fade requires skill, but the textured top is less technical than pompadour or slick-back styles, so pricing is moderate. Tipping 20% is standard.
Common Questions Answered
How do I maintain a high skin fade at home between barber visits?
Skin fade home maintenance extends the cut 2-3 days maximum. Every 6 days, use a zero-gap adjusted trimmer (Wahl Magic Clip or equivalent) to carefully re-establish the skin line at the very bottom of the fade. Work in upward strokes with extremely light pressure — you’re tracing the existing line, not creating a new one. Use a three-way mirror setup to see all angles simultaneously. The mid-level blend (#1 to #2 guards) can be touched up with a #1 guard every 7 days, blending in short upward strokes. Apply alcohol-free aftershave balm immediately after trimming to prevent razor bumps. This buys time but doesn’t replace professional work — book your next appointment before leaving the shop.
Which face shape suits The Corporate Rebel best?
Round and oval faces achieve the most flattering results. Round faces benefit from the vertical lines created by the aggressive skin fade, which elongates proportions, while the forward fringe adds width at the forehead to prevent bottom-heavy appearance. Oval faces gain textured dimension without losing natural balance. Square faces work well if the texturing is executed properly — the piecey fringe softens angular features. Diamond faces can wear this with good results, but avoid styling the fringe too far forward to prevent top-heavy proportions. Oblong faces need modifications: reduce top length to 2 inches and style fringe with side sweep rather than straight forward.
What is the difference between a messy fringe and a structured fringe?
A messy fringe uses heavy texturing techniques (point-cutting, slide-cutting, razor work) to create separation and movement, resulting in a deliberately disheveled look with visible individual hair strands. It’s styled with matte products like fiber or clay and looks intentionally undone. A structured fringe has cleaner, more defined edges with less internal texturing — it sits as a more uniform section across the forehead and is typically styled with pomade or gel for a controlled, polished appearance. Choose based on environment: messy fringe for creative industries, tech, and casual-professional settings; structured fringe for traditional corporate, finance, and law.
How often should I get The Corporate Rebel touched up?
Every 12-14 days for optimal appearance. The skin fade loses definition by day 10, but the textured top actually improves slightly with 3-4 days of growth, so the overall aesthetic holds longer than slicked or structured styles. If you’re maintaining this for professional environments that lean business-casual, the 14-day schedule works. Traditionalist corporate cultures might require 12-day intervals to keep the fade crisp. Budget approximately $105-180 monthly based on 3-4 visits at $35-60 per session depending on your market.
The next cut takes this textured foundation and adds old-school volume that commands attention from across the room.
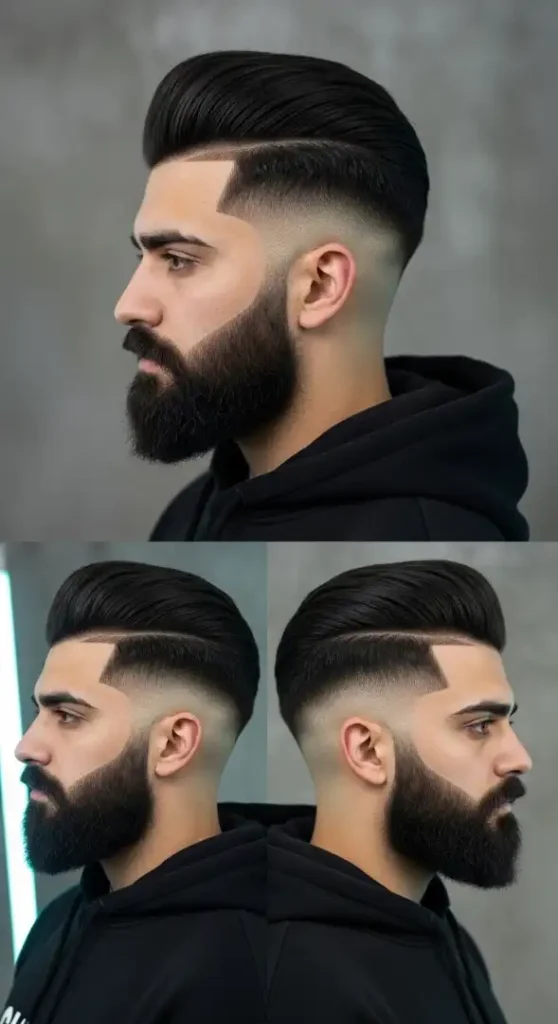
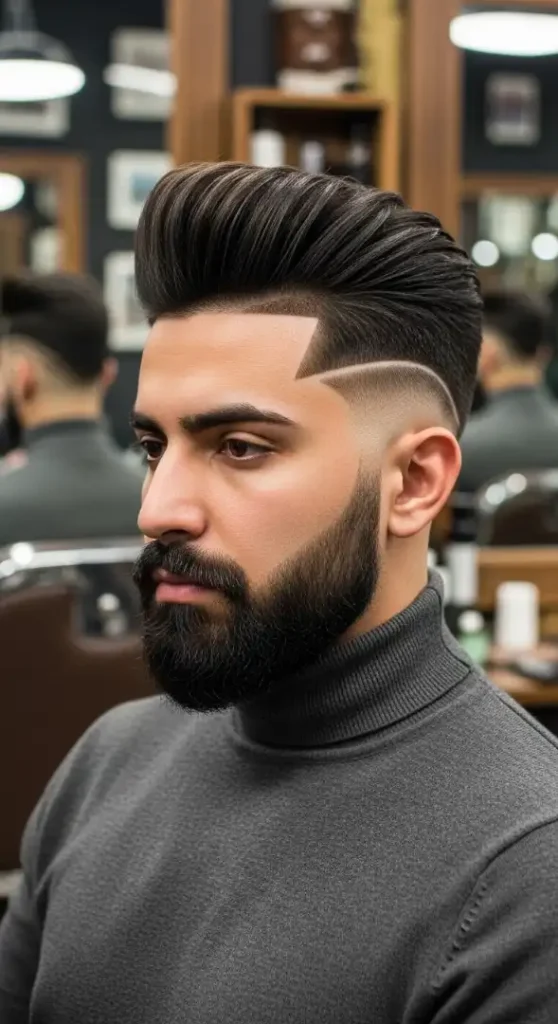
5 of 12 — The Burst Kin
Expert Analysis: Face Shape & Styling Authority
Best Face Shapes For This Cut
The Burst King excels on oval and square face shapes through its radial fade geometry and vertical pompadour volume. The burst fade’s semi-circular pattern around the ears creates visual width at mid-face level, which prevents oval faces from appearing narrow or overly vertical. The pompadour’s 2-inch height adds vertical emphasis that balances the horizontal movement of the burst pattern. For square faces, this cut is transformative — the curved burst fade introduces organic lines that soften angular jawlines, while the beard connection creates seamless flow that prevents the “face on top of hair” disconnected look.
Round faces benefit significantly but require precise execution. The pompadour height must be emphasized (request 2.5 inches minimum) to create vertical elongation, and the burst fade should start slightly higher than standard (mid-temple rather than low-temple) to remove maximum side volume. The curved fade pattern naturally slims round faces by creating diagonal visual movement rather than horizontal width.
Diamond faces with wide cheekbones should approach cautiously. The burst fade’s radiating pattern can emphasize mid-face width. If you have a diamond face and love this aesthetic, request a tighter burst pattern (less dramatic curve) and ensure the pompadour has maximum height to draw attention upward.
Oblong faces can wear this successfully with modifications: reduce pompadour height to 1.5 inches and request slightly more volume at the sides of the pompadour (not perfectly centered backward sweep) to add horizontal balance.
Professional Grooming Kit
Clippers: Andis Master (primary tool for burst fade work — the magnetic motor provides the control needed for curved fade patterns), Wahl Magic Clip (detail work on the tightest sections of the burst where it meets skin)
Trimmer/Outliner: BaByliss Pro FX787 Gold Outliner (defining the burst pattern’s curves and creating the sharp cheek line on the beard), Andis Slimline Pro Li (beard edge work and connecting the fade to the beard seamlessly)
Finishing Tools: Mason Pearson Pocket Bristle Brush (boar bristle creates the high-shine finish on the pompadour), Kent 6T fine-tooth comb (essential for pompadour shaping — creates the sculptural lift and backward sweep), round brush 2-inch diameter (blow-drying the pompadour into shape with volume)
Styling Products: Uppercut Deluxe Pomade (water-based, high shine, strong hold — the gold standard for classic pompadours, nickel-sized amount), Suavecito Firme Hold (extreme hold for high-humidity climates or all-day events), Layrite Supershine Cream (high shine, medium hold for a more natural variation), Honest Amish Beard Balm (maintains beard shape and softness, connects beard texture to the overall look — pea-sized amount), Beard brush boar bristle (distributes balm and trains beard to lay flat against fade)
Maintenance Reality Check
Maintenance Level: HIGH
Salon visits every 9-11 days. The burst fade’s curved pattern grows out asymmetrically — hair at the curve’s tightest point (around the ear) grows faster visually than hair at the curve’s widest point (toward the back), destroying the sunburst effect by day 12. This cut demands commitment and budget.
Daily routine: 15-18 minutes. This is not a quick style — the pompadour requires blow-drying and careful shaping. Start with freshly washed, damp hair (this cut doesn’t work on second-day hair). Towel-dry to 60% damp. Apply a small amount of heat protectant or light leave-in conditioner to prevent heat damage. Use the round brush and blow dryer on medium-high heat, directing hair backward and upward from the hairline. The brush creates the pompadour’s volume — roll it backward while applying heat, then hold in position for 3 seconds to set the shape before releasing. Repeat across the entire front section until the pompadour holds its 2-inch height naturally.
Once 90% dry, work Uppercut Pomade between palms until it breaks down (20 seconds of friction), then apply to the top section in backward strokes. Use the fine-tooth comb to shape the pompadour: insert comb at the hairline, lift upward to create height at the front, then sweep backward toward the crown. The comb should create visible parallel lines in the pomade — this is intentional, it’s part of the aesthetic. Use the boar bristle brush to smooth and add final shine. Finish with light mist of strong-hold hairspray if needed for all-day hold.
Beard routine adds 4 minutes. After showering, apply beard balm to damp beard, use beard brush to distribute and train the beard to lay flat against the face (not puff outward), then use beard trimmer with #2.5 guard to maintain 8mm length every 4 days.
Product routine: 7 steps. Wash, towel-dry, heat protectant, blow-dry with brush technique, pomade application, comb shaping, brush smoothing, optional hairspray. This is a full routine.
Plan to carry a comb and small pomade tin for mid-day touch-ups. The pompadour can lose shape after 6-8 hours, especially in humid weather.
What To Tell Your Barber
“I want a high burst fade, not a standard high fade or drop fade. The fade should start at my temples and curve around my ears in a semi-circular pattern — like a sunburst radiating from the ear. At the tightest point of the curve, right behind the ear, I want it faded down close to skin. The pattern should mirror on both sides symmetrically.
Blend the burst fade from near-skin at the ear up to a #1.5 guard by mid-head, then scissor-cut the top to 3.5 inches at the front, graduating slightly shorter toward the crown. I’m styling this as a pompadour, so I need length and density at the front.
I have a full beard at 8mm — use a #2.5 guard to maintain that length. Create a sharp cheek line to define the upper beard boundary, then blend the beard into the burst fade with a transition zone. I shouldn’t be able to see where the beard ends and the fade begins — it needs to look connected.
The pompadour should be cut to sweep straight back, not to the side. Make sure there’s enough length at the front for me to create 2 inches of lift when I style it.
Check the burst pattern symmetry on both sides before finishing. If one side’s curve is tighter or looser than the other, the whole cut looks off. Show me both profiles and the front before I leave.”
Expect to pay $50-75 for this cut in metro areas. The burst fade requires advanced technical skill — this is not a cut for apprentice barbers or quick-service chains. Tipping 20-25% is appropriate for this level of craftsmanship.
Common Questions Answered
How do I maintain a high burst fade at home between barber visits?
Home maintenance of a burst fade is nearly impossible due to the curved pattern requiring vision of angles you can’t see with standard mirrors. However, you can extend the cut 2-3 days with careful work. Every 5 days, use a trimmer with a #0.5 guard to lightly blend the very bottom section of the burst curve where it’s closest to skin. Work in small curved strokes following the original pattern — never work in straight lines or you’ll destroy the sunburst effect. Use a triple-mirror setup (bathroom mirror plus two angled handheld mirrors) to see the curve from multiple angles simultaneously. Apply light beard oil after trimming to reduce irritation. This minimal maintenance buys time but doesn’t replace professional execution.
Which face shape suits The Burst King best?
Oval and square faces achieve optimal results. Oval faces benefit from the burst fade’s width-adding horizontal movement, which prevents narrow appearance, while the pompadour maintains balanced vertical proportions. Square faces gain softness from the curved fade pattern, which contrasts angular jawlines, and the beard connection creates seamless flow. Round faces can wear this successfully with modifications: request maximum pompadour height (2.5+ inches) and start the burst fade higher (mid-temple) to maximize vertical emphasis. Diamond faces should request a tighter burst curve to avoid emphasizing wide cheekbones. Oblong faces need reduced pompadour height (1.5 inches) to prevent over-elongation.
What is the difference between a burst fade and a drop fade?
Both are curved fade variations, but the curve pattern differs completely. A drop fade curves downward behind the ears then back up at the rear, creating a single continuous arc from temple to temple across the back of the head. A burst fade curves in a semi-circular pattern around each ear independently, radiating outward like a sunburst — it doesn’t curve all the way to the back; instead, the curves on each side remain separate, framing the ears. Visually, drop fades look like a swooping line, while burst fades look like two parentheses around the ears. Choose based on aesthetic: drop fades are organic and flowing; burst fades are architectural and bold.
How often should I get The Burst King touched up?
Every 9-11 days for crisp results. The burst fade’s curved pattern grows out asymmetrically, with the tightest curve (around the ear) showing growth faster than outer areas, which destroys the sunburst effect by day 12. The pompadour requires less frequent cutting — you could technically stretch top cuts to 18-20 days — but the fade’s maintenance schedule drives your appointments. If you’re maintaining this for social presence or creative professional work, hold to the 9-day schedule. Casual wearers can stretch to 11 days but will sacrifice the sharp burst pattern. Budget $200-300 monthly for maintenance ($50 per cut × 4-5 visits or $75 per cut × 3-4 visits depending on market).
The next style strips away this vintage formality and brings raw street texture back into play.
6 of 12 — The Nordic Clean
Expert Analysis: Face Shape & Styling Authority
Best Face Shapes For This Cut
The Nordic Clean transforms oval, square, and heart-shaped faces through vertical texture emphasis and extreme side minimalism. The brush-up technique creates 1.5 inches of vertical height, which elongates all face shapes while the temple fade’s ultra-high starting point removes maximum side volume. For oval faces, this cut enhances natural proportion without adding unnecessary width — it’s refined simplicity. Square faces gain softness from the textured, vertical brush-up, which contrasts angular jawlines by introducing organic upward movement. Heart-shaped faces with wider foreheads and narrow chins benefit significantly — the vertical brush-up draws attention to the center of the face rather than the forehead width, and the minimal sides prevent the face from appearing top-heavy.
Round faces should approach with caution and request modifications. The standard 2-inch top length may not provide enough vertical emphasis to elongate round proportions. Request 2.5-3 inches and ensure the barber creates maximum height on the brush-up (2+ inches when styled). The temple fade should start as high as anatomically possible — literally at the temple corner — to remove maximum horizontal volume.
Diamond faces with wide cheekbones can wear this successfully. The minimal sides created by the temple fade slim mid-face width, and the vertical brush-up balances proportions by drawing the eye upward.
Oblong faces should avoid this cut or request significant modifications. The vertical brush-up will over-elongate already long faces. If you have an oblong face and love this aesthetic, request a horizontal brush-forward or brush-to-the-side variation instead of vertical.
Professional Grooming Kit
Clippers: Wahl Senior (primary tool for temple fade work — the V9000 motor provides power through thick Scandinavian hair texture), Andis Master (detail blending work)
Trimmer/Outliner: Andis T-Outliner (razor-sharp temple lines and hairline definition — the precision here makes or breaks the minimalist look), BaByliss Pro FX Outliner (alternative with cooler-running motor for sensitive scalps)
Finishing Tools: Denman Classic Styling Brush 9-row (creates the vertical brush-up texture during blow-drying), wide-tooth carbon comb (initial detangling on damp hair before blow-drying)
Styling Products: American Crew Fiber (medium hold, matte finish — perfect for the textured brush-up that needs to stand vertical without looking wet, quarter-sized amount on dry hair), Hanz de Fuko Claymation (stronger hold alternative for fine hair that doesn’t naturally hold vertical shape), Baxter of California Hard Cream Pomade (semi-matte finish with extreme hold for all-day vertical hold), sea salt spray (pre-styling on damp hair before blow-drying to add grit and texture — 4-5 sprays at 6 inches distance)
Maintenance Reality Check
Maintenance Level: MEDIUM-HIGH
Salon visits every 11-13 days. The temple fade’s ultra-high starting point means even 2-3mm of growth becomes visible and disrupts the clean minimalist aesthetic. The brush-up top is more forgiving — it actually gains character with slight growth — but the fade drives the appointment schedule.
Daily routine: 8-11 minutes. This cut requires blow-drying — the brush-up won’t form naturally from air-drying fine straight hair. Start with freshly washed hair. Towel-dry to 60% damp. Spray sea salt spray across the top section for pre-texture. Use the Denman brush and blow dryer on medium-high heat, brushing the hair upward from roots to ends. The key technique: insert brush at the roots, lift straight up toward ceiling while applying heat, hold for 2 seconds, release. Repeat across the entire front and center section. The hair should stand nearly vertical when you finish blow-drying.
Once hair is 95% dry, work Fiber between palms until it breaks down (10 seconds), then apply to the top section using upward scrunching motions with your fingers. Don’t smooth or flatten — you’re enhancing the vertical texture the blow-dryer created. Use your fingers to separate and define individual strands in the front tuft area. The result should look intentionally textured, not perfectly uniform.
Product routine: 5 steps. Wash, towel-dry, sea salt spray, blow-dry with vertical brush technique, Fiber application with scrunching. Requires focus.
This style holds all day in normal conditions but struggles in high humidity or rain — the vertical texture collapses into flat hair. Keep a travel-size Fiber and comb in your bag for emergency restyling.
What To Tell Your Barber
“I want a high temple fade — I need the fade to start at the very top corners of my temples, not mid-temple or low-temple. At the highest point, I want to see skin or near-skin using your tightest clipper setting. Blend from skin or #0.5 at the top down to a #1 guard at ear level. The blend should be tight — less than an inch of transition space.
Keep the top at 2 inches long, scissor-cut with light texturing. I’m styling this with a brush-up technique, so I need the hair cut to stand vertically when I style it. Don’t over-thin the top — I need enough density for the vertical hold, especially at the front.
I’m clean-shaven, so no beard work. Sideburns should be minimal — end them at mid-ear level and fade them cleanly into the temple fade. Don’t leave thick or long sideburns; they break the minimal aesthetic.
Clean up my hairline with the T-Outliner — I want sharp definition at the temples and forehead, but don’t reshape my natural hairline or push it back. Keep it natural.
Check both temples in the mirror before finishing. The fade should start at the same height on both sides and be symmetrical. Show me both sides and the front.”
This cut runs $35-55 in most markets. The temple fade requires precision but less total cutting time than pompadour or slick-back styles, so pricing is moderate. Tipping 20% is standard.
Common Questions Answered
How do I maintain a high temple fade at home between barber visits?
Temple fade home maintenance is challenging due to the high starting point making every millimeter of growth visible. Every 6 days, use a trimmer with a #0.5 guard to carefully blend the lowest section where near-skin meets #1 guard. Work in short upward strokes with light pressure, following the original fade line. The temple corners require extreme care — use a handheld mirror plus bathroom mirror to see the area from multiple angles. Never free-hand without a guard at the temple corners or you’ll create patches. Apply cooling aftershave gel immediately after trimming (alcohol-free to prevent irritation on sensitive temple skin). This extends the cut 2-3 days maximum.
Which face shape suits The Nordic Clean best?
Oval, square, and heart-shaped faces achieve the most flattering results. Oval faces maintain natural balance while gaining textured dimension. Square faces benefit from the softening effect of the vertical brush-up texture, which contrasts angular features. Heart-shaped faces with wider foreheads gain balance — the vertical brush-up draws attention center rather than emphasizing forehead width. Round faces can wear this with modifications: request 2.5-3 inches on top and maximum brush-up height (2+ inches when styled) to create vertical elongation. Diamond faces work well — minimal sides slim wide cheekbones. Oblong faces should avoid or request horizontal styling instead of vertical.
What is the difference between a brush-up and a quiff?
A brush-up stands nearly vertical at the front with minimal backward sweep — think standing straight up like a small mohawk-inspired tuft. A quiff sweeps backward at an angle, creating a curved pompadour-like shape — think Elvis but more textured. Both use similar blow-drying techniques, but the brush-up directs hair straight up, while the quiff directs hair up-and-back in a single motion. Choose based on formality: brush-up for casual, textured, modern looks; quiff for slightly more polished, rockabilly-inspired styles.
How often should I get The Nordic Clean touched up?
Every 11-13 days for optimal appearance. The temple fade’s ultra-high starting point shows growth faster than standard high fades, but the cut remains acceptable longer than skin fades because the blend starts at #0.5 rather than bare skin. If you’re maintaining this for minimalist-aesthetic conscious environments (design studios, architecture firms, tech companies), hold to the 11-day schedule. Casual wearers can stretch to 13 days. Budget approximately $105-165 monthly based on 3-4 visits at $35-55 per session.
The next variation brings Mediterranean warmth back with a side-swept sophistication that works in any room.
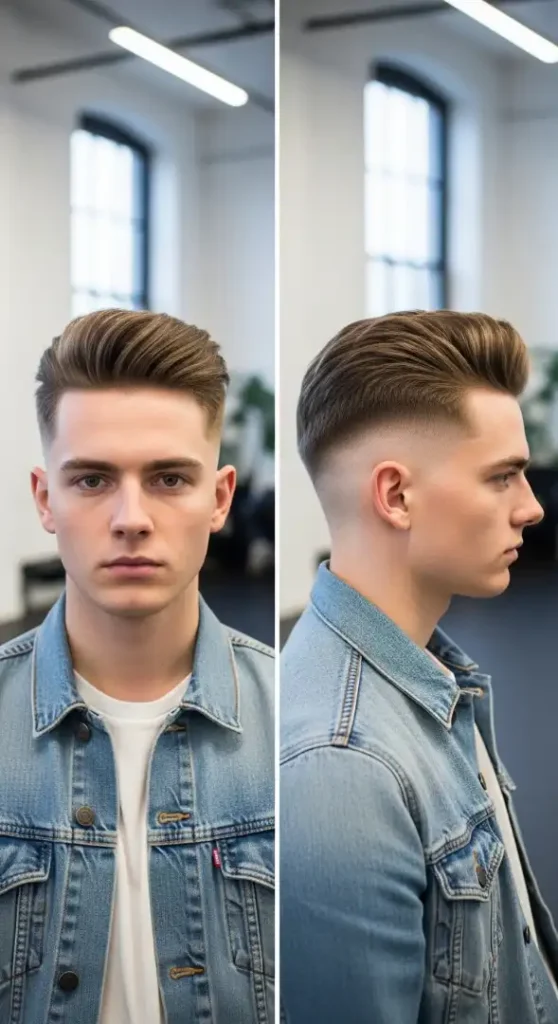
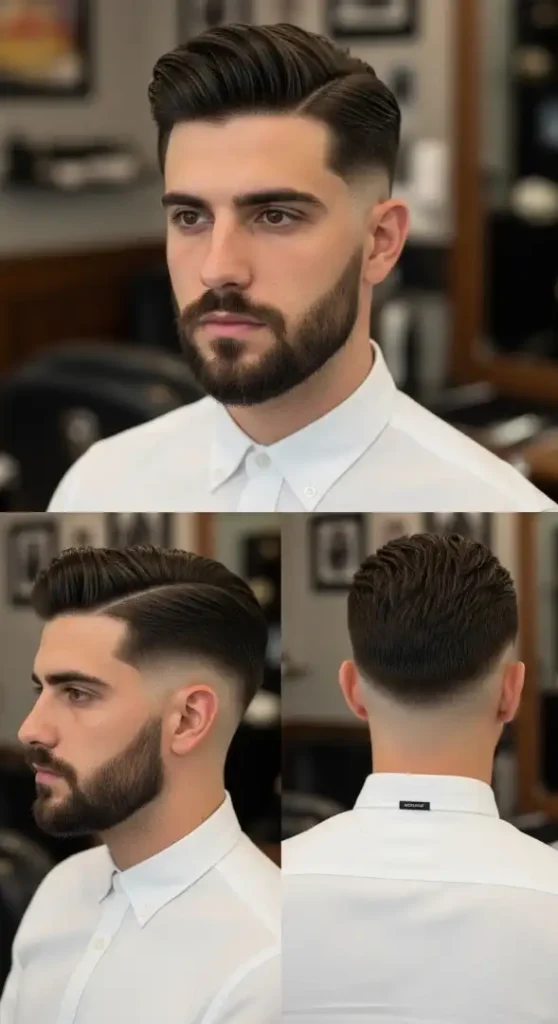
7 of 12 — The Comb Over King
Expert Analysis: Face Shape & Styling Authority
Best Face Shapes For This Cut
The Comb Over King dominates on oval, square, and oblong face shapes through asymmetric volume distribution and horizontal movement. The deep side part creates architectural division that adds interest to oval faces without disrupting natural balance. The comb-over sweeps hair horizontally across the head, which prevents oblong faces from appearing overly vertical — this is one of the rare styles that intentionally adds horizontal emphasis. Square faces gain refined sophistication; the smooth, combed lines contrast angular jawlines by introducing flowing organic movement, while the razor fade keeps the overall look sharp rather than soft.
Round faces should approach this cut carefully. The horizontal comb-over movement can emphasize facial width rather than creating vertical elongation. If you have a round face and want this aesthetic, request modifications: ask the barber to create more volume on top (slight lift before combing over rather than flat combing) and ensure the side part is positioned higher (closer to the center of the head) rather than a deep side part. This creates diagonal rather than purely horizontal movement.
Diamond faces with narrow chins work moderately well. The comb-over adds volume at the top and sides, which can help balance narrow lower-face proportions. However, if you have wide cheekbones, the horizontal movement may emphasize mid-face width.
Heart-shaped faces can wear this successfully. The comb-over adds visual weight to the narrower chin area through its horizontal sweep, creating better overall proportion.
Professional Grooming Kit
Clippers: Andis Master (primary fade work), Wahl Senior (bulk removal before detailed fade)
Trimmer/Outliner: BaByliss Pro FX787 Gold Outliner (creating the side part line — must be razor-sharp), Andis Slimline Pro Li (beard work at 3mm and neckline definition)
Finishing Tools: Mason Pearson Pocket Bristle Brush (boar bristle for high-shine comb-over finish and pomade distribution), Kent 4T fine-tooth comb (essential for creating the parallel comb-over lines — this is THE tool for this style), Straight razor or shavette (for the true razor fade and neckline finish — many modern barbers use this)
Styling Products: Layrite Supershine Cream (high shine, medium hold — creates the wet-look classic comb-over, nickel-sized amount), Uppercut Deluxe Pomade (water-based, high shine, strong hold for all-day comb-over hold), Murray’s Superior Pomade (petroleum-based for those who want maximum shine and extreme hold, but harder to wash out — traditional old-school choice), Honest Amish Beard Oil (maintains 3mm beard softness and healthy appearance — 2-3 drops)
Maintenance Reality Check
Maintenance Level: HIGH
Salon visits every 8-10 days. The razor fade requires the most frequent maintenance of all fade variations because bare skin shows regrowth immediately — by day 6, stubble is visible, and by day 10, the fade line looks fuzzy rather than sharp. The comb-over top grows out more gracefully, but the fade drives the schedule.
Daily routine: 12-15 minutes. This is a formal style requiring careful execution. Hair must be washed every morning — the comb-over doesn’t work on second-day hair because pomade buildup destroys the clean lines. After washing, towel-dry to 60% damp. Apply Layrite Supershine to damp hair — water-based pomades activate better on damp hair than dry. Work it through the top section evenly with your fingers.
Use the fine-tooth comb to create the side part: position the comb at your front left hairline and draw a perfectly straight line back toward your crown. The part should be visible as a clean division — if it’s not, add more pomade to that area and re-comb. Once the part is established, comb all hair on the left side of the part over to the right in smooth, parallel strokes. Each stroke should leave a visible comb line — this is intentional, it creates the classic comb-over texture. Use 8-12 strokes from front to back, always in the same direction, always with firm pressure.
Finish by using the boar bristle brush to smooth the surface and add final shine. The brush also helps lay the hair flat against the scalp, which is essential for the sleek comb-over look.
Beard routine adds 2 minutes. Apply beard oil to 3mm beard daily to prevent dryness and itch. Every 3 days, use trimmer with a #1 guard to maintain 3mm length.
Product routine: 6 steps. Wash daily, towel-dry, pomade on damp hair, create side part with comb, comb-over with parallel strokes, brush smooth. This is a daily ritual.
Plan to restyle if you get caught in rain or heavy wind — the comb-over is not weather-resistant. Keep a comb and small pomade tin in your car or office.
What To Tell Your Barber
“I want a high razor fade, not a clipper fade. Use a straight razor or shavette to take the sides and temples down to bare skin — I want to see actual scalp, not just very short hair. Start the razor line at temple level and blend up from bare skin to a #1 guard over about an inch of transition.
The top should be cut with asymmetric length: 3 inches on the left side where I’ll be parting it, and 1.5 inches on the right side where the hair will comb over to. This length difference helps the comb-over lay flat on the right side rather than having too much bulk.
Create a clean hard part on my left side using your trimmer or razor — the part needs to be a visible line, not just a natural part. Position it on the left side of my head, running from my hairline back to my crown.
I’m keeping a short beard at 3mm — use a #1 guard to maintain that length. Create a clean cheek line and blend the beard into the razor fade. The neckline should be razor-shaved into a rounded shape, perfectly symmetrical.
For the back, make sure the razor fade is clean all the way around to the nape. I want the back to look as sharp as the sides.
Show me the side part, both profiles, and the back before finishing. The razor fade should be symmetrical on both sides, and the part should be perfectly straight.”
Expect to pay $45-70 for this cut. Razor work takes more time and skill than clipper fades, and many barbers charge a premium for straight-razor services. Some states/regions require barber licenses (not just cosmetology licenses) for straight-razor work, so ensure your barber is properly licensed. Tipping 20-25% is appropriate.
Common Questions Answered
How do I maintain a high razor fade at home between barber visits?
Home maintenance of a razor fade is not recommended — straight-razor work on your own head is dangerous and requires angles impossible to achieve safely with mirrors. However, you can extend the cut 2 days with electric trimmer work. Every 5 days, use a zero-gap adjusted trimmer (Wahl Balding Clipper or equivalent) to carefully trim the lowest section of the fade where stubble is most visible. Work in upward strokes with extremely light pressure. Never attempt to re-create the razor line yourself. Apply alcohol-free aftershave balm immediately after trimming. This minimal maintenance adds 2 days maximum before professional razor work is needed again.
Which face shape suits The Comb Over King best?
Oval, square, and oblong faces achieve optimal results. Oval faces gain architectural interest from the asymmetric side part and horizontal comb-over movement. Square faces benefit from the refined, flowing lines that soften angular features while the razor fade maintains sharp masculinity. Oblong faces gain horizontal balance — the comb-over’s side-swept movement prevents over-emphasis on facial length. Round faces should request modifications: higher side part (closer to center) and slight lift before combing over to create diagonal rather than horizontal movement. Diamond and heart-shaped faces work moderately well — the horizontal sweep can help balance narrow lower-face proportions.
What is the difference between a comb-over and a side part?
A side part is a styling technique where hair is parted on one side and both sections are styled independently — the smaller section might be slicked back, while the larger section might also be slicked back or to the side. A comb-over uses a side part as its foundation but then takes all or most of the hair from the parted side and combs it over to the opposite side, covering that side’s shorter hair. Visually, a side part shows two distinct sections, while a comb-over shows one section covering another. Historically, comb-overs were used to cover thinning hair, but modern versions use the technique for style rather than coverage.
How often should I get The Comb Over King touched up?
Every 8-10 days for crisp results. The razor fade shows stubble regrowth within 5-6 days, and by day 10, the sharp line between skin and hair becomes fuzzy and undefined. This is the highest-maintenance fade variation. If you’re maintaining this for formal environments or personal brand presentation, hold to the 8-day schedule strictly. Even casual wearers should not exceed 10 days or the razor fade’s defining characteristic (bare skin) disappears entirely. Budget $180-280 monthly for maintenance ($45 per cut × 4-5 visits or $70 per cut × 3-4 visits).
The next style abandons all this formality for raw street texture and casual confidence.
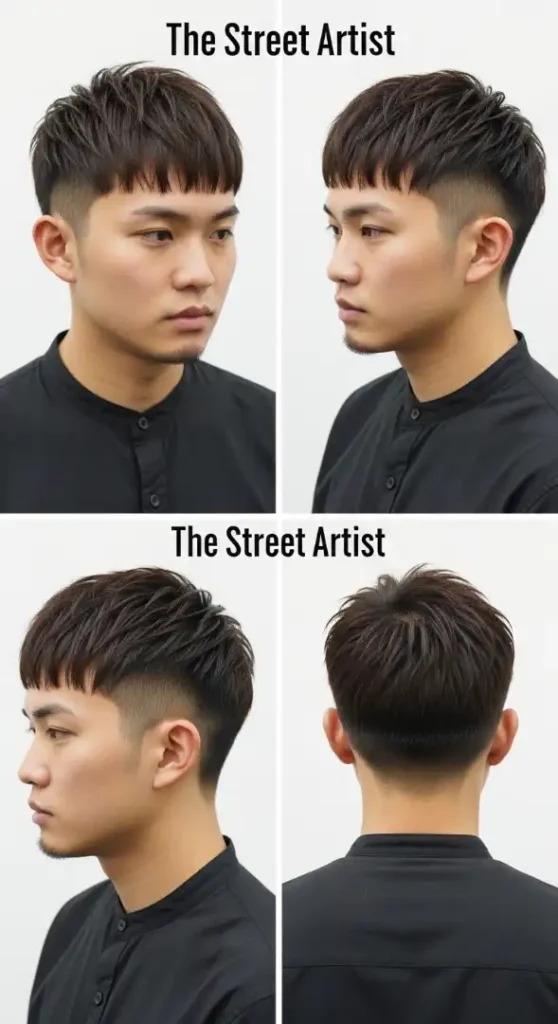
8 of 12 — The Street Artist
Expert Analysis: Face Shape & Styling Authority
Best Face Shapes For This Cut
The Street Artist transforms oval, square, and diamond face shapes through horizontal fringe emphasis and soft fade texture. The French crop’s blunt fringe creates strong horizontal weight at the eyebrow line, which prevents oval faces from appearing overly long and adds structure to naturally balanced proportions. Square faces gain unexpected softness — the scissor fade’s organic texture (versus harsh clipper lines) introduces natural movement that contrasts angular jawlines without feminizing the cut. The short forward fringe adds youthful energy while maintaining masculine edge.
Diamond faces with wide cheekbones benefit significantly. The heavy horizontal fringe draws attention to the upper face rather than mid-face width, and the textured scissor fade creates vertical lines that slim the cheekbones visually. The key is keeping the fringe truly short (just above eyebrows) rather than long — long fringes that cover the forehead create a top-heavy look on diamond faces.
Round faces can wear this successfully with modifications. Request the barber to create slight height on top (lifting the hair slightly before cutting the fringe rather than cutting it completely flat) to add vertical emphasis. The fringe should still be short and forward, but the top section behind the fringe needs 0.5 inches more length to create lift.
Oblong and heart-shaped faces should avoid this cut or request significant changes. The horizontal fringe adds horizontal emphasis that’s unflattering on already-long faces. If you love the French crop aesthetic but have an oblong face, request a textured crop with minimal fringe (fringe pushed to the side rather than forward).
Professional Grooming Kit
Clippers: Andis Master (initial bulk removal before scissor fade work), Wahl Magic Clip (can be used for the lowest section of the scissor fade if the barber prefers a hybrid technique)
Trimmer/Outliner: Andis T-Outliner (hairline definition and neckline cleanup)
Finishing Tools: Barber scissors (essential — the scissor fade requires quality shears, preferably 6-7 inch barber shears with razor-sharp blades), barber comb (fine-tooth for scissor-over-comb technique), thinning shears (for internal texturing on the fringe)
Styling Products: American Crew Fiber (matte finish, medium hold — perfect for the textured French crop that needs definition without shine, dime-sized amount on dry hair), Baxter of California Clay Pomade (alternative with slightly stronger hold), Hanz de Fuko Quicksand (ultra-dry texture for maximum matte finish and gritty separation), light sea salt spray (optional pre-styling spray for added texture before product application)
Maintenance Reality Check
Maintenance Level: MEDIUM
Salon visits every 13-15 days. The scissor fade grows out more gracefully than clipper fades because the textured, organic blend doesn’t show harsh grow-out lines. However, the French crop fringe requires maintenance — by day 16, it’s grown past eyebrow level and starts to look unkempt rather than intentionally short.
Daily routine: 5-8 minutes. This is one of the lowest-maintenance fade variations for daily styling. Works well on second-day hair, though freshly washed is ideal. If styling after shower, towel-dry to 80% — this cut works best on nearly-dry or fully dry hair, not damp. Apply Fiber to dry hair, working it between palms for 5 seconds, then rake through the top section and fringe with fingers spread wide. The key motion is forward-and-down: push hair forward toward your forehead, then use your fingers to create separation by twisting small random sections. The fringe should sit naturally just above your eyebrows. Don’t comb or brush once product is applied — that destroys the textured separation.
For a more polished variation, you can use a small amount of sea salt spray on damp hair, blow-dry with your fingers to create pre-texture, then apply Fiber to fully dry hair. This adds 3 minutes but creates more defined texture.
Product routine: 3 steps. Dry hair (fully or mostly), apply Fiber, create forward texture with finger separation. This is as simple as high-quality cuts get.
This style survives gym sessions, rain, and wind better than slicked styles. The matte texture actually improves slightly with minor dishevelment — it’s built for real life, not studio conditions.
What To Tell Your Barber
“I want a high scissor fade, not a clipper fade. Use scissor-over-comb technique to create the fade from temple level up to the top section. I want the fade to have a textured, organic look, not smooth clipper-guard lines. Start at about 3mm at the temples and blend up to the top using scissors.
The top should be cut as a French crop — 2.5 inches long with a short blunt fringe. Cut the fringe to sit just above my eyebrows when it falls forward naturally, and cut it with a horizontal edge, but then use thinning shears or point-cutting to add internal texture. I don’t want a solid blunt line — I want separation and movement in the fringe.
The back and sides should fade seamlessly into the nape and crown. Keep the neckline natural — follow my natural hairline shape, don’t create a hard line.
I’m clean-shaven, so no beard work. Just make sure the sideburns taper cleanly into the scissor fade.
This cut should have a casual, lived-in look — it’s not supposed to be perfectly uniform like a military cut. The scissor work should create texture and movement.
Show me all angles before finishing — front, both sides, and back.”
This cut runs $35-60 depending on the barber’s scissor-work skill level. Scissor fades take more time than clipper fades, and they require advanced technique. Not all barbers are proficient at scissor-over-comb work, so ask before booking if your barber specializes in or offers scissor fades. Tipping 20% is standard.
Common Questions Answered
How do I maintain a high scissor fade at home between barber visits?
Scissor fade home maintenance is minimal because the organic, textured blend grows out gracefully without harsh lines appearing. Unlike clipper fades that show distinct guard-line grow-out, scissor fades simply get gradually fuller without creating visible demarcation lines. However, if you want to extend the cut 3-4 days, you can lightly trim the very lowest section using a trimmer with a #1 guard every 7 days, working in upward strokes. Don’t attempt to replicate the scissor-over-comb technique yourself — leave that to professionals. The fringe will need trimming every 14-15 days, which you can technically do at home with small scissors, but most people prefer to let their barber handle it to maintain the horizontal line.
Which face shape suits The Street Artist best?
Oval, square, and diamond faces achieve the most flattering results. Oval faces gain structural horizontal emphasis from the blunt fringe while maintaining natural balance. Square faces benefit from the soft, organic scissor fade texture that contrasts angular features, and the short forward fringe adds youthful energy. Diamond faces with wide cheekbones see the best results — the horizontal fringe draws attention upward and the textured fade slims mid-face visually. Round faces can wear this with modifications (slight top height, fringe just above eyebrows but not covering forehead entirely). Oblong and heart-shaped faces should avoid or request side-swept variations instead of forward fringe.
What is the difference between a scissor fade and a clipper fade?
A clipper fade uses guard attachments (#0.5, #1, #1.5, #2, etc.) to create graduated length transitions, resulting in smooth, uniform fade lines. A scissor fade uses scissor-over-comb technique where the barber manually cuts the hair at varying lengths by adjusting comb position — no guards are used. Scissor fades have a more organic, textured appearance with softer transitions because each snip creates slight variation rather than the uniform smoothness of clipper guards. Scissor fades grow out more gracefully (no harsh guard lines appearing), take longer to execute, and require more advanced barber skill. Clipper fades are sharper and more precise, while scissor fades are softer and more lived-in. Choose based on aesthetic preference and maintenance commitment.
How often should I get The Street Artist touched up?
Every 13-15 days for optimal appearance. The scissor fade tolerates growth better than clipper fades, which extends time between cuts. The French crop fringe is the limiting factor — by day 16, it’s grown past eyebrows and needs trimming to maintain the cut’s defining characteristic. If you’re maintaining this for creative professional environments (design, tech, media), the 15-day schedule works well. Traditional corporate environments might require 13-day intervals if policies are strict about hair length. Budget approximately $105-180 monthly based on 3-4 visits at $35-60 per session.
The next variation brings natural texture into the equation — perfect for guys with coils or waves who want to embrace rather than fight their hair’s natural pattern.
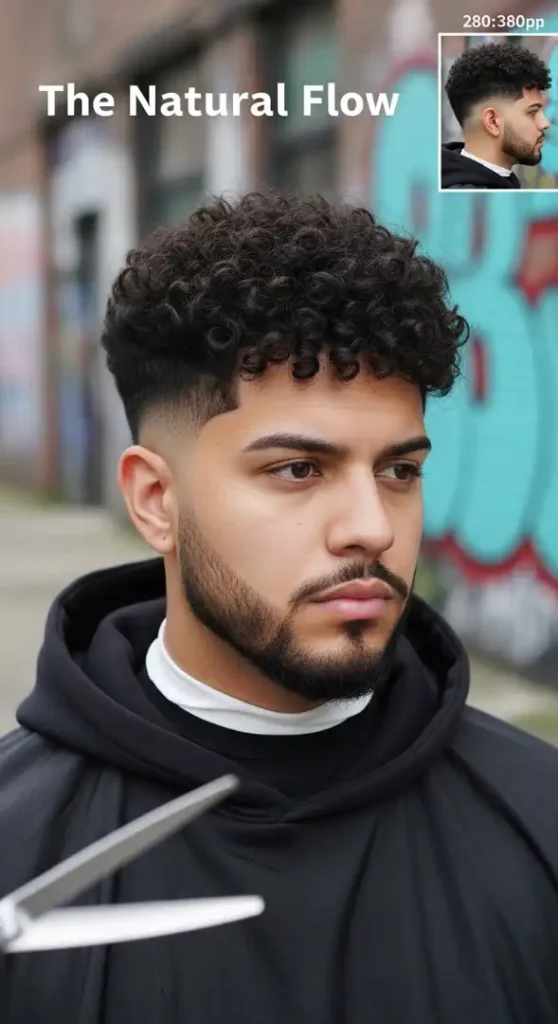
9 of 12 — The Natural Flow
Expert Analysis: Face Shape & Styling Authority
Best Face Shapes For This Cut
The Natural Flow excels on oval, square, and heart-shaped faces through volumetric balance and curl-driven verticality. The rounded, voluminous curl pattern on top creates height and width simultaneously, which prevents oval faces from appearing narrow while maintaining their natural proportion. Square faces gain unexpected harmony — the soft, organic curls contrast angular jawlines by introducing flowing, non-linear movement. The high fade removes side bulk, which emphasizes the curl volume on top and creates vertical emphasis that softens the squared jaw without eliminating its strength.
Heart-shaped faces with wider foreheads and narrow chins benefit significantly. The curl volume at the top balances the wider forehead, and the fade’s minimal side volume prevents the face from appearing top-heavy. The goatee adds visual weight to the narrow chin area, creating better overall proportion from forehead to jawline.
Round faces can wear this successfully but must be careful with curl volume. Natural curls add horizontal width, which can emphasize roundness. If you have a round face and curly hair, request the barber to encourage upward curl pattern rather than outward — use a pick or your fingers to lift curls up rather than letting them expand horizontally. Consider keeping the top section at 3 inches rather than 4 to limit width.
Diamond faces with wide cheekbones should approach cautiously. The curl volume can emphasize mid-face width. If you have a diamond face with curly hair, request more height and less horizontal spread — the curls should grow up, not out.
Oblong faces work moderately well. The curl volume adds horizontal balance to vertical face length, but too much height on the curls can over-elongate. Request 3-inch maximum top length and encourage side-directed curl pattern rather than purely upward.
Professional Grooming Kit
Clippers: Andis Master (primary fade tool for curly hair — the powerful motor handles thick, dense curl texture without pulling), Wahl Magic Clip (detail work on the fade line where it meets the curl pattern)
Trimmer/Outliner: Andis T-Outliner (defining the fade line at temples and cleaning up the hairline), BaByliss Pro FX787 (goatee shaping and edge work)
Finishing Tools: Wide-tooth comb or pick (essential for curly hair — never use fine-tooth combs on natural curls, they create frizz and break the curl pattern), Denman brush with widely-spaced bristles (defines curls when used on damp hair, creates uniform curl clumping)
Styling Products: Cantu Shea Butter Curl Activator Cream (defines curls, reduces frizz, adds moisture — dime-sized amount on damp hair), SheaMoisture Curl Enhancing Smoothie (heavier product for coarser curl patterns, creates defined ringlets), Eco Style Gel (for maximum curl definition and hold on humid days — use sparingly, gel creates crunch that needs to be “scrunched out” once dry), Jojoba oil or Argan oil (seals moisture, adds shine to curls without making them greasy — 3-4 drops on damp hair before curl cream)
Maintenance Reality Check
Maintenance Level: MEDIUM
Salon visits every 12-14 days. The high fade requires regular maintenance, but the curly top is forgiving — curls naturally contract and expand with weather and moisture, so slight growth doesn’t destroy the aesthetic the way it would on straight-hair styles. The fade drives the appointment schedule.
Daily routine: 8-12 minutes, but only on wash days. This is critical: curly hair should NOT be washed daily — it strips natural oils and creates frizz. Wash 2-3 times per week maximum. On wash days, the routine is involved. After washing with sulfate-free shampoo and conditioner, squeeze out excess water (don’t rub or towel-dry vigorously — that creates frizz). Apply curl cream to soaking-wet hair, using praying hands method (smooth product onto hair with both palms pressed together, sliding down the curl sections). Use the Denman brush or wide-tooth comb to distribute product and encourage curl clumps. Scrunch the hair gently with your hands, pushing curls upward toward your scalp to encourage curl formation. Apply light oil to seal. Let air-dry naturally or use a diffuser attachment on your blow dryer with low heat, low speed. Never touch curls while they dry — that creates frizz.
On non-wash days (4-5 days per week): Refresh curls by lightly misting with water, applying tiny amount of curl cream to dry areas, and scrunching gently. Takes 2-3 minutes.
Goatee routine adds 2 minutes. Apply beard oil daily to 4mm goatee. Trim every 5 days with #1.5 guard to maintain length.
Product routine on wash days: 6 steps. Wash, condition, squeeze water, apply cream, distribute with brush/comb, apply oil, air-dry or diffuse. This is a ritual, not a quick task.
Curly hair rewards patience. If you rush the routine or skip the curl cream, you get frizz instead of defined curls.
What To Tell Your Barber
“I want a high blowout fade designed for curly hair. Start the fade at my temples and blend from skin up to my natural curl pattern on top. This is critical: don’t brush out or blow out my curls during the fade blending — I want my natural curl pattern preserved at the top, not straightened or stretched. Use your clippers to fade the sides, but transition gently into the curls at the top using scissor-over-comb if needed.
The top should be 3-4 inches long measured when the curl is pulled straight, but it’ll shrink to about half that when it springs back into curl. Cut the curls dry, not wet — cutting curly hair wet creates inaccurate length because the curls contract when they dry. Use the curl-by-curl cutting method if you know it, or just carefully scissor-cut the overall shape to create a rounded, volumetric silhouette.
I’m keeping a short goatee at 4mm — use a #1.5 guard to maintain that length. Clean up the edges with your trimmer.
For the fade, make sure both sides are symmetrical and the back blends seamlessly into the crown curl pattern.
Don’t use thinning shears on my curls — that creates frizz. If you need to remove bulk, use point-cutting with regular shears.
Show me all angles and confirm the curl pattern is intact at the top before finishing.”
Expect to pay $40-65 for this cut. Curly hair requires specialized technique, and not all barbers are trained in cutting natural curl patterns. Ask before booking if your barber has experience with textured, curly, or coily hair. Many barbers charge a premium for curly hair due to the additional time and skill required. Tipping 20% is standard, 25% if the barber nailed the curl definition.
Common Questions Answered
How do I maintain a high blowout fade at home between barber visits?
Blowout fade maintenance is similar to other high fades. Every 6 days, use a trimmer with a #0.5 guard to carefully blend the lowest section of the fade where it starts to look fuzzy. Work in upward strokes following the original fade line. Use a three-way mirror setup to see all angles. Never attempt to trim the curly top section at home — curly hair cutting requires specific techniques that are difficult to execute on yourself. Apply light beard oil to the fade area after trimming to reduce irritation. This extends the fade 2-3 days before professional work is needed.
Which face shape suits The Natural Flow best?
Oval, square, and heart-shaped faces achieve the most flattering results. Oval faces maintain natural proportion while the curl volume adds textured dimension. Square faces benefit from the soft, flowing curl pattern that contrasts angular jawlines. Heart-shaped faces gain balance — curl volume at top balances wider foreheads, and minimal sides prevent top-heavy appearance. Round faces can wear this with modifications: encourage upward curl direction rather than outward expansion, and keep top length to 3 inches maximum. Diamond faces should request more height and less width in the curl pattern to avoid emphasizing cheekbone width. Oblong faces work moderately with reduced top length (3 inches).
What is the difference between a blowout fade and a regular high fade on curly hair?
Both start the fade at the same high temple position, but the difference is in curl treatment at the top. A regular high fade on curly hair often involves brushing or blowing out the curls to straighten or stretch them during blending, creating a more uniform transition from fade to top — this results in some curl definition being lost at the blend zone. A blowout fade is specifically designed to preserve the natural curl pattern at the top, using techniques that blend the fade into the curls without stretching or straightening them. The term “blowout” refers to the voluminous, expanded curl appearance on top, not to blow-drying (which is actually minimal in this cut). Choose blowout if you want maximum curl definition; choose regular high fade if you prefer a more controlled, less voluminous top.
How often should I get The Natural Flow touched up?
Every 12-14 days for optimal appearance. The fade requires regular upkeep, but the curly top tolerates growth well — curls naturally shrink and expand with humidity and moisture, so slight length increases don’t destroy the silhouette. If you’re maintaining this for creative professional or casual environments, the 14-day schedule works well. Fashion-forward or social media presence contexts might require 12-day intervals for maximum crispness. Budget approximately $120-195 monthly based on 3-4 visits at $40-65 per session.
The next cut returns to straight-hair territory with a flowing, directional style that breaks the backward-sweep formula.
10 of 12 — The Undercut Flow
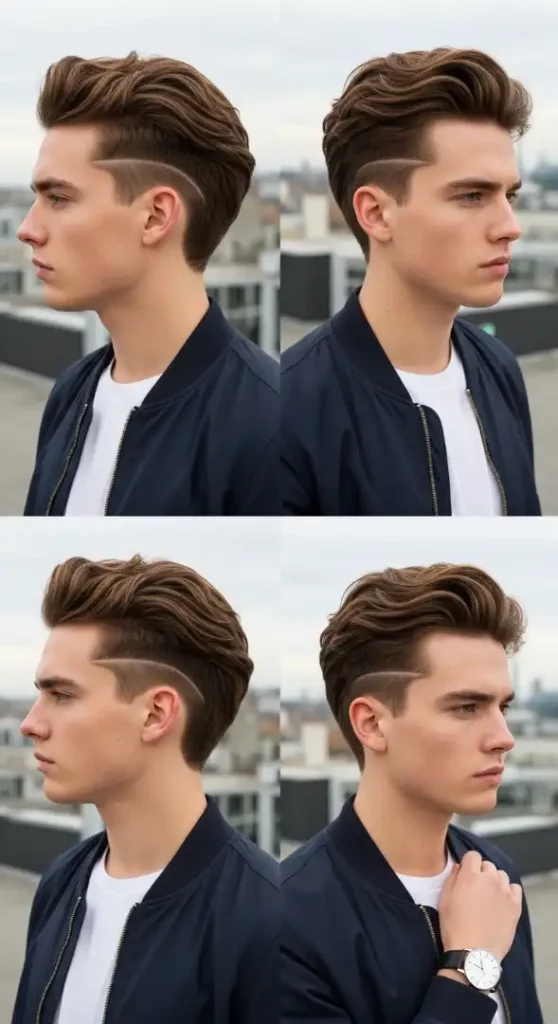
Expert Analysis: Face Shape & Styling Authority
Best Face Shapes For This Cut
The Undercut Flow transforms oval, square, and oblong faces through dramatic length contrast and directional flow. The disconnected undercut removes all side volume, creating clean vertical lines that elongate round and square faces while the flowing top adds horizontal movement that prevents oblong faces from appearing overly vertical. For oval faces, this cut maximizes natural proportion — the long flowing top showcases the face’s balance while the minimal sides prevent any width-adding distraction.
Square faces gain refined edge. The sharp disconnect line at temple level creates architectural interest, while the flowing wavy top introduces organic movement that softens angular jawlines. The side-swept direction draws the eye horizontally, which balances the vertical jaw structure.
Oblong faces benefit significantly from this cut’s horizontal emphasis. The flowing waves moving to the right create visual width that prevents the face from appearing too narrow or elongated. The key is styling with loose hold rather than slicking — slicked-back styling would emphasize vertical length, while loose flowing waves add horizontal balance.
Round faces should be cautious with this cut. The minimal sides are beneficial (remove horizontal width), but the flowing top can add unwanted horizontal movement if styled too loosely. If you have a round face and want this look, request 4 inches on top (not 5) and style with slightly more backward direction and less side flow to create diagonal rather than purely horizontal movement.
Diamond faces with wide cheekbones should avoid this cut or request modifications. The side flow can emphasize mid-face width. Request more backward flow and less side sweep.
Professional Grooming Kit
Clippers: Wahl Senior (primary tool for the undercut — uniform #1 guard work across entire sides and back), Andis Master (alternative if you prefer magnetic motor)
Trimmer/Outliner: Andis T-Outliner (defining the disconnect line at temples and cleaning up the hairline), BaByliss Pro FX787 (precision work on the hard undercut line)
Finishing Tools: Wide-tooth comb (detangling wavy hair without breaking wave pattern), round brush 2.5-inch diameter (blow-drying the waves into flowing shape), paddle brush (smoothing the surface while maintaining wave structure)
Styling Products: Baxter of California Clay Effect Style Spray (matte finish spray that adds texture and light hold for the flowing waves — 4-5 sprays on damp hair before blow-drying), American Crew Fiber (applied to dry hair after blow-drying for definition and separation, quarter-sized amount), Layrite Natural Matte Cream (alternative with natural finish and medium hold), sea salt spray (pre-styling spray to enhance natural wave pattern — 5-6 sprays on damp hair)
Maintenance Reality Check
Maintenance Level: MEDIUM-HIGH
Salon visits every 11-13 days. The undercut’s uniform #1 guard length shows growth quickly — by day 14, the sides have grown from 3mm to 5-6mm, which softens the dramatic disconnect and makes the cut look less intentional. The long top is forgiving and actually improves with slight growth.
Daily routine: 10-14 minutes. This cut requires blow-drying to achieve the flowing wave shape. Start with freshly washed hair. Towel-dry to 60% damp. Apply sea salt spray across the top section for wave enhancement. Use the round brush and blow dryer on medium heat, directing hair backward and to the right while brushing. The brush creates wave structure and flow direction. Dry until 90% complete.
Once mostly dry, spray Clay Effect Style Spray across the top section (4-5 sprays from 8 inches distance). Let it set for 30 seconds. Then work a small amount of Fiber between palms until it breaks down, and rake through the top section with fingers spread wide. The motion is back-and-to-the-right: push hair backward from hairline, then sweep slightly right. Don’t comb after product application — use only your fingers to shape the flow direction and create separation. The waves should look natural and movable, not locked in place.
Product routine: 6 steps. Wash, towel-dry, sea salt spray, blow-dry with directional brushing, style spray, Fiber application with finger shaping. This is a full styling routine.
The flow holds 6-8 hours before needing touch-ups in normal conditions. Humid weather reduces hold time to 4-5 hours. Keep a small Fiber tin in your bag for mid-day reshaping.
What To Tell Your Barber
“I want a high undercut fade with a disconnected line, not a blended fade. Use a #1 guard to cut the sides and back to uniform 3mm length — no graduation, no blending. The line where the short sides meet the long top should be a hard disconnect at temple level, creating a clear horizontal line around my head.
The top should be scissor-cut to 4-5 inches long with light layering to enhance my natural wave pattern. I’m styling this with a flowing side-swept look, so don’t over-thin the top — I need density and weight for the waves to hold their shape.
I’m clean-shaven, so no beard work. Keep the sideburns short and make sure they blend into the uniform #1 guard length on the sides.
The disconnect line needs to be sharp and clean — use your trimmer to define it clearly at the temples. Both sides should have the disconnect at the exact same height.
Show me both sides and the front before finishing. The disconnect line should be perfectly horizontal and symmetrical.”
This cut runs $35-55 in most markets. The undercut is technically simpler than blended fades (uniform guard work is faster than gradual blending), but the long top requires scissor skill for proper layering. Tipping 20% is standard.
Common Questions Answered
How do I maintain a high undercut fade at home between barber visits?
Undercut maintenance is straightforward because there’s no blending to preserve. Every 6-7 days, use your clippers with a #1 guard to trim the sides and back yourself. Work in upward strokes from the neckline to the disconnect line. Don’t trim above the disconnect line — you’ll cut into the long top. The disconnect line itself can be cleaned up every 7 days with a trimmer (no guard) to keep it sharp, but be extremely careful not to cut into the top section. Use multiple mirrors to see all angles. Many guys maintain the undercut sides themselves between professional cuts and only visit the barber for top-section trimming and disconnect-line reshaping.
Which face shape suits The Undercut Flow best?
Oval, square, and oblong faces achieve the most flattering results. Oval faces maintain natural balance while the flowing top adds textured dimension. Square faces benefit from the organic wave movement that softens angular features, and the sharp disconnect line adds architectural interest. Oblong faces gain horizontal balance from the side-swept flow, which prevents over-emphasis on facial length. Round faces should request reduced top length (4 inches maximum) and more backward flow rather than side sweep to avoid emphasizing width. Diamond faces should request backward flow instead of side sweep to avoid emphasizing wide cheekbones.
What is the difference between an undercut fade and a regular high fade?
A regular high fade creates a graduated blend from skin or near-skin at the temples up to the longer top section, using progressively longer guards (#0.5, #1, #1.5, #2, etc.) to create a smooth transition. An undercut fade (or disconnected undercut) uses a single uniform guard length on the entire sides and back with NO blending — the transition from short to long is abrupt and intentional, creating a visible horizontal line (the disconnect) at temple level. Regular high fades have a smooth, blended aesthetic; undercut fades have a dramatic, architectural aesthetic with a hard line. Choose based on preference: blended for classic refinement, disconnected for modern edge.
How often should I get The Undercut Flow touched up?
Every 11-13 days for optimal appearance. The uniform #1 guard sides show growth faster than blended fades because there’s no gradient to disguise lengthening — growth creates visible fuzz that softens the sharp disconnect. If you maintain the sides yourself with clippers at home (see home maintenance answer above), you can extend professional appointments to 18-21 days and only visit for top-section trimming and disconnect-line reshaping. Budget varies based on self-maintenance: approximately $105-165 monthly if visiting every 11-13 days (3-4 visits at $35-55), or $70-110 monthly if self-maintaining sides and visiting only for top work (2-3 visits).
The final two styles bring this collection home with a shadow fade and a box fade — one for understated confidence, one for bold cultural statement.
11 of 12 — The Shadow Fade Elite
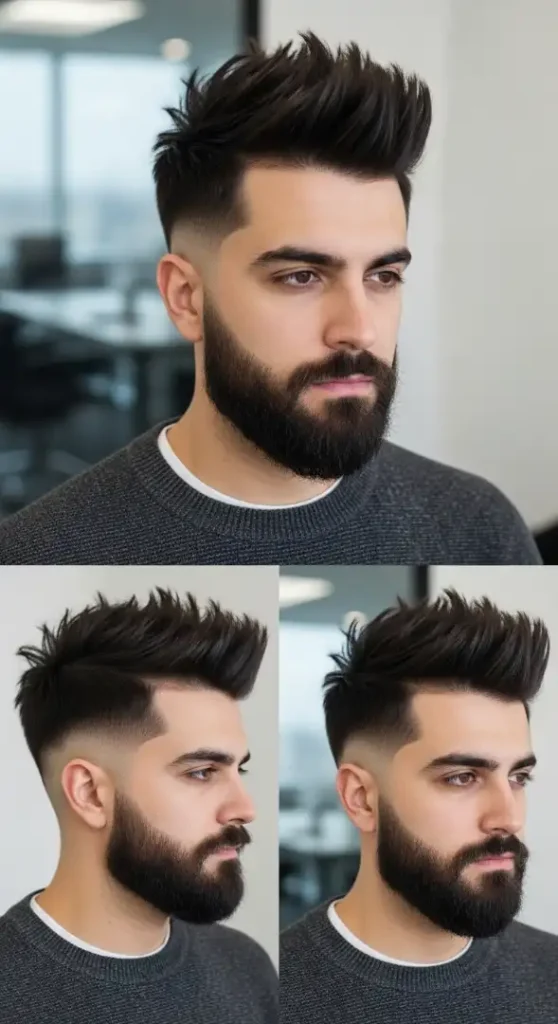
Expert Analysis: Face Shape & Styling Authority
Best Face Shapes For This Cut
The Shadow Fade Elite works universally across all face shapes through its low-contrast, subtle approach. Unlike dramatic fades that create strong architectural lines, the shadow fade’s gentle gradient complements rather than transforms facial structure. Oval faces maintain their natural balance while gaining textured dimension on top. Square faces benefit from the spiky top texture that softens angular jawlines through multi-directional movement. Round faces gain moderate vertical emphasis from the spiky height without the aggressive side-volume removal of skin fades — the shadow fade’s longer minimum length (#2 guard = 6mm) leaves enough side presence to avoid making round faces appear wider.
Diamond faces with wide cheekbones see excellent results. The subtle fade doesn’t draw attention to the sides of the face, and the spiky top creates upward visual movement that balances mid-face width. Oblong faces work well — the spiky texture adds horizontal interest through multi-directional spikes, preventing over-emphasis on facial length.
Heart-shaped faces benefit from the beard integration, which adds visual weight to narrow chins while the subtle fade prevents the forehead from appearing too dominant.
This is the “safe choice” fade — appropriate for conservative professional environments, traditional industries, and anyone who wants the benefits of a fade without making a bold statement. If your workplace has grooming policies or you’re uncertain about dramatic cuts, this is your answer.
Professional Grooming Kit
Clippers: Wahl Senior (primary tool — excellent for the #2 to #4 guard work that defines shadow fades), Andis Master (alternative for magnetic motor preference)
Trimmer/Outliner: Andis T-Outliner (hairline cleanup and beard sculpting at the cheek line), BaByliss Pro FX787 (beard edge work)
Finishing Tools: Wide-tooth comb (initial styling and creating spiky separation), Denman brush (blow-drying to create lift before product application)
Styling Products: Hanz de Fuko Claymation (ultra-matte clay, strong hold — perfect for the spiky controlled-chaos look, dime-sized amount on dry hair), American Crew Fiber (alternative with slightly more pliability), Baxter of California Hard Cream Pomade (extreme hold for all-day spike maintenance), sea salt spray (optional pre-styling spray for added texture — 3-4 sprays on damp hair before blow-drying), Honest Amish Beard Balm (maintains 6mm beard softness and shape — pea-sized amount)
Maintenance Reality Check
Maintenance Level: LOW-MEDIUM
Salon visits every 14-18 days. The shadow fade is the most forgiving fade variation — the subtle gradient from #2 to #4 guard means growth doesn’t create harsh demarcation lines. As hair grows, the fade simply becomes slightly less defined rather than looking grown-out and unkempt. This is ideal for busy professionals, frequent travelers, or anyone who doesn’t want to schedule bi-weekly barber appointments.
Daily routine: 6-9 minutes. This is the easiest styled fade for daily maintenance. Works on second-day hair, though freshly washed is ideal. After washing, towel-dry to 70%. Apply sea salt spray if using (optional — adds texture). Blow-dry the top section using your fingers or the Denman brush to create lift at the roots — you’re not creating specific shape, just adding volume. Once 90% dry, work Claymation between palms until it softens (10 seconds of palm friction), then rake through the top section with fingers spread wide. The key motion is upward-and-outward: push small sections of hair upward toward the ceiling, then twist slightly to create spikes. Vary the direction — some spikes forward, some backward, some to the sides. The result should look intentionally messy, not uniform.
Beard routine adds 3 minutes. Apply beard balm to damp beard daily, brush to distribute, let air-dry. Every 4 days, trim beard with #2 guard to maintain 6mm length and use trimmer without guard to re-define the sculpted cheek line.
Product routine: 4 steps. Optional sea salt spray, blow-dry with lift technique, Claymation application, spike creation with finger twisting. Quick and forgiving.
This style holds all day in normal conditions and doesn’t collapse easily — the matte clay grips well and the spiky texture actually looks better with slight dishevelment from daily activity.
What To Tell Your Barber
“I want a high shadow fade, not a skin fade or dramatic fade. Use a #2 guard at the temples and sides, blend up to a #4 guard at mid-head level. The transition should be subtle and gradual — I want it to look almost like natural shadow rather than an obvious fade. This is a low-contrast cut.
The top should be scissor-cut to 2.5 inches long with texturing for spiky styling. Use point-cutting or thinning shears to create internal texture so the spikes have separation and movement.
I’m keeping a full beard at 6mm — use a #2 guard to maintain that length. Sculpt my cheek line to create a defined upper beard boundary, then blend the beard into the shadow fade. The beard and fade should look connected, not separate.
For the back, keep the same subtle fade gradient — #2 at the nape blending to #4 at mid-head. The neckline should be tapered naturally, not squared.
Show me both sides and the front. The shadow fade should be symmetrical and the gradient should be smooth with no harsh lines.”
This cut runs $30-50 in most markets. Shadow fades are technically simpler than skin fades or complex blends, so pricing is typically lower than dramatic fade variations. Tipping 20% is standard.
Common Questions Answered
How do I maintain a high shadow fade at home between barber visits?
Shadow fade home maintenance is minimal because the subtle gradient tolerates growth better than high-contrast fades. If you want to extend the cut 4-5 days, you can use clippers with a #2 guard to trim the very lowest section (around the ears and nape) every 10 days. Work in upward strokes with light pressure. The mid-level blend doesn’t require touch-ups between professional visits — it naturally grows into a slightly less defined but still acceptable gradient. Many guys don’t do any home maintenance on shadow fades and simply visit the barber every 16-18 days. Apply light beard oil to the fade area if you do any trimming to prevent irritation.
Which face shape suits The Shadow Fade Elite best?
All face shapes work well with shadow fades due to the subtle, low-contrast approach. This is the most universally flattering fade variation. Oval, square, round, diamond, oblong, and heart-shaped faces all benefit because the shadow fade doesn’t create strong architectural lines that might conflict with facial structure — it simply provides clean, professional grooming without making bold statements. If you’re unsure which fade type suits your face, start with a shadow fade. It’s the safest choice and can be modified to more dramatic variations (skin fade, drop fade, etc.) in future appointments if desired.
What is the difference between a shadow fade and a taper fade?
Both are subtle, low-contrast fades, and the terms are often used interchangeably. When distinction exists, it’s usually this: a taper fade blends from very short (#0.5 or #1) at the bottom up to longer guards, creating a slightly more visible gradient. A shadow fade typically starts at #2 guard and blends to #3 or #4, using only mid-length guards throughout for maximum subtlety — the gradient is so gentle it looks like shadow rather than an intentional fade. Both are professional, conservative options. For the most understated look, request a shadow fade and specify you want #2 minimum guard length. For slightly more definition while staying subtle, request a taper fade with #1 starting point.
How often should I get The Shadow Fade Elite touched up?
Every 14-18 days for optimal appearance. The shadow fade is the most forgiving variation — the subtle gradient grows out gradually without creating harsh demarcation lines. By day 18, the fade is less defined but still looks intentional and professional, unlike skin fades that look grown-out and unkempt by day 10-12. If you’re maintaining this for professional environments, the 16-day schedule is ideal. Casual wearers or those with flexible grooming policies can comfortably stretch to 18 days. Budget approximately $90-150 monthly based on 3 visits at $30-50 per session.
The final style brings bold cultural confidence with a box fade that celebrates natural hair texture and geometric precision.
12 of 12 — The Box Fade Statement
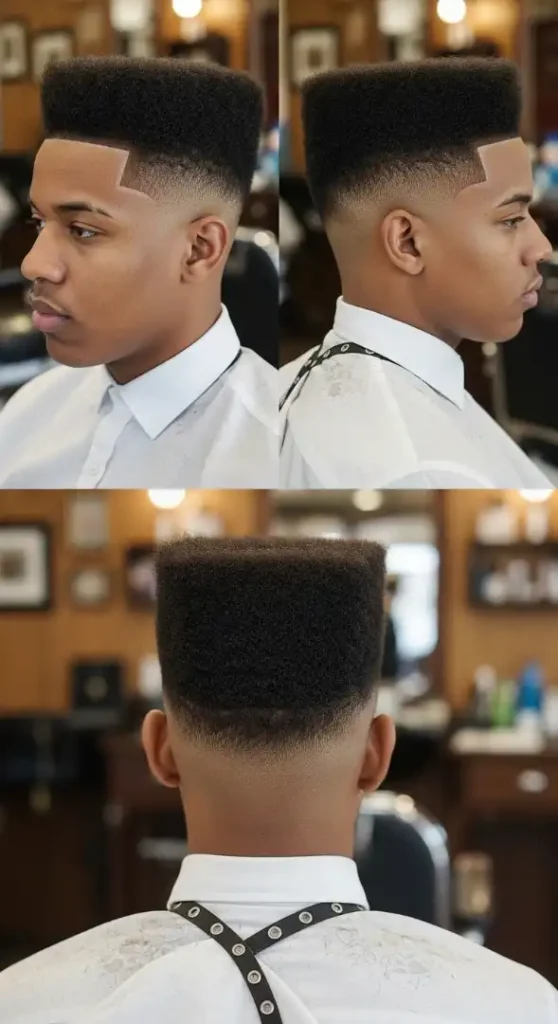
Expert Analysis: Face Shape & Styling Authority
Best Face Shapes For This Cut
The Box Fade Statement dominates on square, oval, and round face shapes through geometric volume addition and dramatic side contrast. The box shape’s rectangular silhouette adds angular structure that enhances square faces’ natural bone structure — the 90-degree corners at the temples echo jaw angularity, creating harmonious repetition. Oval faces gain bold dimension while maintaining balance; the box adds width at the crown without disrupting the face’s natural proportion. Round faces see transformative results — the vertical walls of the box create strong vertical lines that elongate the face, while the flat top adds controlled horizontal weight at the crown rather than the cheeks, shifting visual emphasis upward.
Diamond faces with wide cheekbones should approach this cut carefully. The box’s width can emphasize mid-face width if the top section is too wide. Request a narrower box shape (reduce width by 15-20%) and ensure maximum height (4 inches rather than 3) to create vertical rather than horizontal emphasis.
Oblong faces should avoid this cut or request significant modifications. The box’s height will over-elongate already long faces. If you have an oblong face and love the box fade aesthetic, request a “low box” variation with only 2-2.5 inches of height and slightly wider box proportions to add horizontal balance.
Heart-shaped faces work moderately well. The box adds visual weight to the narrow chin area by drawing attention upward, but if the forehead is significantly wider than the chin, the box can make the face appear top-heavy. Request moderate box dimensions (3 inches height, moderate width) rather than dramatic proportions.
Professional Grooming Kit
Clippers: Andis Master (primary tool for the fade work and box shape creation — the magnetic motor provides control needed for coily hair), Wahl Magic Clip (detail work on the skin fade at temples)
Trimmer/Outliner: Andis T-Outliner (defining the box shape’s sharp corners and edges — this is essential, the corners make or break the cut), BaByliss Pro FX787 (alternative for sensitive scalps)
Finishing Tools: Wide-tooth comb or pick (essential for coily hair — used to lift and shape the box during cutting and daily maintenance), edge brush or soft-bristle brush (cleaning up the fade area and hairline), leveling comb (some barbers use this to ensure the box top is perfectly horizontal)
Styling Products: Cantu Shea Butter Wave & Curl Moisturizer (maintains coil definition and moisture in the box top section — dime-sized amount daily), Eco Style Black Castor Oil Gel (strong hold gel for edge control and shape maintenance — use sparingly on the box edges), SheaMoisture Coconut & Hibiscus Curl Enhancing Smoothie (heavier moisturizer for very coarse coil patterns), Jamaican Black Castor Oil (seals moisture, adds shine, promotes healthy hair and scalp — 4-5 drops worked into the box top section after moisturizing)
Maintenance Reality Check
Maintenance Level: HIGH
Salon visits every 7-9 days. The box fade requires the most frequent maintenance of all the cuts in this collection because geometric precision doesn’t tolerate growth. By day 10, the box shape has lost its sharp corners and flat top surface — coily hair grows upward and outward simultaneously, which rounds the box edges and creates height variation on the flat top. The skin fade at the sides shows stubble by day 6. This is a commitment cut.
Daily routine: 8-12 minutes. Box fades require daily maintenance to preserve shape. Every morning, lightly mist the box top section with water until damp (not soaking — just enough to reactivate product). Apply moisturizer to the damp hair, distributing evenly with your fingers. Use your pick to lift the hair and reshape the box — insert the pick at the base of the box and lift straight up to restore height, then use the side of the pick to flatten the top surface and define the vertical walls. The box should look crisp and defined, not rounded or fluffy.
Every 3-4 days, apply edge control gel to the corners of the box and the fade line to keep sharp definition. Use an edge brush to smooth and define these areas.
Nighttime routine adds 3 minutes. Before bed, wear a durag or wave cap to preserve the box shape overnight. Without this, the hair will compress and lose shape from pillow contact.
Product routine: 5 steps. Mist with water, apply moisturizer, pick to lift and shape, edge control on corners (every 3-4 days), nighttime durag. This is a daily ritual for box fades.
Box fades are high-maintenance but deliver maximum visual impact. If you’re not willing to invest 10 minutes daily and visit the barber weekly, choose a different variation from this collection.
What To Tell Your Barber
“I want a high box fade with geometric precision. Fade the sides from skin at my temples up to where the box shape starts. The box should have a perfectly flat horizontal top surface and vertical walls at the sides — I want to see 90-degree angles at the corners where the top meets the sides.
The box should be 3-4 inches tall measured from where the vertical wall starts at the fade line up to the flat top surface. The width should be proportional to my head shape — not too narrow or too wide. The box shape should be consistent all the way around my head — the front corners, side walls, back edge, and top surface should all align.
Use your clippers to create the vertical walls by holding them horizontally and cutting straight up. The top surface needs to be cut with your clippers held flat across the top to create a level plane. Use your T-Outliner to define the sharp corners — this is critical for the box shape.
For the fade, take it down to skin at the temples and blend up to where the box begins. The fade should be tight and clean.
I’m clean-shaven, so no beard work. Just clean up my hairline and make sure the fade is symmetrical.
Check the box shape from all four angles — front, both sides, and back — before finishing. The corners should be sharp, the top should be flat and level, and the vertical walls should be consistent height all around.”
Expect to pay $45-75 for this cut in metro areas. Box fades require advanced technical skill and experience with coily hair texture. Seek out barbers who specialize in Black hair and have portfolio examples of box fades — this is not a cut for general barbers without texture-specific training. Tipping 20-25% is appropriate for this level of specialized work.
Common Questions Answered
How do I maintain a high box fade at home between barber visits?
Box fade home maintenance is limited to daily reshaping of the box top using your pick, which extends the shape by 1-2 days but doesn’t replace professional cutting. The fade itself can be touched up every 5 days using a trimmer with a #0.5 guard on the lowest section where stubble appears. Work in upward strokes carefully — never cut into the box shape’s vertical walls. Use triple-mirror setup to see all angles. The box top requires professional cutting — attempting to level or reshape the flat top yourself typically results in uneven surfaces and ruined geometric precision. Most box fade wearers do NOT attempt home cutting and instead commit to the weekly barber schedule.
Which face shape suits The Box Fade Statement best?
Square, oval, and round faces achieve the most flattering results. Square faces benefit from the geometric angular repetition that echoes natural jaw structure. Oval faces gain bold dimension while maintaining balance. Round faces see the most transformative results — vertical walls elongate the face and the controlled top width adds height without expanding width. Diamond faces should request narrower box proportions and maximum height. Oblong faces should avoid or request low-box variations with reduced height. Heart-shaped faces work moderately with balanced box dimensions.
What is the difference between a box fade and a flat top?
Both have flat horizontal top surfaces, but the distinction is in shape and fade. A traditional flat top (common in the 1990s) typically has a more rounded box shape with softer corners and a lower fade that starts mid-head or lower. A modern box fade has sharper 90-degree corners, vertical walls (not rounded sides), and a higher fade starting at temple level for maximum contrast. Box fades emphasize geometric precision and architectural lines, while flat tops were softer and more organic. Current trends favor box fades for their sharp, bold aesthetic.
How often should I get The Box Fade Statement touched up?
Every 7-9 days for crisp geometric shape. This is the highest-maintenance cut in this entire collection. The box shape loses its defining characteristics (flat top, sharp corners, vertical walls) by day 10 as coily hair grows and rounds the edges. The skin fade shows visible stubble by day 6. If you’re maintaining this for cultural pride, personal brand, or social presence, hold strictly to the 7-8 day schedule. Even casual wearers should not exceed 9 days or the box becomes rounded rather than geometric. Budget $180-300 monthly for maintenance ($45 per cut × 4-5 visits or $75 per cut × 3-4 visits depending on your barber and market).
This completes the collection — 12 high fade variations covering every texture, face shape, and style personality. Each cut delivers on the promise in the title: trending, precise, and worth racing to the barber for.